CloudWatch is a powerful monitoring and management tool, collects monitoring and operational data in the form of logs, metrics, and events, providing you with a unified view of AWS resources. One of the most common use cases is collecting logs from web applications.
Log files are generated locally in the form of text files and some running process monitor them and then decide where to send them. This is usually performed by the SSM Agent, however, as per AWS documents:
"Important The unified CloudWatch Agent has replaced SSM Agent as the tool for sending log data to Amazon CloudWatch Logs. Support for using SSM Agent to send log data will be deprecated in the near future. We recommend that you begin using the unified CloudWatch Agent for your log collection processes as soon as possible."
Assigning permissions to EC2 instances
EC2 instances need permission to access CloudWatch logs, if your current instances don’t have any roles associated, then create one with the CloudWatchAgentServerPolicy managed policy attached.
If your instances already have a role then you can add the policy to the existing role. In either case, the instance needs to perform operations such as CreateLogGroup, CreateLogStream, PutLogEvents and so on.
Install the CloudWatch Agent
On Windows Server, the installation process consists of three basic steps:
- Download the package from https://s3.amazonaws.com/amazoncloudwatch-agent/windows/amd64/latest/AmazonCloudWatchAgent.zip
- Unzip to a local folder
- Change directory to the folder containing unzipped package and run install.ps1
For more information about how to install the agent, see AWS documents.
Here is a powershell snippet to automate this process.
# Install the CloudWatch Agent
$zipfile = "AmazonCloudWatchAgent.zip"
$tempDir = Join-Path $env:TEMP "AmazonCloudWatchAgent"
Invoke-WebRequest -Uri "https://s3.amazonaws.com/amazoncloudwatch-agent/windows/amd64/latest/AmazonCloudWatchAgent.zip" -OutFile $zipfile
Expand-Archive -Path $zipfile -DestinationPath $tempDir -Force
cd $tempDir
Write-Host "Trying to uninstall any previous version of CloudWatch Agent"
.\uninstall.ps1

Write-Host "install the new version of CloudWatch Agent"
.\install.ps1
Creating configuration file
Before launching the agent, a configuration file is required, this configuration file can seem daunting at first, especially because it’s a different format from one used in SSM Agent. This configuration file contain three sections: agent, metrics and logs.
In this case, we are interested only in section logs which in turn has two main parts: windows_events (system or application events we can find in Windows Event Viewer) and files (any log files including IIS logs).
There are two common parameters required:
- log_group_name - Used in CloudWatch to identify a log group, it should be something meaningful such as the event type or website name.
- log_stream_name - Used in CloudWatch to identify a log stream within a log group, typically it’s a reference to the current EC2 instance.
Collecting Windows Events
Here is an example of a Windows Event log
{
    "event_levels": ["ERROR","INFORMATION"],
    "log_group_name": "/eventlog/application",
    "event_format": "text",
    "log_stream_name": "EC2AMAZ-NPQGPRK",
    "event_name": "Application"
}
Key points:
- event_levels can be one or more of (INFORMATION, WARNING, ERROR, CRITICAL,VERBOSE).
- event_name is typically one of (System, Security, Application)
- event_format is text or xml.
Collecting IIS logs
Here is an example of an IIS website logs
{
    "log_group_name": "/iis/website1",
    "timezone": "UTC",
    "timestamp_format": "%Y-%m-%d %H:%M:%S",
    "encoding": "utf-8",
    "log_stream_name": "EC2AMAZ-NPQGPRK",
    "file_path": "C:\\inetpub\\logs\\LogFiles\\W3SVC2\\*.log"
}
Key points:
- timezone and timestamp_format are optional.
- encoding defaults to utf-8
- file_path uses the standard Unix glob matching rules to match files, while all the examples in AWS docs display concrete log files, the example above matches all .log files within IIS logs folder, this is important since IIS create new files based on a rotation and we can’t predict their names.
These sections can be repeated for every website and for every Windows Event we’d like to push logs to CloudWatch. If we have several EC2 instances as web servers, this process can be tedious and error prone, therefore it should be automated. Here is an example of a powershell snippet.
$windowsLogs = @("Application", "System", "Security")
$windowsLoglevel = @("ERROR", "INFORMATION")
$instance = hostname

$iissites = Get-Website | Where-Object {$_.Name -ne "Default Web Site"}

$iislogs = @()
foreach ($site in $iissites) {
    $iislog = @{
        file_path = "$($site.logFile.directory)\w3svc$($site.id)\*.log"
        log_group_name = "/iis/$($site.Name.ToLower())"
        log_stream_name = $instance
        timestamp_format = "%Y-%m-%d %H:%M:%S"
        timezone = "UTC"
        encoding = "utf-8"
    }
    $iislogs += $iislog
}

$winlogs = @()
foreach ($event in $windowsLogs) {
    $winlog = @{
        event_name = $event
        event_levels = $windowsLoglevel
        event_format ="text"
        log_group_name = "/eventlog/$($event.ToLower())"
        log_stream_name = $instance
    }
    $winlogs += $winlog
}

$config = @{
    logs = @{
        logs_collected = @{
            files = @{
                collect_list = $iislogs
            }
            windows_events = @{
                collect_list = $winlogs
            }
        }
        log_stream_name = "generic-logs"
    }
}

# this could be any other location as long as it’s absolute
$configfile = "C:\Users\Administrator\amazon-cloudwatch-agent.json"

$json = $config | ConvertTo-Json -Depth 6

# Encoding oem is important as the file is required without any BOM
$json | Out-File -Force -Encoding oem $configfile
For more information on how to create this file, see AWS documents.
Starting the agent
With the configuration file in place, it’s time to start the agent, to do that, change directory to CloudWatch Agent installation path, typically within Program Files\Amazon\AmazonCloudWatchAgent and run the following command line:
.\amazon-cloudwatch-agent-ctl.ps1 -a fetch-config -m ec2 -c file:configuration-file-path -s
Key points:
- -a is short for -Action, fetch-config indicates it will reload configuration file.
- -m is short for -Mode, in this case ec2 as opposed to onPrem.
- -c is short for -ConfigLocation which is the configuration file previously generated.
- -s is short for -Start which indicates to start the service after loading configuration.
Here is a powershell snippet covering this part of the process.
cd "${env:ProgramFiles}\Amazon\AmazonCloudWatchAgent"
Write-Host "Starting CloudWatch Agent"
.\amazon-cloudwatch-agent-ctl.ps1 -a fetch-config -m ec2 -c file:$configfile -s
Let’s test it.
Assuming we have 3 websites running in our test EC2 instance, let’s name them.
- website1 - hostname: web1.local
- website2 - hostname: web2.local
- website3 - hostname: web3.local

After some browsing to generate some traffic, let’s inspect CloudWatch.


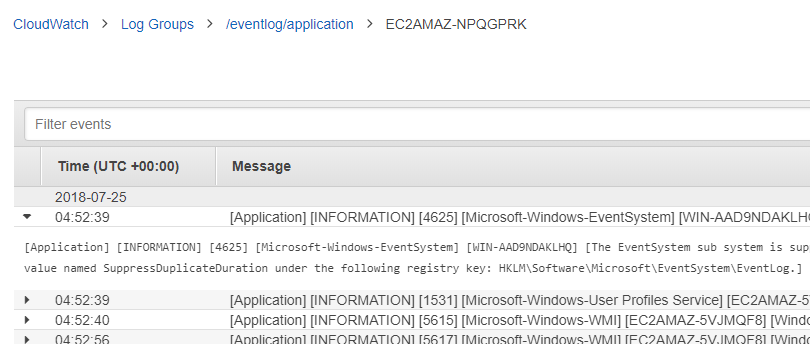
Some Windows Events also in CloudWatch Logs
Here is the complete powershell script.