Showing posts with label IIS. Show all posts

Thursday, 26 July 2018

How to push Windows and IIS logs to CloudWatch using unified CloudWatch Agent automatically

CloudWatch is a powerful monitoring and management tool, collects monitoring and operational data in the form of logs, metrics, and events, providing you with a unified view of AWS resources. One of the most common use cases is collecting logs from web applications.

Log files are generated locally in the form of text files and some running process monitor them and then decide where to send them. This is usually performed by the SSM Agent, however, as per AWS documents:

"Important The unified CloudWatch Agent has replaced SSM Agent as the tool for sending log data to Amazon CloudWatch Logs. Support for using SSM Agent to send log data will be deprecated in the near future. We recommend that you begin using the unified CloudWatch Agent for your log collection processes as soon as possible."

Assigning permissions to EC2 instances

EC2 instances need permission to access CloudWatch logs, if your current instances don’t have any roles associated, then create one with the CloudWatchAgentServerPolicy managed policy attached.

If your instances already have a role then you can add the policy to the existing role. In either case, the instance needs to perform operations such as CreateLogGroup, CreateLogStream, PutLogEvents and so on.

Install the CloudWatch Agent

On Windows Server, the installation process consists of three basic steps:

  1. Download the package from https://s3.amazonaws.com/amazoncloudwatch-agent/windows/amd64/latest/AmazonCloudWatchAgent.zip
  2. Unzip to a local folder
  3. Change directory to the folder containing unzipped package and run install.ps1

For more information about how to install the agent, see AWS documents.

Here is a powershell snippet to automate this process.

# Install the CloudWatch Agent
$zipfile = "AmazonCloudWatchAgent.zip"
$tempDir = Join-Path $env:TEMP "AmazonCloudWatchAgent"
Invoke-WebRequest -Uri "https://s3.amazonaws.com/amazoncloudwatch-agent/windows/amd64/latest/AmazonCloudWatchAgent.zip" -OutFile $zipfile
Expand-Archive -Path $zipfile -DestinationPath $tempDir -Force
cd $tempDir
Write-Host "Trying to uninstall any previous version of CloudWatch Agent"
.\uninstall.ps1

Write-Host "install the new version of CloudWatch Agent"
.\install.ps1

Creating configuration file

Before launching the agent, a configuration file is required, this configuration file can seem daunting at first, especially because it’s a different format from one used in SSM Agent. This configuration file contain three sections: agent, metrics and logs.

In this case, we are interested only in section logs which in turn has two main parts: windows_events (system or application events we can find in Windows Event Viewer) and files (any log files including IIS logs).

There are two common parameters required:

  • log_group_name - Used in CloudWatch to identify a log group, it should be something meaningful such as the event type or website name.
  • log_stream_name - Used in CloudWatch to identify a log stream within a log group, typically it’s a reference to the current EC2 instance.

Collecting Windows Events

Here is an example of a Windows Event log

{
    "event_levels": ["ERROR","INFORMATION"],
    "log_group_name": "/eventlog/application",
    "event_format": "text",
    "log_stream_name": "EC2AMAZ-NPQGPRK",
    "event_name": "Application"
}

Key points:

  • event_levels can be one or more of (INFORMATION, WARNING, ERROR, CRITICAL,VERBOSE).
  • event_name is typically one of (System, Security, Application)
  • event_format is text or xml.

Collecting IIS logs

Here is an example of an IIS website logs

{
    "log_group_name": "/iis/website1",
    "timezone": "UTC",
    "timestamp_format": "%Y-%m-%d %H:%M:%S",
    "encoding": "utf-8",
    "log_stream_name": "EC2AMAZ-NPQGPRK",
    "file_path": "C:\\inetpub\\logs\\LogFiles\\W3SVC2\\*.log"
}

Key points:

  • timezone and timestamp_format are optional.
  • encoding defaults to utf-8
  • file_path uses the standard Unix glob matching rules to match files, while all the examples in AWS docs display concrete log files, the example above matches all .log files within IIS logs folder, this is important since IIS create new files based on a rotation and we can’t predict their names.

These sections can be repeated for every website and for every Windows Event we’d like to push logs to CloudWatch. If we have several EC2 instances as web servers, this process can be tedious and error prone, therefore it should be automated. Here is an example of a powershell snippet.

$windowsLogs = @("Application", "System", "Security")
$windowsLoglevel = @("ERROR", "INFORMATION")
$instance = hostname

$iissites = Get-Website | Where-Object {$_.Name -ne "Default Web Site"}

$iislogs = @()
foreach ($site in $iissites) {
    $iislog = @{
        file_path = "$($site.logFile.directory)\w3svc$($site.id)\*.log"
        log_group_name = "/iis/$($site.Name.ToLower())"
        log_stream_name = $instance
        timestamp_format = "%Y-%m-%d %H:%M:%S"
        timezone = "UTC"
        encoding = "utf-8"
    }
    $iislogs += $iislog
}

$winlogs = @()
foreach ($event in $windowsLogs) {
    $winlog = @{
        event_name = $event
        event_levels = $windowsLoglevel
        event_format ="text"
        log_group_name = "/eventlog/$($event.ToLower())"
        log_stream_name = $instance
    }
    $winlogs += $winlog
}

$config = @{
    logs = @{
        logs_collected = @{
            files = @{
                collect_list = $iislogs
            }
            windows_events = @{
                collect_list = $winlogs
            }
        }
        log_stream_name = "generic-logs"
    }
}

# this could be any other location as long as it’s absolute
$configfile = "C:\Users\Administrator\amazon-cloudwatch-agent.json"

$json = $config | ConvertTo-Json -Depth 6 

# Encoding oem is important as the file is required without any BOM 
$json | Out-File -Force -Encoding oem $configfile

For more information on how to create this file, see AWS documents.

Starting the agent

With the configuration file in place, it’s time to start the agent, to do that, change directory to CloudWatch Agent installation path, typically within Program Files\Amazon\AmazonCloudWatchAgent and run the following command line:

.\amazon-cloudwatch-agent-ctl.ps1 -a fetch-config -m ec2 -c file:configuration-file-path -s 

Key points:

  • -a is short for -Action, fetch-config indicates it will reload configuration file.
  • -m is short for -Mode, in this case ec2 as opposed to onPrem.
  • -c is short for -ConfigLocation which is the configuration file previously generated.
  • -s is short for -Start which indicates to start the service after loading configuration.

Here is a powershell snippet covering this part of the process.

cd "${env:ProgramFiles}\Amazon\AmazonCloudWatchAgent"
Write-Host "Starting CloudWatch Agent"
.\amazon-cloudwatch-agent-ctl.ps1 -a fetch-config -m ec2 -c file:$configfile -s

Let’s test it.

Assuming we have 3 websites running in our test EC2 instance, let’s name them.

  • website1 - hostname: web1.local
  • website2 - hostname: web2.local
  • website3 - hostname: web3.local

After some browsing to generate some traffic, let’s inspect CloudWatch.

Some Windows Events also in CloudWatch Logs
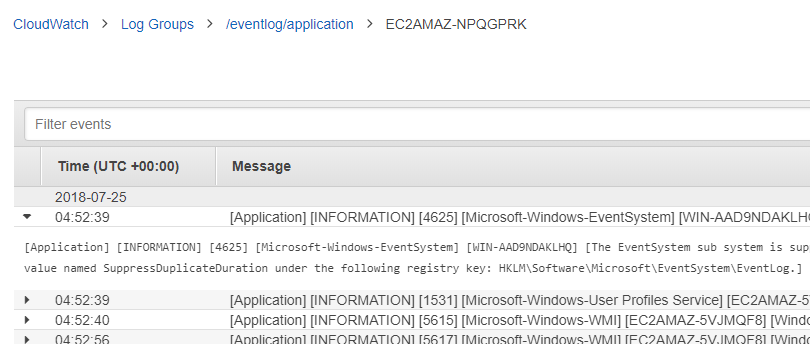
Here is the complete powershell script.

Tuesday, 1 May 2012

Upload very large files - Part 1

In my last post I talked about settings we have to set server side on IIS in order to allow large uploads, and I also mentioned the security risks involved. The solution I’ll talk this time is becoming more common as HTML5 is being implemented more and more.

The main problem was related to the size of the post when uploading, but why not split file into several small pieces and upload piece by piece? Maybe some time ago was crazy to think about manipulating the file in client side from JavaScript, the only ways were using Flash or Silverlight, now the file API is more popular, almost all modern browsers implement it but IE which is always retarded implementing good stuff.

I’ve found some implementations such as plupload or http://hertzen.com/experiments/jsupload/ but I’m not 100 % satisfied with it, I took the ideas and hands on. In this first part I’ll explain how it works to achieve a bullet proof mechanism, for example: The connection might be interrupted or something can happen on the server and the worker thread was shot down. The mechanism must be protected against these events.

I talked to a friend of mine and after a session of brainstorming I decided to imitate some kind of TCP connection in regard to sending packet and receiving the ACK (Acknowledgement), this stuff. The idea is implemented as follows:

  • The browser opens the file dialog and a file is selected, the initial packet is prepared with file name, the type (MIME) and the size.
  • In the server a new GUID is generated for this file that will be the file id for the whole process.
  • A new file is created with this id that will be the metadata file, where the information from the client will be stored for further use.
  • A new blank file is created with this id and the extension of the original name that will be the data file.
  • The reply for this initial packet is a JSON with the GUID generated.

The following steps in client side are:

  • Read the file fragment according to the current packet number and send to the server the data packet with the id, the current packet number and the total packets.
  • Each data packet sent receives its ACK which indicates the number of the last packet received OK, after that the client will send the last received + 1 unless this is the last one.

The server process the data packet:

  • If the metadata file or actual file doesn’t exist, the result is an ACK with packet -1, which means the file must be uploaded from scratch.
  • If the file doesn’t have the required size: the packet number – 1 multiplied by packet size, then return the required value in order to the client knows which is the correct fragment to resend.
  • If everything goes well, a success ACK with the current packet number is sent encouraging to the client to send the next packet.

I’ve implemented this using HTML5 techniques but not all the browsers are capable for to do it, Modernizr could be a great helper on this, since there’s no HTML5 detection but feature detection on demand, for now it’s necessary the browser to be capable of use the file API and if you want to support retry after refresh the page, it should be capable of access to local Storage which allows to store data and retrieve it when necessary. The browser will able to use the XMLHttpRequest object for upload files.

I haven’t implemented yet any fallback mechanism, it will be nice to have a third party such as Silverlight which could substitute the missing browser HTML5 features, a good example of implementation using Silverlight can be found at HSS.Interlink. they cover all the aspects on read a fragment of file and send the request to the server.

My implementation I am planning to distribute it via nuget.org containing a js script and a dll with the classes to be called from any handler/controller without to have to deal with all the verifications mentioned above.

In next posts I’ll cover the implementation of this solution and I’ll provide a code sample for to understand it better.

Saturday, 14 April 2012

Magic settings for upload large files under IIS and .NET

I remember when I started this blog; I talked about upload large files using .NET and IIS. This time I’ll share with you some interesting points to be aware of when trying to upload large files. I consider large when the size is bigger than 2GB, because this is the actual limit is almost all web servers under Microsoft technology.
Based on my experience with this kind of situations, I can say that the web environment is not ready to transfer that much information. Remember the beginnings of WWW, when everything that roamed through the wires were just text and small graphics, I say more, remember what HTTP stands for (Hypertext Transfer Protocol) and what is HyperText?
However, the file transfer to and from the server is something very common nowadays, therefore, it’s necessary to know how to handle it. For those who doesn’t need to upload files greater than 500 MB, I recommend the solution I presented through the my firsts posts in this blog, even for upload a bit bigger files, but when the size start over the 1 GB it’s better to think about another solution.
The larger sizes you could upload the bigger security risk you have. I explain, solutions like NeatUpload and many others (open source or not) expect to make the upload in a big single request, although there are modules that make the copy block by block in order to be sure of not making big memory peaks, the web server must allow a very large request, exposing it to a DOS attack, just an example. Another possible problem may be if the client doesn’t have a fast connection (like me) there’s a (high) risk that a large file might be interrupted, and then? Start over again. On the server side the risk of execution timed out exists too (I’ve faced that), so the value of this setting must be increased.
If you wish to upload small/medium files there’s no problem using this kind of solution, but if you want go over the size, I suggest another kind of workaround.
Alongside my research for the best solution I’ve found the following links I hope to be useful to you, I let MSDN articles, Stack Overflow questions, among others very interesting sources written by the most involved people in this matter, where one can drink the honeys of knowledge.
As a quick conclusion, I can say the following in order to configure properly your application:
The default value for the request size in ASP.NET 2.0 and later is 4 MB. Under IIS6 the setting is configured by the httpRuntime node, example:
 <configuration> 
  <system.web>
   <httpRuntime maxRequestLength="102400" executionTimeout="3600" />
  </system.web>
 </configuration> 
Important to say here, the value of maxRequestLength is given in KB and the executionTimeout is given in seconds.
Under IIS7+ the setting is configured by the requestLimits node, example:
 <system.webServer>
  <security>
   <requestFiltering>
    <requestLimits maxAllowedContentLength="1024000000" />
   </requestFiltering>
  </security>
 </system.webServer>
In this case the value of maxAllowedContentLength is given in bytes. This must combined with the applicationHost.config file usually located at (C:\Windows\System32\inetsrv\Configs) whose section should look like:
 <section name="requestFiltering" overrideModeDefault="Allow" />

As I said before, I hope this compilation saves you time of google-research, in a further post I’ll talk about another solution that I consider that more fits better in web environment.