Showing posts with label cloudformation. Show all posts

Thursday, 7 February 2019

Querying Aurora serverless database remotely using Lambda - part 3

This post is part of a series

In the previous part, we've set up the Aurora MySql cluster. At this point we can start creating the client code to allow querying.

The Lambda code

In this example I'll be using .NET Core 2.1 as Lambda runtime and C# as programming language. The code is very simple and should be easy to port to your favourite runtime/language.

Lambda Input

The input to my function consists of two main pieces of information: database connection information and the query to execute.

    public class ConnectionInfo
    {
        public string DbUser { get; set; }
        public string DbPassword { get; set; }
        public string DbName { get; set; }
        public string DbHost { get; set; }
        public int DbPort { get; set; }
    }

    public class LambdaInput
    {
        public ConnectionInfo Connection { get; set; }

        public string QueryText { get; set; }
    }

Lambda Code

The function itself returns a List of dictionary where each item of the list represents a "record" from the query result, these are in a key/value form where key is the "field" name and the value is the what comes form the query.

    public List<Dictionary<string, object>> RunQueryHandler(LambdaInput input, ILambdaContext context)
    {
        var cxnString = GetCxnString(input.Connection);
        var query = input.QueryText;

        var result = new List<Dictionary<string, object>>();
        using (var conn = new MySql.Data.MySqlClient.MySqlConnection(cxnString))
        {
            var cmd = GetCommand(conn, query);
            var reader = cmd.ExecuteReader();

            var columns = new List<string>();

            for (int i = 0; i < reader.FieldCount; i++)
            {
                columns.Add(reader.GetName(i));
            }

            while (reader.Read())
            {
                var record = new Dictionary<string, object>();
                foreach (var column in columns)
                {
                    record.Add(column, reader[column]);
                }
                result.Add(record);
            }
        }
        return result;
    }

Support methods

Here is the code of the missing methods: GetCxnString and GetCommand not really complicated.

    private static readonly string cxnStringFormat = "server={0};uid={1};pwd={2};database={3};Connection Timeout=60";

    private string GetCxnString(ConnectionInfo cxn)
    {
        return string.Format(cxnStringFormat, cxn.DbHost, cxn.DbUser, cxn.DbPassword, cxn.DbName);
    }

    private static MySqlCommand GetCommand(MySqlConnection conn, string query)
    {
        conn.Open();
        var cmd = conn.CreateCommand();
        cmd.CommandText = query;
        cmd.CommandType = CommandType.Text;
        return cmd;
    }

Project file

Before compiling and packaging the code we need a project file, assuming you don't have one already, this is how it looks like to be able to run in AWS Lambda environment.

<Project Sdk="Microsoft.NET.Sdk">

  <PropertyGroup>
    <TargetFramework>netcoreapp2.1</TargetFramework>
    <GenerateRuntimeConfigurationFiles>true</GenerateRuntimeConfigurationFiles>
  </PropertyGroup>

  <ItemGroup>
    <PackageReference Include="Amazon.Lambda.Core" Version="1.0.0" />
    <PackageReference Include="Amazon.Lambda.Serialization.Json" Version="1.3.0" />
    <PackageReference Include="MySql.Data" Version="8.0.13" />
    <PackageReference Include="Newtonsoft.Json" Version="11.0.2" />
  </ItemGroup>

  <ItemGroup>
    <DotNetCliToolReference Include="Amazon.Lambda.Tools" Version="2.2.0" />
  </ItemGroup>


Preparing Lambda package

Assuming you have both the code and csproj file in the current directory, we just run dotnet lambda package command as per below, where -c sets the Configuration to release, -f sets the target framework to netcoreapp2.1 and -o sets the output zip file name.

$ dotnet lambda package -c release -f netcoreapp2.1 -o aurora-lambda.zip
Amazon Lambda Tools for .NET Core applications (2.2.0)
Project Home: https://github.com/aws/aws-extensions-for-dotnet-cli, https://github.com/aws/aws-lambda-dotnet

Executing publish command
Deleted previous publish folder
... invoking 'dotnet publish', working folder '/home/abel/Downloads/aurora_cluster_sample/bin/release/netcoreapp2.1/publish'

( ... ) --- removed code for brevity ---

... zipping:   adding: aurora.lambda.deps.json (deflated 76%)
Created publish archive (/home/abel/Downloads/aurora_cluster_sample/aurora-lambda.zip).
Lambda project successfully packaged: /home/abel/Downloads/aurora_cluster_sample/aurora-lambda.zip

Next, we upload the resulting zip file to an S3 bucket of our choice. In this example I'm using a bucket named abelperez-temp and I'm uploading the zip file to a folder named aurora-lambda so I keep some form of organisation in my file directory.

$ aws s3 cp aurora-lambda.zip s3://abelperez-temp/aurora-lambda/
upload: ./aurora-lambda.zip to s3://abelperez-temp/aurora-lambda/aurora-lambda.zip

Lambda stack

To create the Lambda function, I've put together a CloudFormation template that includes:

  • AWS::EC2::SecurityGroup contains outbound traffic rule to allow port 3306
  • AWS::IAM::Role contains an IAM role to allow the Lambda function to write to CloudWatch Logs and interact with ENIs
  • AWS::Lambda::Function contains the function definition

Here is the full template, the required parameters are VpcId, SubnetIds and LambdaS3Bucket which we should get from previous stacks' outputs. The template outputs the function full name, which we'll need to be able to invoke it later.

Special attention to the Lambda function definition, the property Handler, in .NET runtime is in the form of AssemblyName::Namespace.ClassName::MethodName and the property Code containing the S3 location of the zip file we uploaded earlier.

Description: Template to create a lambda function 

Parameters: 
  LambdaS3Bucket:
    Type: String
  DbClusterPort: 
    Type: Number
    Default: 3306
  VpcId: 
    Type: String
  SubnetIds: 
    Type: CommaDelimitedList

Resources:
  LambdaSg:
    Type: AWS::EC2::SecurityGroup
    Properties:
      GroupDescription: Allow outbound traffic to MySQL host
      VpcId:
        Ref: VpcId
      SecurityGroupEgress:
        - IpProtocol: tcp
          FromPort: !Ref DbClusterPort
          ToPort: !Ref DbClusterPort
          CidrIp: 0.0.0.0/0

  AWSLambdaExecutionRole:
    Type: AWS::IAM::Role
    Properties:
      AssumeRolePolicyDocument:
        Version: 2012-10-17
        Statement:
          - Effect: Allow
            Principal:
              Service:
                - lambda.amazonaws.com
            Action: sts:AssumeRole
      Path: /
      Policies:
        - PolicyName: PermitLambda
          PolicyDocument:
            Version: 2012-10-17
            Statement:
            - Effect: Allow
              Action:
              - logs:CreateLogGroup
              - logs:CreateLogStream
              - logs:PutLogEvents
              - ec2:CreateNetworkInterface
              - ec2:DescribeNetworkInterfaces
              - ec2:DeleteNetworkInterface
              Resource: 
                - "arn:aws:logs:*:*:*"
                - "*"
  HelloLambda:
    Type: AWS::Lambda::Function
    Properties:
      Handler: aurora.lambda::project.lambda.Function::RunQueryHandler
      Role: !GetAtt AWSLambdaExecutionRole.Arn
      Code:
        S3Bucket: !Ref LambdaS3Bucket
        S3Key: aurora-lambda/aurora-lambda.zip
      Runtime: dotnetcore2.1
      Timeout: 30
      VpcConfig:
        SecurityGroupIds:
          - !Ref LambdaSg
        SubnetIds: !Ref SubnetIds

Outputs:
  LambdaFunction:
    Value: !Ref HelloLambda

To deploy this stack we use the following command where we pass the parameters specific to our VPC (VpcId and SubnetIds) as well as the S3 bucket name.

$ aws cloudformation deploy --stack-name fn-stack \
--template-file aurora_lambda_template.yml \
--parameter-overrides VpcId=vpc-0b442e5d98841996c SubnetIds=subnet-013d0bbb3eca284a2,subnet-00c67cfed3ab0a791 LambdaS3Bucket=abelperez-temp \
--capabilities CAPABILITY_IAM

Waiting for changeset to be created..
Waiting for stack create/update to complete
Successfully created/updated stack - fn-stack

Let's get the outputs as we'll need this information later. We have the Lambda function full name.

$ aws cloudformation describe-stacks --stack-name fn-stack --query Stacks[*].Outputs
[
    [
        {
            "OutputKey": "LambdaFunction",
            "OutputValue": "fn-stack-HelloLambda-C32KDMYICP5W"
        }
    ]
]

Invoking Lambda function

Now that we have deployed the function and we know its full name, we can invoke it by using dotnet lambda invoke-function command. Part of this job is to prepare the payload which is a JSON in put corresponding to the Lambda input defined above.

{
    "Connection": {
        "DbUser": "master", 
        "DbPassword": "Aurora.2019", 
        "DbName": "dbtest", 
        "DbHost": "db-stack-auroramysqlcluster-xxx.rds.amazonaws.com", 
        "DbPort": 3306
    }, 
    "QueryText":"show databases;"
}

Here is the command to invoke the Lambda function, including the payload parameter encoded to escape the quotes and all in a single line. There are better ways to do this, but for the sake of this demonstration, it's good enough.

$ dotnet lambda invoke-function \
--function-name fn-stack-HelloLambda-C32KDMYICP5W \
--payload "{ \"Connection\": {\"DbUser\": \"master\", \"DbPassword\": \"Aurora.2019\", \"DbName\": \"dbtest\", \"DbHost\": \"db-stack-auroramysqlcluster-xxx.rds.amazonaws.com\", \"DbPort\": 3306}, \"QueryText\":\"show databases;\" }" \
--region eu-west-1

Amazon Lambda Tools for .NET Core applications (2.2.0)
Project Home: https://github.com/aws/aws-extensions-for-dotnet-cli, https://github.com/aws/aws-lambda-dotnet

Payload:
[{"Database":"information_schema"},{"Database":"dbtest"},{"Database":"mysql"},{"Database":"performance_schema"}]

Log Tail:
START RequestId: 595944b5-73bb-4536-be92-a42652125ba8 Version: $LATEST
END RequestId: 595944b5-73bb-4536-be92-a42652125ba8
REPORT RequestId: 595944b5-73bb-4536-be92-a42652125ba8  Duration: 11188.62 ms   Billed Duration: 11200 ms       Memory Size: 128 MB     Max Memory Used: 37 MB

Now we can see the output in the Payload section. And that's how we can query remotely any Aurora serverless cluster without having to set up any EC2 instance. This could be extended to handle different SQL operations such as Create, Insert, Delete, etc.

Monday, 4 February 2019

Querying Aurora serverless database remotely using Lambda - part 2

This post is part of a series

In the previous part, we've set up the base layer to deploy our resources. At this point we can create the database cluster.

Aurora DB Cluster

Assuming we have our VPC ready with at least two subnets to comply with high availability best practices, let's create our cluster, I've put together a CloudFormation template that includes:

  • AWS::EC2::SecurityGroup contains inbound traffic rule to allow port 3306
  • AWS::RDS::DBSubnetGroup contains a group of subnets to deploy the cluster
  • AWS::EC2::DBCluster contains all the parameters to create the database cluster

Here is the full template, the only required parameters are VpcId and SubnetIds, but feel free to override any of the database cluster parameters such as database name, user name, password, etc. The template outputs the IDs corresponding to newly created resources such as the database cluster DNS endpoint, port and the security group.

Description: Template to create a serverless aurora mysql cluster

Parameters: 
  DbClusterDatabaseName: 
    Type: String
    Default: dbtest
  DbClusterIdentifier: 
    Type: String
    Default: serverless-mysql-aurora
  DbClusterParameterGroup: 
    Type: String
    Default: default.aurora5.6
  DbClusterMasterUsername: 
    Type: String
    Default: master
  DbClusterMasterPassword: 
    Type: String
    Default: Aurora.2019
  DbClusterPort: 
    Type: Number
    Default: 3306
  VpcId: 
    Type: String
  SubnetIds: 
    Type: CommaDelimitedList

Resources:
  DbClusterSg:
    Type: AWS::EC2::SecurityGroup
    Properties:
      GroupDescription: Allow MySQL port to client host
      VpcId:
        Ref: VpcId
      SecurityGroupIngress:
        - IpProtocol: tcp
          FromPort: !Ref DbClusterPort
          ToPort: !Ref DbClusterPort
          CidrIp: 0.0.0.0/0

  DbSubnetGroup: 
    Type: "AWS::RDS::DBSubnetGroup"
    Properties: 
      DBSubnetGroupDescription: "aurora subnets"
      SubnetIds: !Ref SubnetIds

  AuroraMysqlCluster:
    Type: AWS::RDS::DBCluster
    Properties:
      DatabaseName:
        Ref: DbClusterDatabaseName
      DBClusterParameterGroupName:
        Ref: DbClusterParameterGroup
      DBSubnetGroupName:
        Ref: DbSubnetGroup
      Engine: aurora
      EngineMode: serverless
      MasterUsername:
        Ref: DbClusterMasterUsername
      MasterUserPassword:
        Ref: DbClusterMasterPassword
      ScalingConfiguration:
        AutoPause: true
        MinCapacity: 2
        MaxCapacity: 4
        SecondsUntilAutoPause: 1800
      VpcSecurityGroupIds:
        - !Ref DbClusterSg
        
Outputs:
  DbClusterEndpointAddress:
    Value: !GetAtt AuroraMysqlCluster.Endpoint.Address
  DbClusterEndpointPort:
    Value: !GetAtt AuroraMysqlCluster.Endpoint.Port
  DbClusterSgId:
    Value: !Ref DbClusterSg

To deploy this stack we use the following command where we pass the parameters specific to our VPC (VpcId and SubnetIds).

$ aws cloudformation deploy --stack-name db-stack \
--template-file aurora_cluster_template.yml \
--parameter-overrides VpcId=vpc-0b442e5d98841996c SubnetIds=subnet-013d0bbb3eca284a2,subnet-00c67cfed3ab0a791

Waiting for changeset to be created..
Waiting for stack create/update to complete
Successfully created/updated stack - db-stack

Let's get the outputs as we'll need this information later. We have the cluster endpoint DNS name and the port as per our definition.

$ aws cloudformation describe-stacks --stack-name db-stack --query Stacks[*].Outputs
[
    [
        {
            "OutputKey": "DbClusterEndpointAddress",
            "OutputValue": "db-stack-auroramysqlcluster-1d1udg4ringe4.cluster-cnfxlauucwwi.eu-west-1.rds.amazonaws.com"
        },
        {
            "OutputKey": "DbClusterSgId",
            "OutputValue": "sg-072bbf2078caa0f46"
        },
        {
            "OutputKey": "DbClusterEndpointPort",
            "OutputValue": "3306"
        }
    ]
]

In the next part, we'll create the Lambda function to query this database remotely.

Wednesday, 30 January 2019

Querying Aurora serverless database remotely using Lambda - part 1

This post is part of a series

Why aurora serverless?

For those who like experimenting with new technology, AWS feeds us with a lot of new stuff every year at re:Invent conference, and many more times. In August 2018, Amazon announced its general availability. I was intrigued by this totally new way to doing database, so I started to play with it.

The first road block I found was connectivity from my local environment. I wanted to connect to my new cluster using my traditional MySQL Workbench client. It turned out to be one of the limitations clearly explained by Amazon, and as of today:

You can't give an Aurora Serverless DB cluster a public IP address. You can access an Aurora Serverless DB cluster only from within a virtual private cloud (VPC) based on the Amazon VPC service.

Most common workarounds involve the use of an EC2 instance to either run a MySQL client from there or SSH tunnel and allow connections from outside of the VPC. In both cases we'll be charged for the use of the EC2 instace. At the moment of this writing there is a solution for that, but still in beta: Data API.

With all that said, I decided to explore my own way in the meantime by creating a serverless approach involving Lambda to query my database.

Setting up the base - VPC

First, we need a VPC. For testing only, it doesn't really matter if we just use the default VPC in the current region. But if you'd like to get started with a blue print, there is this public CloudFormation template, it contains a sample VPC with two public subnets and two private subnets as well as all the required resources to guarantee connectivity (IGW, NAT, Route tables, etc.).

I prefer to isolate my experiments from the rest of the resources, that's why I came up with a template containing the bare minimum to get a VPC up and running. It only includes:

  • AWS::EC2::VPC the VPC itself - default CIDR block 10.192.0.0/16
  • AWS::EC2::Subnet private subnet 1 - default CIDR block 10.192.20.0/24
  • AWS::EC2::Subnet private subnet 2 - default CIDR block 10.192.21.0/24

Here is the full template, the only required parameter is EnvironmentName, but feel free to override any of the CIDR blocks. The template outputs the IDs corresponding to newly created resources such as the VPC and the subnets.

Description: >-
  This template deploys a VPC, with two private subnets spread across 
  two Availability Zones. This VPC does not provide any internet 
  connectivity resources such as IGW, NAT Gw, etc.

Parameters:
  EnvironmentName:
    Description: >-
      An environment name that will be prefixed to resource names
    Type: String

  VpcCIDR:
    Description: >-
      Please enter the IP range (CIDR notation) for this VPC
    Type: String
    Default: 10.192.0.0/16

  PrivateSubnet1CIDR:
    Description: >-
      Please enter the IP range (CIDR notation) for the private subnet 
      in the first Availability Zone
    Type: String
    Default: 10.192.20.0/24

  PrivateSubnet2CIDR:
    Description: >-
      Please enter the IP range (CIDR notation) for the private subnet 
      in the second Availability Zone
    Type: String
    Default: 10.192.21.0/24

Resources:
  VPC:
    Type: AWS::EC2::VPC
    Properties:
      CidrBlock: !Ref VpcCIDR
      EnableDnsSupport: true
      EnableDnsHostnames: true
      Tags:
        - Key: Name
          Value: !Ref EnvironmentName

  PrivateSubnet1:
    Type: AWS::EC2::Subnet
    Properties:
      VpcId: !Ref VPC
      AvailabilityZone: !Select [ 0, !GetAZs '' ]
      CidrBlock: !Ref PrivateSubnet1CIDR
      MapPublicIpOnLaunch: false
      Tags:
        - Key: Name
          Value: !Sub ${EnvironmentName} Private Subnet (AZ1)

  PrivateSubnet2:
    Type: AWS::EC2::Subnet
    Properties:
      VpcId: !Ref VPC
      AvailabilityZone: !Select [ 1, !GetAZs '' ]
      CidrBlock: !Ref PrivateSubnet2CIDR
      MapPublicIpOnLaunch: false
      Tags:
        - Key: Name
          Value: !Sub ${EnvironmentName} Private Subnet (AZ2)

Outputs:
  VPC:
    Description: A reference to the created VPC
    Value: !Ref VPC

  PrivateSubnet1:
    Description: A reference to the private subnet in the 1st Availability Zone
    Value: !Ref PrivateSubnet1

  PrivateSubnet2:
    Description: A reference to the private subnet in the 2nd Availability Zone
    Value: !Ref PrivateSubnet2

To create a stack from this template we run the following command (or go to AWS console and upload the template)

$ aws cloudformation deploy --stack-name vpc-stack \
--template-file vpc_template.yml \
--parameter-overrides EnvironmentName=Dev

Waiting for changeset to be created..
Waiting for stack create/update to complete
Successfully created/updated stack - vpc-stack

After successful stack creation, we can get the outputs as we'll need them for the next step.

$ aws cloudformation describe-stacks --stack-name vpc-stack --query Stacks[*].Outputs
[
    [
        {
            "Description": "A reference to the private subnet in the 1st Availability Zone",
            "OutputKey": "PrivateSubnet1",
            "OutputValue": "subnet-013d0bbb3eca284a2"
        },
        {
            "Description": "A reference to the private subnet in the 2nd Availability Zone",
            "OutputKey": "PrivateSubnet2",
            "OutputValue": "subnet-00c67cfed3ab0a791"
        },
        {
            "Description": "A reference to the created VPC",
            "OutputKey": "VPC",
            "OutputValue": "vpc-0b442e5d98841996c"
        }
    ]
]

In the next part, we'll create the Database cluster using these resources as a base layer.

Thursday, 27 September 2018

How to implement a CloudFormation Include custom tag using YamlDotNet

YAML has become a popular format used to describe a wide range of information in a more readable way. Depending on the concrete use case, these files can grow significantly. One example of this is AWS CloudFormation templates which can be written either in JSON or YAML.

Especially when working on Serverless projects, it doesn’t matter if it’s serverless framework, AWS SAM or just pure CloudFormation. The fact is the main file to maintain is (most of the time) a YAML template that grows over time.

I’d like to focus on a more concrete example: a typical serverless microservice architecture consists of a backend database, a function and a HTTP endpoint (i.e DynamoDB, Lambda and API Gateway). It’s also a common practice to use OpenAPI specification aka Swagger to describe the Web API interface.

In this case, when trying to use Lambda integration (either custom or proxy) we can’t use variables or intrinsic functions within the swagger file (we have to hardcode the lambda invocation url including account number and region, apart from the fact that function name might change if using autogenerated by CloudFormation), unless swagger content is inline in the Body property, which makes the file to grow by a great deal.

As of this writing, there are some strategies proposed by AWS to mitigate this problem, I personally find them a bit cumbersome to use on a daily basis:

  • AWS::CloudFormation::Stack It adds complexity to the whole process since we have to pass parameters to nested stacks and retrieve outputs from them in order to access information from both parties. The template for the nested stack must be stored on an Amazon S3 bucket, which adds friction to our development workflow while building.
  • AWS::Include Transform which is a form of macro hosted by AWS CloudFormation, is simpler than nested stacks but currently it still has some limiations:
    • The snippet has to be stored on an Amazon S3 bucket.
    • If the snippets change, your stack doesn't automatically pick up those changes.
    • It does not currently support using shorthand notations for YAML snippets.

Personally, I prefer a solution where at development time I can split the template in logical parts and then, before deploying it to AWS, compose them in one piece. I like the idea of include partials in specific parts of the parent file.

How to implement this include mechanism ?

YAML provides an extension mechanism named tags, where we can associate a particular data type with a tag (it’s basically a prefix added to a value). In YamlDotNet this is implemented by creating a custom type converter and mapping the new tag with the custom type converter.

IncludeTagConverter (custom type converter)

public class IncludeTagConverter: IYamlTypeConverter
{
    public bool Accepts(Type type)
    {
        return typeof(IncludeTag).IsAssignableFrom(type);
    }

    public object ReadYaml(IParser parser, Type type)
    {
        parser.Expect<MappingStart>();
        var key = parser.Expect<Scalar>();
        var val = parser.Expect<Scalar>();
        parser.Expect<MappingEnd>();

        if (key.Value != "File")
        {
            throw new YamlException(key.Start, val.End, "Expected a scalar named 'File'");
        }

        var input = File.ReadAllText(val.Value);
        var data = YamlSerializer.Deserialize(input);
        return data;
    }

    public void WriteYaml(IEmitter emitter, object value, Type type)
    {
    }
}

IncludeTag class

public class IncludeTag
{
    public string File { get; set; }
}

In this case we are indicating that IncludeTagConverter class should be used if the desiralization mechanism needs to deserialize an object of type IncludeTag. At the end of ReadYaml method, we call a helper class that starts deserialization process again with the content of the “included file”.

YamlSerializer helper class

public class YamlSerializer
{
    private const string IncludeTag = "!Include";

    public static object Deserialize(string yaml)
    {
        var reader = new StringReader(yaml);
        var deserializer = new DeserializerBuilder()
            .WithTypeConverter(new IncludeTagConverter())
            .WithTagMapping(IncludeTag, typeof(IncludeTag))
            .Build();
        var data = deserializer.Deserialize(reader);
        return data;
    }

    public static string Serialize(object data)
    {
        var serializer = new SerializerBuilder().Build();
        var yaml = serializer.Serialize(data);
        return yaml;
    }
}

In this helper class, we tell the deserializer that we are using a type converter and that it has to map !Include tags to data type of IncludeTag. This way, when it encounters an !Include in the yaml file, it will use our type converter to deserialize the content instead, which in turn, will read whatever file we put the name in File: key and will trigger the deserialization process again, thus, allowing us to execute this at several levels in a recursive way.

How do we compose a yaml ?

Once we have the whole file yaml object in memory, by triggering the deserialization process on the main yaml file, like this:

var data = YamlSerializer.Deserialize(input);

We only need to call Serialize again, and since we converted all the !Include tags into normal maps, sequence or scalars, there’s nothing extra we need to do to serialize it back using the default implementation.

var output = YamlSerializer.Serialize(data);

The output will be the composed file which can be saved and used after that.

Example:

Main yaml file (cloud-api.yaml)

Description: Template to create a serverless web api 

Resources:
  ApiGatewayRestApi:
    Type: AWS::ApiGateway::RestApi
    Properties:
      Name: Serverless API
      Description: Serverless API - Using CloudFormation and Swagger
      Body: !Include
        File: simple-swagger.yaml

simple-swagger.yaml file

swagger: "2.0"

info:
  version: 1.0.0
  title: Simple API
  description: A simple API to learn how to write OpenAPI Specification

paths:
  /persons: !Include
    File: persons.yaml
  /pets: !Include
    File: pets.yaml

persons.yaml file

get:
  summary: Gets some persons
  description: Returns a list containing all persons.
  responses:
    200:
      description: A list of Person
      schema:
        type: array
        items:
          required:
            - username
          properties:
            firstName:
              type: string
            lastName:
              type: string
            username:
              type: string

pets.yaml file

get:
  summary: Gets some pets
  description: Returns a list containing all pets.
  responses:
    200:
      description: A list of pets
      schema:
        type: array
        items:
          required:
            - petname
          properties:
            petname:
              type: string
            ownerName:
              type: string
            breed:
              type: string

Final result (composed file)

Description: Template to create a serverless web api
Resources:
  ApiGatewayRestApi:
    Type: AWS::ApiGateway::RestApi
    Properties:
      Name: Serverless API
      Description: Serverless API - Using CloudFormation and Swagger
      Body:
        swagger: 2.0
        info:
          version: 1.0.0
          title: Simple API
          description: A simple API to learn how to write OpenAPI Specification
        paths:
          /persons:
            get:
              summary: Gets some persons
              description: Returns a list containing all persons.
              responses:
                200:
                  description: A list of Person
                  schema:
                    type: array
                    items:
                      required:
                      - username
                      properties:
                        firstName:
                          type: string
                        lastName:
                          type: string
                        username:
                          type: string
          /pets:
            get:
              summary: Gets some pets
              description: Returns a list containing all pets.
              responses:
                200:
                  description: A list of pets
                  schema:
                    type: array
                    items:
                      required:
                      - petname
                      properties:
                        petname:
                          type: string
                        ownerName:
                          type: string
                        breed:
                          type: string

Thursday, 5 April 2018

Serverless static website - part 9

One of the greatest benefits of cloud computing is the ability to automate processes and up to this point, we've learned how to set everything up via AWS console web interface.

Why automate?

It is always good to know how to manage stuff via console in case we need to manually modify something, but we should aim to avoid this practice. Instead, limit the use of the console to a bare minimum and the rest of the time, aim for some automated way, this has the following advantages:

  • We can keep source code / templates under source control, allowing to keep track of changes.
  • It can be reused to replicate in case of a new customer / new environment / etc.
  • No need to remember where every single option is located as the UI can change.
  • It can be transferred to another account in a matter of a few minutes.

In AWS world, the automated process is achieved by creating templates in CloudFormation and deploying them to stacks.

I have already created a couple of CloudFormation templates to automate all the process described to this point, they can be found at my GitHub repo.

CloudFormation templates

In order to automate this infrastructure, I've divided resources into two separate templates: one containing the SSL certificate and the other containing all the rest of the resources. The reason why the SSL certificate is in another template is because it needs to be run on N. Virginia region (US-East-1) as explained earlier when we created it manually, it's a CloudFront requirement.

Templates can contain parameters that make them more flexible, in this case, there is a parameter that controls the creation of a redirection bucket, we might have a scenario when we want just a website on a sub domain and we might not want to redirect from the naked domain. These are the parameters:

SSL Certificate template

  • DomainName: The site domain name (naked domain only)

Infrastructure template

  • HostedZone: This is just for reference, it should not be changed
  • SSLCertificate: This should be taken from the output of the SSL certificate template
  • DomainName: Same as above, only naked domain
  • SubDomainName: specific sub domain, typically www
  • IncludeRedirectToSubDomain: Whether it should include a redirection bucket from the naked domain to the subdomain

Creating SSL certificate Stack

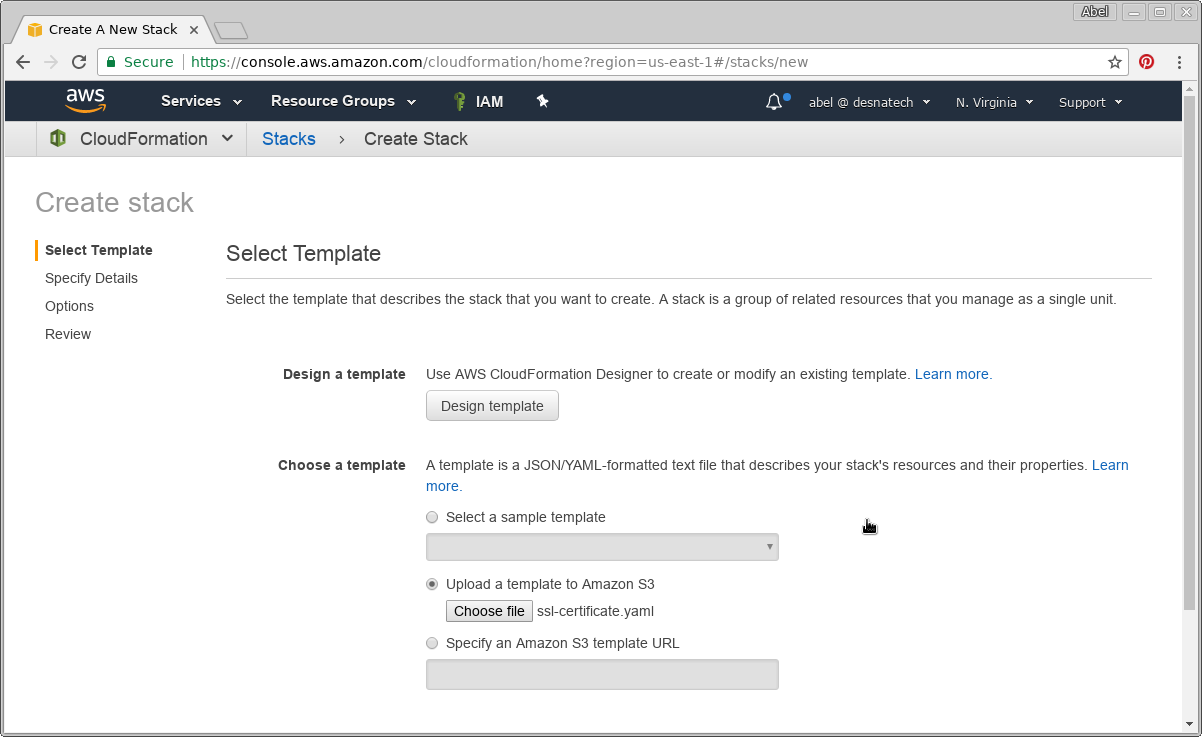
First, let's make sure we are in N. Virginia region. Go to CloudFormation console, once there, click Create Stack button. We are presented with Select Template screen, where we'll choose a template from my repository (ssl-certificate.yaml) by selecting Upload a template to Amazon S3 radio button.

Click Next, you'll see the input parameters page including the stack name which I'll name abelperez-info-ssl-stack to give it some meaningful name.

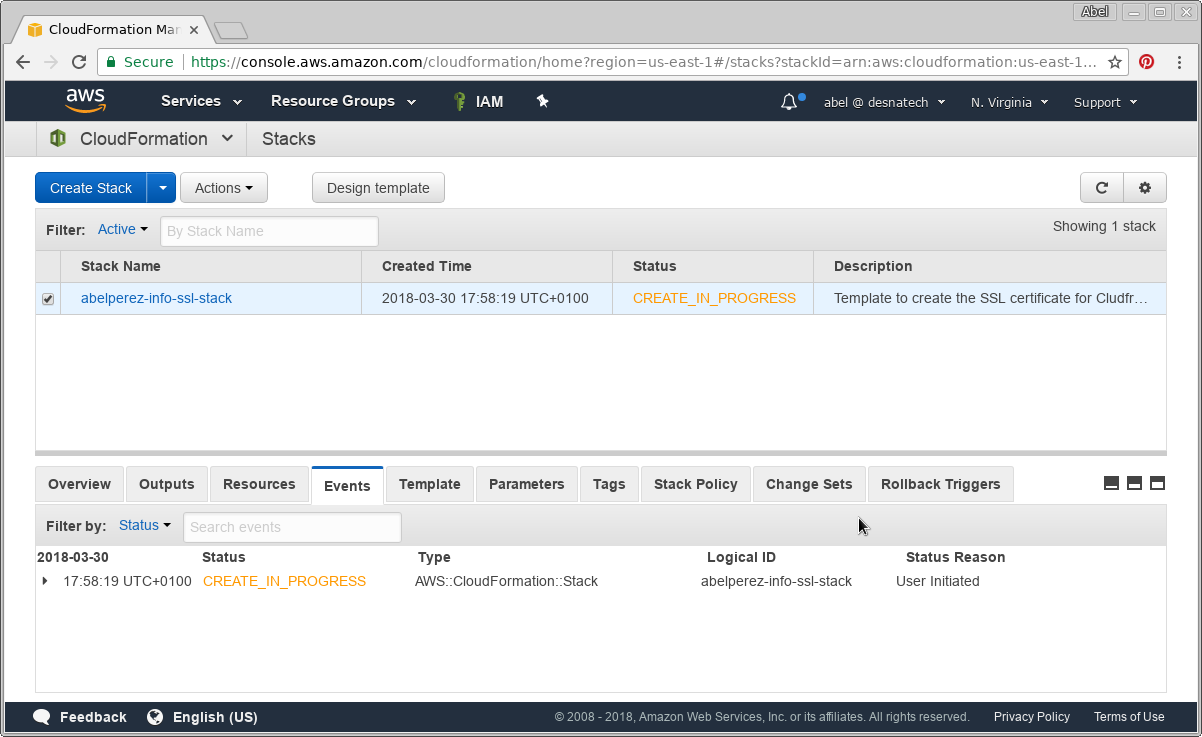
After entering the required information, click Next and Next again, then on Create button. You'll see the Create in progress status in the stack.

At this point, the SSL certificate is being created and will require the identity verification just like when it was created manually, this will block the stack creation until the validation process is finished, so go ahead and check your email and follow the link to validate the identity to proceed with the stack creation.

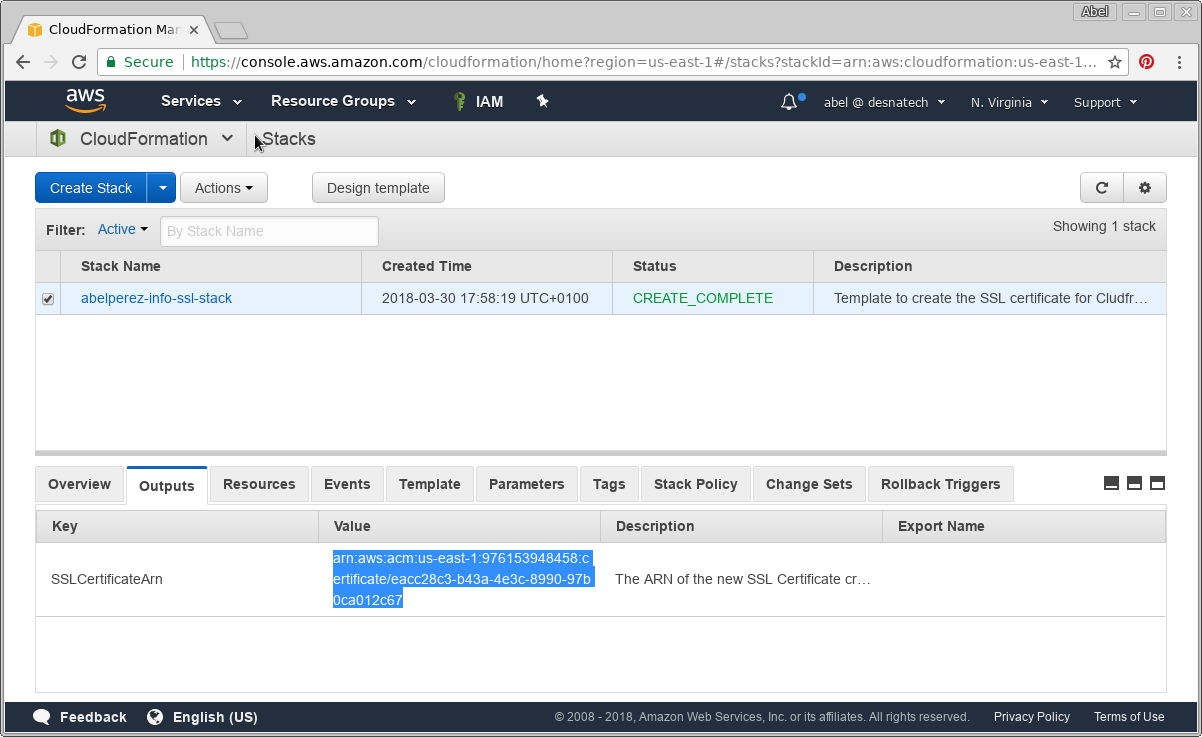
Once the creation is done you'll see the Create complete status in the stack, on the lower pane, select Outputs, you'll find SSLCertificateArn. Take that value and copy it somewhere temporarily, we'll need it for our next stack.

Creating Infrastructure Stack

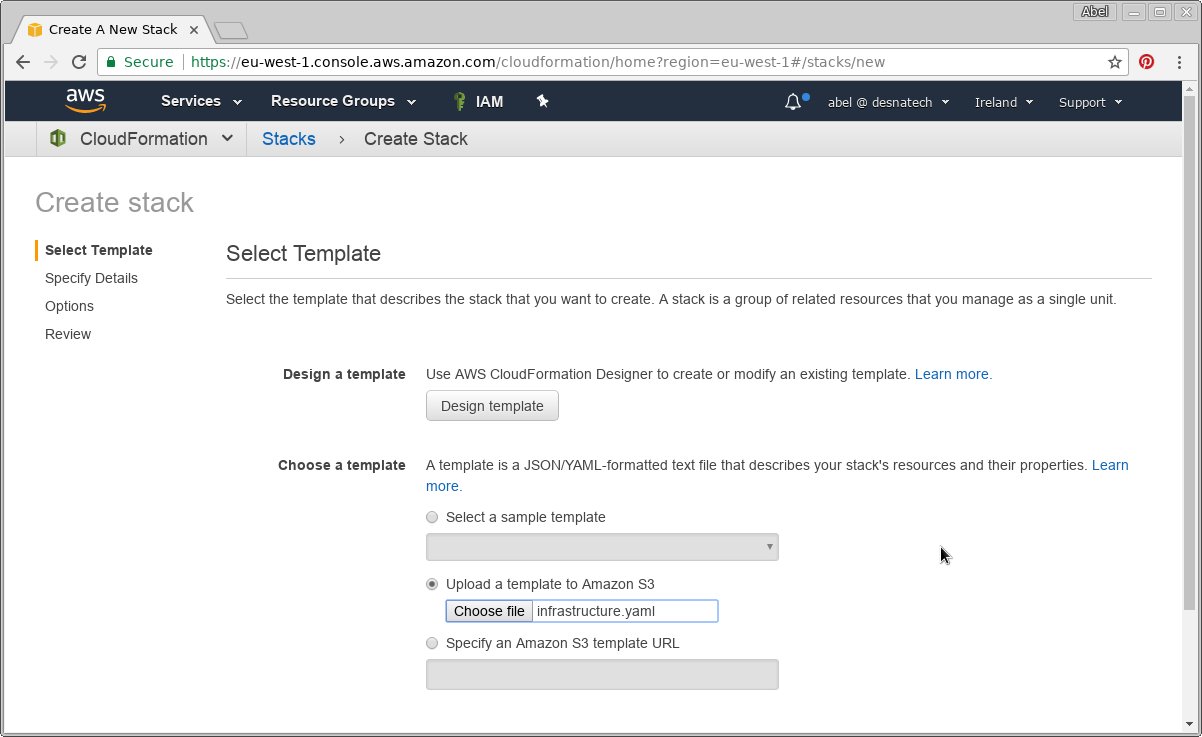
Following a similar process, let's create the second stack containing most of the resources to provision. In this case we are not forced to create it in any specific region, we can choose any provided all the services are available, for this example I'll Ireland (EU-West-1). The template can be downloaded from my repository (infrastructure.yaml).

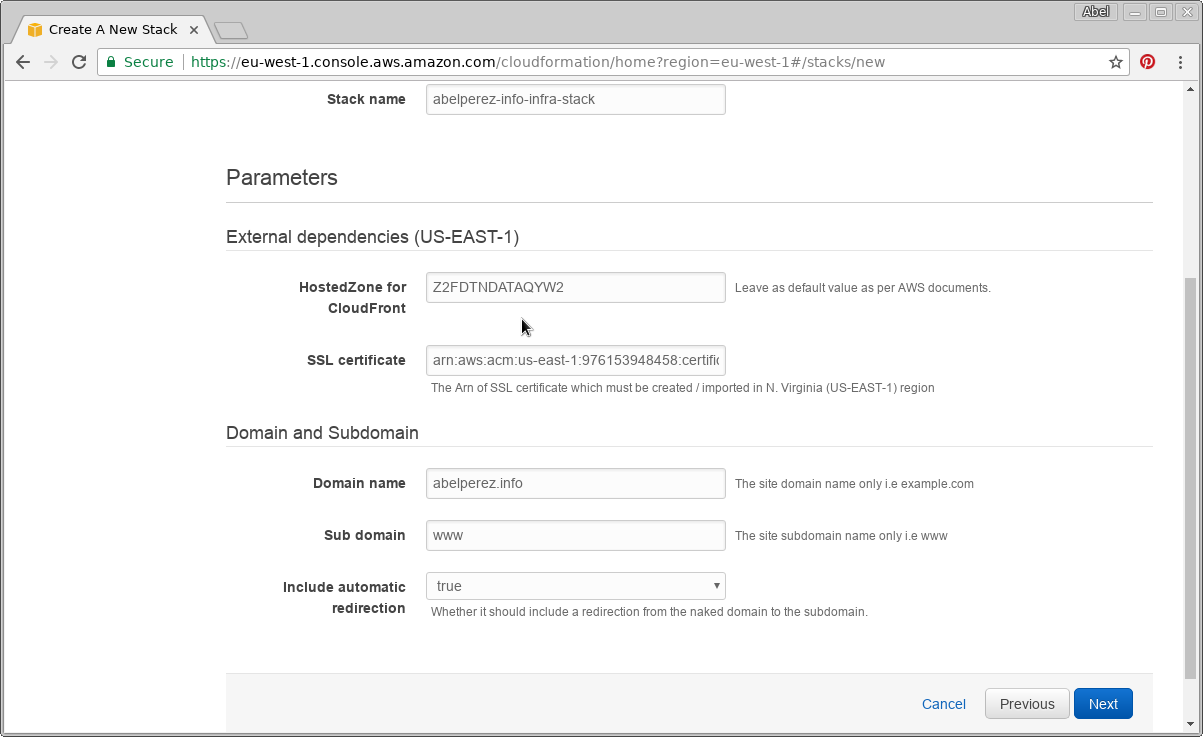
This time, you are presented a different set of parameters, SSL Certificate will be the output of the previous stack as explained above. Domain name will be exactly the same as in the previous stack, give we are using the SSL certificate for this domain. Subdomain will be www and I'll include a redirection as I expect users to be redirected from abelperez.info to www.abelperez.info. I'll name the stack abelperez-info-infra-stack just to make it meaningful.

Since this template will create IAM users, roles and policies, we need to acknowledge this by ticking the box.

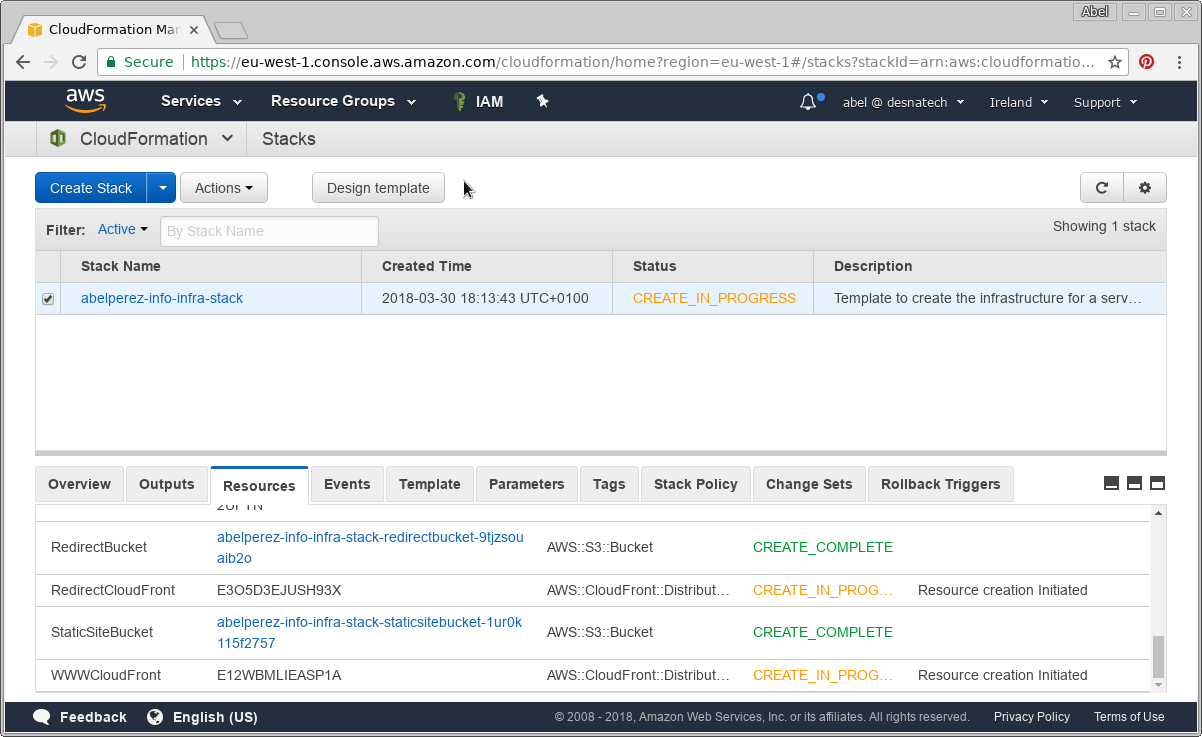
Once we hit Create, we can see the Create in progress screen.

This process can take up to 30 minutes, so please be patient, this takes so long time to create the stack because we are provisioning CloudFront distributions and they can take some time to propagate.

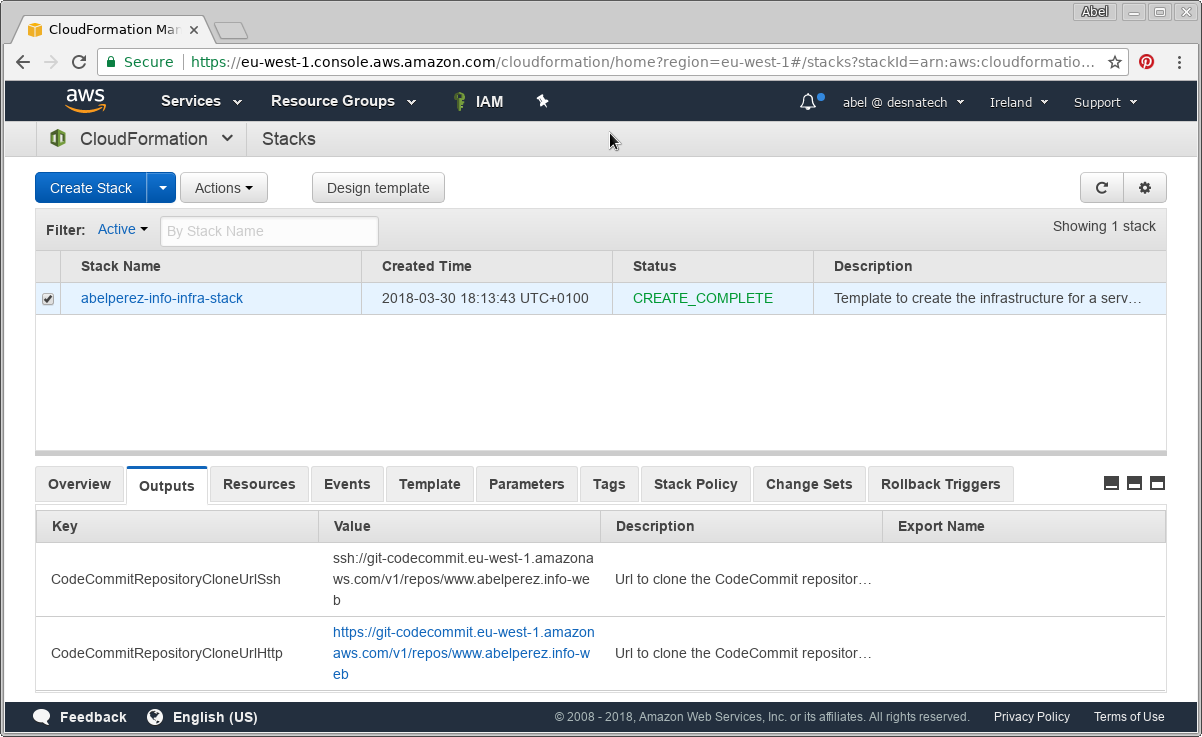
Once the stack is created, we can take note of a couple of values from the output: CodeCommit repository url (either SSH or HTTPS) and the Static bucket name.

Manual steps to finish the set up.

With all resource automatically provisioned by the templates, we are in a position where the only thing we need is to link our local SSH key with the IAM user. To do that, let's do exactly what we did when it was set up manually in part 6.

In my case, I chose to use SSH key, so I went to IAM console, found the user, under Security Credentials, I uploaded my SSH public key.

We also need to update the buildspec.yml to run our build, can be downloaded from the above linked GitHub repository. The placeholder <INSERT-YOUR-BUCKET-NAME-HERE> must be replaced with the actual bucket name, in this instance the bucket name generated is abelperez-info-infra-stack-staticsitebucket-1ur0k115f2757 and my buildspec.yml looks like:

version: 0.2

phases:
  build:
    commands:
      - mkdir dist
      - cp *.html dist/

  post_build:
    commands:
      - aws s3 sync ./dist 
        s3://abelperez-info-infra-stack-staticsitebucket-1ur0k115f2757/ 
        --delete --acl=public-read

Let's test it!

Our test consist of cloning the git repository from CodeCommit, add two files: index.html and buildspec.yml. Then we'll perform a git push and we expect it will trigger the build executing the s3 sync command and copying the index.html to our destination bucket which will be behind CloudFront and CNamed by Route 53. In the end, we should be able to just browse www.abelperez.info and get whatever the result is in index.html just uploaded.

Just a note, if you get a HTTP 403 instead of the expected HTML, then just wait for a few minutes, CloudFront/Route 53 might not be fully propagated just yet.

abel@ABEL-DESKTOP:~$ git clone ssh://git-codecommit.eu-west-1.amazonaws.com/v1/repos/www.abelperez.info-web
Cloning into 'www.abelperez.info-web'...
warning: You appear to have cloned an empty repository.
abel@ABEL-DESKTOP:~$ cd www.abelperez.info-web/
abel@ABEL-DESKTOP:~/www.abelperez.info-web$ git add buildspec.yml index.html 
abel@ABEL-DESKTOP:~/www.abelperez.info-web$ git commit -m "initial commit"
[master (root-commit) dc40888] initial commit
 Committer: Abel Perez Martinez 
Your name and email address were configured automatically based
on your username and hostname. Please check that they are accurate.
You can suppress this message by setting them explicitly. Run the
following command and follow the instructions in your editor to edit
your configuration file:

    git config --global --edit

After doing this, you may fix the identity used for this commit with:

    git commit --amend --reset-author

 2 files changed, 16 insertions(+)
 create mode 100644 buildspec.yml
 create mode 100644 index.html
abel@ABEL-DESKTOP:~/www.abelperez.info-web$ git push
Counting objects: 4, done.
Delta compression using up to 4 threads.
Compressing objects: 100% (4/4), done.
Writing objects: 100% (4/4), 480 bytes | 0 bytes/s, done.
Total 4 (delta 0), reused 0 (delta 0)
To ssh://git-codecommit.eu-west-1.amazonaws.com/v1/repos/www.abelperez.info-web
 * [new branch]      master -> master
abel@ABEL-DESKTOP:~/www.abelperez.info-web$ curl https://www.abelperez.info
<html>
<body>
<h1>Hello from S3 bucket :) </h1>
</body>
</html>