Showing posts with label automate. Show all posts

Saturday, 2 March 2019

How to create a dynamic DNS with AWS Route 53

Have you ever wanted to host some pet project or even a small website on your own domestic network? If so, you must have stumbled across the DNS resolution issue: since we depend on our ISP to get our "real IP address", there's no guarantee that the IP we see today will stay any longer the same.

You could update your domain's DNS records every time you detect the IP has changed, but obviously that's tedious and error prone. That's when dynamic DNS (DDNS) comes in. Services like No-IP,Duck DNS,etc can be helpful.

In this post I'll go through the steps involved when it comes to setting up your own DDNS service when you own a domain that has been registered in AWS Route 53.

Prerequisites

Before running the commands I suggest here, we need a couple of things to set up. Let's start by installing the required packages if you haven't already installed them.

  • sudo apt-get install awscli
  • sudo apt-get install jq

Configure AWS credentials

$ aws configure
AWS Access Key ID [None]: AKIAIOSFODNN7EXAMPLE
AWS Secret Access Key [None]: wJalrXUtnFEMI/K7MDENG/bPxRfiCYEXAMPLEKEY
Default region name [None]: eu-west-1
Default output format [None]: json

A hosted zone in AWS Route 53

$ aws route53 list-hosted-zones
{
    "HostedZones": [
        {
            "ResourceRecordSetCount": 5, 
            "CallerReference": " ... ", 
            "Config": {
                "Comment": "HostedZone created by Route53 Registrar", 
                "PrivateZone": false
            }, 
            "Id": "/hostedzone/Z2TLEXAMPLEZONE", 
            "Name": "abelperez.info."
        }
    ]
}

What's the plan?

The scenario I'm covering here is probably one of the most common. I want to create a new subdomain that points to my external IP and update that record as the external IP changes. To achieve that, we'll follow the steps:

  • Find out the external IP.
  • Get the desired hosted zone.
  • Create the A record (or update it if it already exists).
  • Set it up to run regularly (cron job).

Script step by step

Lest's start like any script, the shebang indicator. Then, input variables, in this case we define the domain name and the public record, notice the "." at the end of the public record, this is required by route 53.

#!/bin/bash
DOMAIN_NAME=abelperez.info
PUBLIC_RECORD=rpi.$DOMAIN_NAME.

Find the external IP, there are many ways to obtain this value, but since we're using AWS, let's get it from checkip endpoint. For debugging purposes we echo the IP found.

IP=$(curl -s http://checkip.amazonaws.com)
echo Found IP=$IP

Determine the hosted zone id, this step is optional if you want to use a hard-coded zone id that can be copied from the AWS Route 53 console. In this case I've invoked list-zones-by-name command which gives the hosted zone information for a specific domain, the format is as above in the prerequisites section. To extract the exact id I used a combination of jq and sed commands.

R53_HOSTED_ZONE=`aws route53 list-hosted-zones-by-name \
--dns-name $DOMAIN_NAME \
--query HostedZones \
| jq -r ".[] | select(.Name == \"$DOMAIN_NAME.\").Id" \
| sed 's/\/hostedzone\///'`

Now that we have all the required information, let's prepare the A record JSON input that will be used by aws route53 change-resource-record-sets command. the action "UPSERT" creates or updates the record accordingly, otherwise we'd need to manually check if it exists or not before updating it. Again for debugging purposes, we echo the final JSON.

read -r -d '' R53_ARECORD_JSON << EOM
{
  "Changes": [
    {
      "Action": "UPSERT",
      "ResourceRecordSet": {
        "Name": "$PUBLIC_RECORD",
        "Type": "A",
        "TTL": 300,
        "ResourceRecords": [
          {
            "Value": "$IP"
          }
        ]
      }
    }
  ]
}
EOM

echo About to execute change
echo "$R53_ARECORD_JSON" 

With the input ready, we invoke the Route 53 command to create/update the A record. This command will return immediately but the operation will take a few seconds to complete. If we want to make sure we know when it's completed, then we need to get the change id returned by the command, in this case, it's stored in the variable. This is optional, as well as the next step.

R53_ARECORD_ID=`aws route53 change-resource-record-sets \
--hosted-zone-id $R53_HOSTED_ZONE \
--change-batch "$R53_ARECORD_JSON" \
--query ChangeInfo.Id \
--output text`

echo Waiting for the change to update.

At this point, the request to create/update the A record is in progress, we could finish the script right now. However, I'd like to get a final confirmation that the operation has been completed. To do that, we can use the wait command providing the change id from the previous request.

aws route53 wait resource-record-sets-changed --id $R53_ARECORD_ID

echo Done.

And now it's actually completed. You should save this to a file, maybe name it update-dns.sh. It will need execute permission.

$ chmod u+x ./update-dns.sh

Set up cron job

In this particular instance I want this script to run in one of my raspberry pis, so I proceeded to copy the script file to pi user's home directory (/home/pi/)

pi@raspberrypi:~ $ ls
update-dns.sh

Now we'll set up a user cron job, we do that by running the command crontab -u followed by the user under which the job should run, this job doesn't require any system-wide privilege therefore it can run as the regular user, pi. -e to edit the file.

pi@raspberrypi:~ $ crontab -u pi -e

All we need to do is append the following text to the file content you are prompted with. The first two numbers correspond to minute and hour to run. For testing purposes I set it near the current time at the moment of testing it. The script output is appended/redirected to a text file so we can review afterwards if desired.

23 22 * * * /home/pi/update-dns.sh >> /home/pi/cron-update-dns.txt

See it in action

Once we've saved the crontab file, if it's the time where the cron job is about to start, we can test it by running tail -f command

pi@raspberrypi:~ $ tail -f cron-update-dns.txt

Finally, don't forget to update the port forwarding section on your home router so your open port directs traffic to a specific device, in my case, to that particular raspberry pi.

Thursday, 27 September 2018

How to implement a CloudFormation Include custom tag using YamlDotNet

YAML has become a popular format used to describe a wide range of information in a more readable way. Depending on the concrete use case, these files can grow significantly. One example of this is AWS CloudFormation templates which can be written either in JSON or YAML.

Especially when working on Serverless projects, it doesn’t matter if it’s serverless framework, AWS SAM or just pure CloudFormation. The fact is the main file to maintain is (most of the time) a YAML template that grows over time.

I’d like to focus on a more concrete example: a typical serverless microservice architecture consists of a backend database, a function and a HTTP endpoint (i.e DynamoDB, Lambda and API Gateway). It’s also a common practice to use OpenAPI specification aka Swagger to describe the Web API interface.

In this case, when trying to use Lambda integration (either custom or proxy) we can’t use variables or intrinsic functions within the swagger file (we have to hardcode the lambda invocation url including account number and region, apart from the fact that function name might change if using autogenerated by CloudFormation), unless swagger content is inline in the Body property, which makes the file to grow by a great deal.

As of this writing, there are some strategies proposed by AWS to mitigate this problem, I personally find them a bit cumbersome to use on a daily basis:

  • AWS::CloudFormation::Stack It adds complexity to the whole process since we have to pass parameters to nested stacks and retrieve outputs from them in order to access information from both parties. The template for the nested stack must be stored on an Amazon S3 bucket, which adds friction to our development workflow while building.
  • AWS::Include Transform which is a form of macro hosted by AWS CloudFormation, is simpler than nested stacks but currently it still has some limiations:
    • The snippet has to be stored on an Amazon S3 bucket.
    • If the snippets change, your stack doesn't automatically pick up those changes.
    • It does not currently support using shorthand notations for YAML snippets.

Personally, I prefer a solution where at development time I can split the template in logical parts and then, before deploying it to AWS, compose them in one piece. I like the idea of include partials in specific parts of the parent file.

How to implement this include mechanism ?

YAML provides an extension mechanism named tags, where we can associate a particular data type with a tag (it’s basically a prefix added to a value). In YamlDotNet this is implemented by creating a custom type converter and mapping the new tag with the custom type converter.

IncludeTagConverter (custom type converter)

public class IncludeTagConverter: IYamlTypeConverter
{
    public bool Accepts(Type type)
    {
        return typeof(IncludeTag).IsAssignableFrom(type);
    }

    public object ReadYaml(IParser parser, Type type)
    {
        parser.Expect<MappingStart>();
        var key = parser.Expect<Scalar>();
        var val = parser.Expect<Scalar>();
        parser.Expect<MappingEnd>();

        if (key.Value != "File")
        {
            throw new YamlException(key.Start, val.End, "Expected a scalar named 'File'");
        }

        var input = File.ReadAllText(val.Value);
        var data = YamlSerializer.Deserialize(input);
        return data;
    }

    public void WriteYaml(IEmitter emitter, object value, Type type)
    {
    }
}

IncludeTag class

public class IncludeTag
{
    public string File { get; set; }
}

In this case we are indicating that IncludeTagConverter class should be used if the desiralization mechanism needs to deserialize an object of type IncludeTag. At the end of ReadYaml method, we call a helper class that starts deserialization process again with the content of the “included file”.

YamlSerializer helper class

public class YamlSerializer
{
    private const string IncludeTag = "!Include";

    public static object Deserialize(string yaml)
    {
        var reader = new StringReader(yaml);
        var deserializer = new DeserializerBuilder()
            .WithTypeConverter(new IncludeTagConverter())
            .WithTagMapping(IncludeTag, typeof(IncludeTag))
            .Build();
        var data = deserializer.Deserialize(reader);
        return data;
    }

    public static string Serialize(object data)
    {
        var serializer = new SerializerBuilder().Build();
        var yaml = serializer.Serialize(data);
        return yaml;
    }
}

In this helper class, we tell the deserializer that we are using a type converter and that it has to map !Include tags to data type of IncludeTag. This way, when it encounters an !Include in the yaml file, it will use our type converter to deserialize the content instead, which in turn, will read whatever file we put the name in File: key and will trigger the deserialization process again, thus, allowing us to execute this at several levels in a recursive way.

How do we compose a yaml ?

Once we have the whole file yaml object in memory, by triggering the deserialization process on the main yaml file, like this:

var data = YamlSerializer.Deserialize(input);

We only need to call Serialize again, and since we converted all the !Include tags into normal maps, sequence or scalars, there’s nothing extra we need to do to serialize it back using the default implementation.

var output = YamlSerializer.Serialize(data);

The output will be the composed file which can be saved and used after that.

Example:

Main yaml file (cloud-api.yaml)

Description: Template to create a serverless web api 

Resources:
  ApiGatewayRestApi:
    Type: AWS::ApiGateway::RestApi
    Properties:
      Name: Serverless API
      Description: Serverless API - Using CloudFormation and Swagger
      Body: !Include
        File: simple-swagger.yaml

simple-swagger.yaml file

swagger: "2.0"

info:
  version: 1.0.0
  title: Simple API
  description: A simple API to learn how to write OpenAPI Specification

paths:
  /persons: !Include
    File: persons.yaml
  /pets: !Include
    File: pets.yaml

persons.yaml file

get:
  summary: Gets some persons
  description: Returns a list containing all persons.
  responses:
    200:
      description: A list of Person
      schema:
        type: array
        items:
          required:
            - username
          properties:
            firstName:
              type: string
            lastName:
              type: string
            username:
              type: string

pets.yaml file

get:
  summary: Gets some pets
  description: Returns a list containing all pets.
  responses:
    200:
      description: A list of pets
      schema:
        type: array
        items:
          required:
            - petname
          properties:
            petname:
              type: string
            ownerName:
              type: string
            breed:
              type: string

Final result (composed file)

Description: Template to create a serverless web api
Resources:
  ApiGatewayRestApi:
    Type: AWS::ApiGateway::RestApi
    Properties:
      Name: Serverless API
      Description: Serverless API - Using CloudFormation and Swagger
      Body:
        swagger: 2.0
        info:
          version: 1.0.0
          title: Simple API
          description: A simple API to learn how to write OpenAPI Specification
        paths:
          /persons:
            get:
              summary: Gets some persons
              description: Returns a list containing all persons.
              responses:
                200:
                  description: A list of Person
                  schema:
                    type: array
                    items:
                      required:
                      - username
                      properties:
                        firstName:
                          type: string
                        lastName:
                          type: string
                        username:
                          type: string
          /pets:
            get:
              summary: Gets some pets
              description: Returns a list containing all pets.
              responses:
                200:
                  description: A list of pets
                  schema:
                    type: array
                    items:
                      required:
                      - petname
                      properties:
                        petname:
                          type: string
                        ownerName:
                          type: string
                        breed:
                          type: string

Thursday, 26 July 2018

How to push Windows and IIS logs to CloudWatch using unified CloudWatch Agent automatically

CloudWatch is a powerful monitoring and management tool, collects monitoring and operational data in the form of logs, metrics, and events, providing you with a unified view of AWS resources. One of the most common use cases is collecting logs from web applications.

Log files are generated locally in the form of text files and some running process monitor them and then decide where to send them. This is usually performed by the SSM Agent, however, as per AWS documents:

"Important The unified CloudWatch Agent has replaced SSM Agent as the tool for sending log data to Amazon CloudWatch Logs. Support for using SSM Agent to send log data will be deprecated in the near future. We recommend that you begin using the unified CloudWatch Agent for your log collection processes as soon as possible."

Assigning permissions to EC2 instances

EC2 instances need permission to access CloudWatch logs, if your current instances don’t have any roles associated, then create one with the CloudWatchAgentServerPolicy managed policy attached.

If your instances already have a role then you can add the policy to the existing role. In either case, the instance needs to perform operations such as CreateLogGroup, CreateLogStream, PutLogEvents and so on.

Install the CloudWatch Agent

On Windows Server, the installation process consists of three basic steps:

  1. Download the package from https://s3.amazonaws.com/amazoncloudwatch-agent/windows/amd64/latest/AmazonCloudWatchAgent.zip
  2. Unzip to a local folder
  3. Change directory to the folder containing unzipped package and run install.ps1

For more information about how to install the agent, see AWS documents.

Here is a powershell snippet to automate this process.

# Install the CloudWatch Agent
$zipfile = "AmazonCloudWatchAgent.zip"
$tempDir = Join-Path $env:TEMP "AmazonCloudWatchAgent"
Invoke-WebRequest -Uri "https://s3.amazonaws.com/amazoncloudwatch-agent/windows/amd64/latest/AmazonCloudWatchAgent.zip" -OutFile $zipfile
Expand-Archive -Path $zipfile -DestinationPath $tempDir -Force
cd $tempDir
Write-Host "Trying to uninstall any previous version of CloudWatch Agent"
.\uninstall.ps1

Write-Host "install the new version of CloudWatch Agent"
.\install.ps1

Creating configuration file

Before launching the agent, a configuration file is required, this configuration file can seem daunting at first, especially because it’s a different format from one used in SSM Agent. This configuration file contain three sections: agent, metrics and logs.

In this case, we are interested only in section logs which in turn has two main parts: windows_events (system or application events we can find in Windows Event Viewer) and files (any log files including IIS logs).

There are two common parameters required:

  • log_group_name - Used in CloudWatch to identify a log group, it should be something meaningful such as the event type or website name.
  • log_stream_name - Used in CloudWatch to identify a log stream within a log group, typically it’s a reference to the current EC2 instance.

Collecting Windows Events

Here is an example of a Windows Event log

{
    "event_levels": ["ERROR","INFORMATION"],
    "log_group_name": "/eventlog/application",
    "event_format": "text",
    "log_stream_name": "EC2AMAZ-NPQGPRK",
    "event_name": "Application"
}

Key points:

  • event_levels can be one or more of (INFORMATION, WARNING, ERROR, CRITICAL,VERBOSE).
  • event_name is typically one of (System, Security, Application)
  • event_format is text or xml.

Collecting IIS logs

Here is an example of an IIS website logs

{
    "log_group_name": "/iis/website1",
    "timezone": "UTC",
    "timestamp_format": "%Y-%m-%d %H:%M:%S",
    "encoding": "utf-8",
    "log_stream_name": "EC2AMAZ-NPQGPRK",
    "file_path": "C:\\inetpub\\logs\\LogFiles\\W3SVC2\\*.log"
}

Key points:

  • timezone and timestamp_format are optional.
  • encoding defaults to utf-8
  • file_path uses the standard Unix glob matching rules to match files, while all the examples in AWS docs display concrete log files, the example above matches all .log files within IIS logs folder, this is important since IIS create new files based on a rotation and we can’t predict their names.

These sections can be repeated for every website and for every Windows Event we’d like to push logs to CloudWatch. If we have several EC2 instances as web servers, this process can be tedious and error prone, therefore it should be automated. Here is an example of a powershell snippet.

$windowsLogs = @("Application", "System", "Security")
$windowsLoglevel = @("ERROR", "INFORMATION")
$instance = hostname

$iissites = Get-Website | Where-Object {$_.Name -ne "Default Web Site"}

$iislogs = @()
foreach ($site in $iissites) {
    $iislog = @{
        file_path = "$($site.logFile.directory)\w3svc$($site.id)\*.log"
        log_group_name = "/iis/$($site.Name.ToLower())"
        log_stream_name = $instance
        timestamp_format = "%Y-%m-%d %H:%M:%S"
        timezone = "UTC"
        encoding = "utf-8"
    }
    $iislogs += $iislog
}

$winlogs = @()
foreach ($event in $windowsLogs) {
    $winlog = @{
        event_name = $event
        event_levels = $windowsLoglevel
        event_format ="text"
        log_group_name = "/eventlog/$($event.ToLower())"
        log_stream_name = $instance
    }
    $winlogs += $winlog
}

$config = @{
    logs = @{
        logs_collected = @{
            files = @{
                collect_list = $iislogs
            }
            windows_events = @{
                collect_list = $winlogs
            }
        }
        log_stream_name = "generic-logs"
    }
}

# this could be any other location as long as it’s absolute
$configfile = "C:\Users\Administrator\amazon-cloudwatch-agent.json"

$json = $config | ConvertTo-Json -Depth 6 

# Encoding oem is important as the file is required without any BOM 
$json | Out-File -Force -Encoding oem $configfile

For more information on how to create this file, see AWS documents.

Starting the agent

With the configuration file in place, it’s time to start the agent, to do that, change directory to CloudWatch Agent installation path, typically within Program Files\Amazon\AmazonCloudWatchAgent and run the following command line:

.\amazon-cloudwatch-agent-ctl.ps1 -a fetch-config -m ec2 -c file:configuration-file-path -s 

Key points:

  • -a is short for -Action, fetch-config indicates it will reload configuration file.
  • -m is short for -Mode, in this case ec2 as opposed to onPrem.
  • -c is short for -ConfigLocation which is the configuration file previously generated.
  • -s is short for -Start which indicates to start the service after loading configuration.

Here is a powershell snippet covering this part of the process.

cd "${env:ProgramFiles}\Amazon\AmazonCloudWatchAgent"
Write-Host "Starting CloudWatch Agent"
.\amazon-cloudwatch-agent-ctl.ps1 -a fetch-config -m ec2 -c file:$configfile -s

Let’s test it.

Assuming we have 3 websites running in our test EC2 instance, let’s name them.

  • website1 - hostname: web1.local
  • website2 - hostname: web2.local
  • website3 - hostname: web3.local

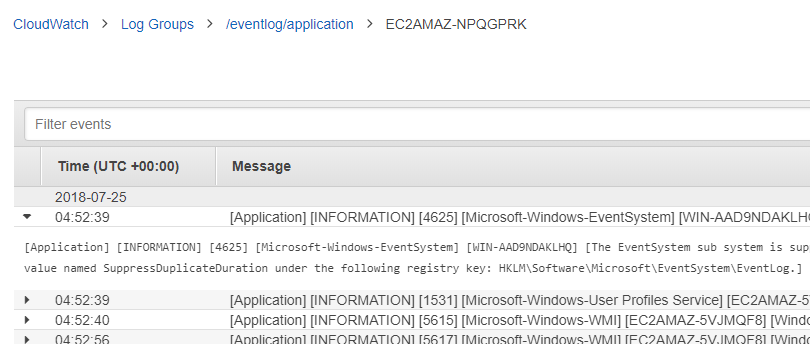
After some browsing to generate some traffic, let’s inspect CloudWatch.

Some Windows Events also in CloudWatch Logs

Here is the complete powershell script.

Thursday, 5 April 2018

Completely serverless static website on AWS

Why serverless ? The basic idea behind this is not to worry about the underlying infrastructure, the Cloud provider will expose services through several interfaces where we allocate resources and use them, and more importantly, pay only for what we use.

This approach helps to prove concepts with little or no budget, also allows to scale as the business grows on demand. All that solves the problem of over provisioning and paying for idle boxes.

One of the common scenarios is having a content website, in this case I'll focus on static website. In this series I'll explain step by step how to create all the environment from development to production on AWS.

At the end of this series we'll have created this infrastructure:

Serverless static website - part 1 - In this part you'll learn how to start with AWS and how to use Amazon S3 to host a static website, making it publicly accesible by its public endpoint url.

Serverless static website - part 2 - In this part you'll learn how to get your own domain and put it in use straight away with the static website.

Serverless static website - part 3 - In this part you'll learn how to get around the problem of having www as well as non-www domain, and how get always redirect to the www endpoint.

Serverless static website - part 4 - In this part you'll learn how to create a SSL certificate via Amazon Certificate Manager and verify the domain identity.

Serverless static website - part 5 - In this part you'll learn how to distribute the content throughout the AWS edge locations and handling SSL traffic.

Serverless static website - part 6 - In this part you'll learn how to set up a git repository using CodeCommit repository, so you can store your source files.

Serverless static website - part 7 - In this part you'll learn how to set up a simple build pipeline using a CodeBuild project.

Serverless static website - part 8 - In this part you'll learn how to automate the process of triggering the build start action when some changes are pushed to the git repository.

Serverless static website - part 9 - In this part you'll learn how the whole process can be automated by using CloudFormation templates to provision all the resources previously described manually.

Serverless static website - part 9

One of the greatest benefits of cloud computing is the ability to automate processes and up to this point, we've learned how to set everything up via AWS console web interface.

Why automate?

It is always good to know how to manage stuff via console in case we need to manually modify something, but we should aim to avoid this practice. Instead, limit the use of the console to a bare minimum and the rest of the time, aim for some automated way, this has the following advantages:

  • We can keep source code / templates under source control, allowing to keep track of changes.
  • It can be reused to replicate in case of a new customer / new environment / etc.
  • No need to remember where every single option is located as the UI can change.
  • It can be transferred to another account in a matter of a few minutes.

In AWS world, the automated process is achieved by creating templates in CloudFormation and deploying them to stacks.

I have already created a couple of CloudFormation templates to automate all the process described to this point, they can be found at my GitHub repo.

CloudFormation templates

In order to automate this infrastructure, I've divided resources into two separate templates: one containing the SSL certificate and the other containing all the rest of the resources. The reason why the SSL certificate is in another template is because it needs to be run on N. Virginia region (US-East-1) as explained earlier when we created it manually, it's a CloudFront requirement.

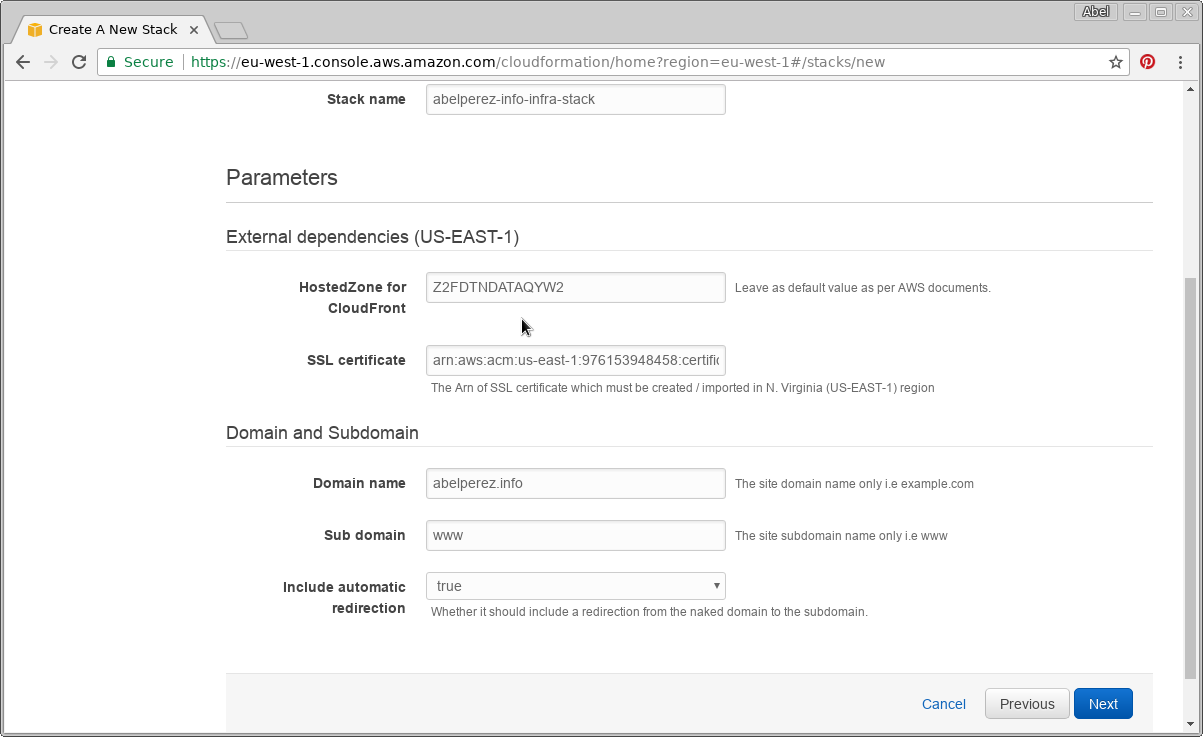
Templates can contain parameters that make them more flexible, in this case, there is a parameter that controls the creation of a redirection bucket, we might have a scenario when we want just a website on a sub domain and we might not want to redirect from the naked domain. These are the parameters:

SSL Certificate template

  • DomainName: The site domain name (naked domain only)

Infrastructure template

  • HostedZone: This is just for reference, it should not be changed
  • SSLCertificate: This should be taken from the output of the SSL certificate template
  • DomainName: Same as above, only naked domain
  • SubDomainName: specific sub domain, typically www
  • IncludeRedirectToSubDomain: Whether it should include a redirection bucket from the naked domain to the subdomain

Creating SSL certificate Stack

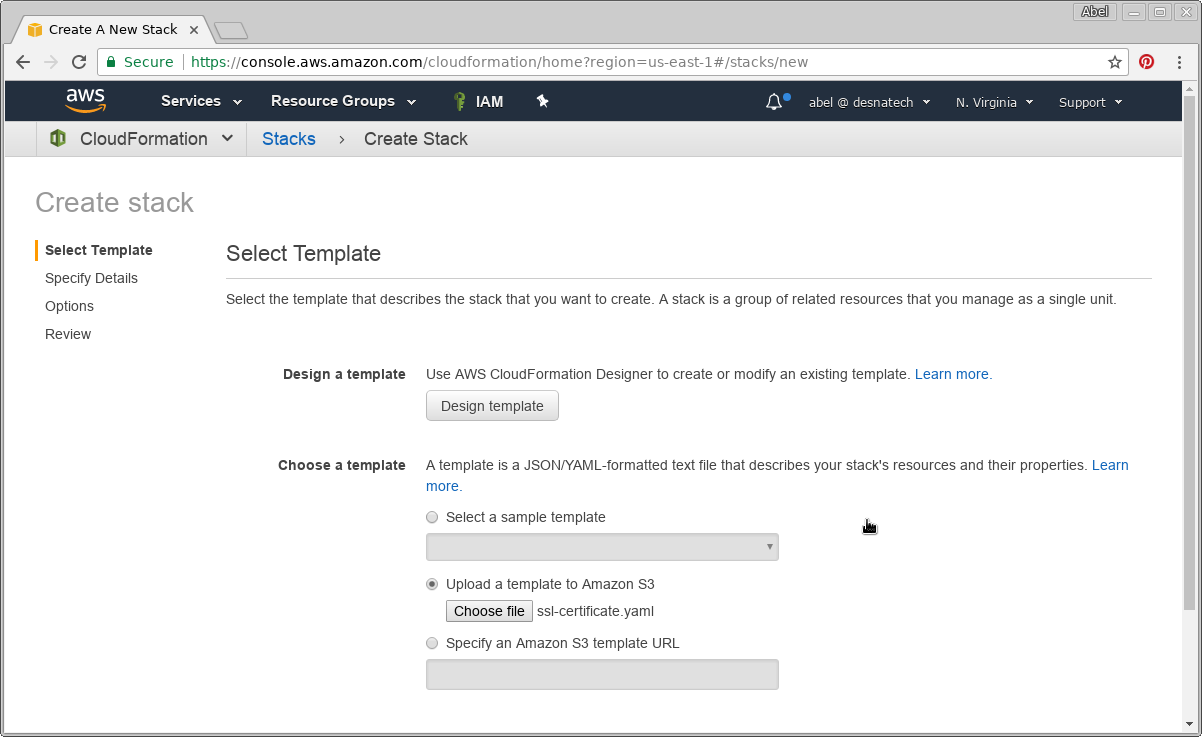
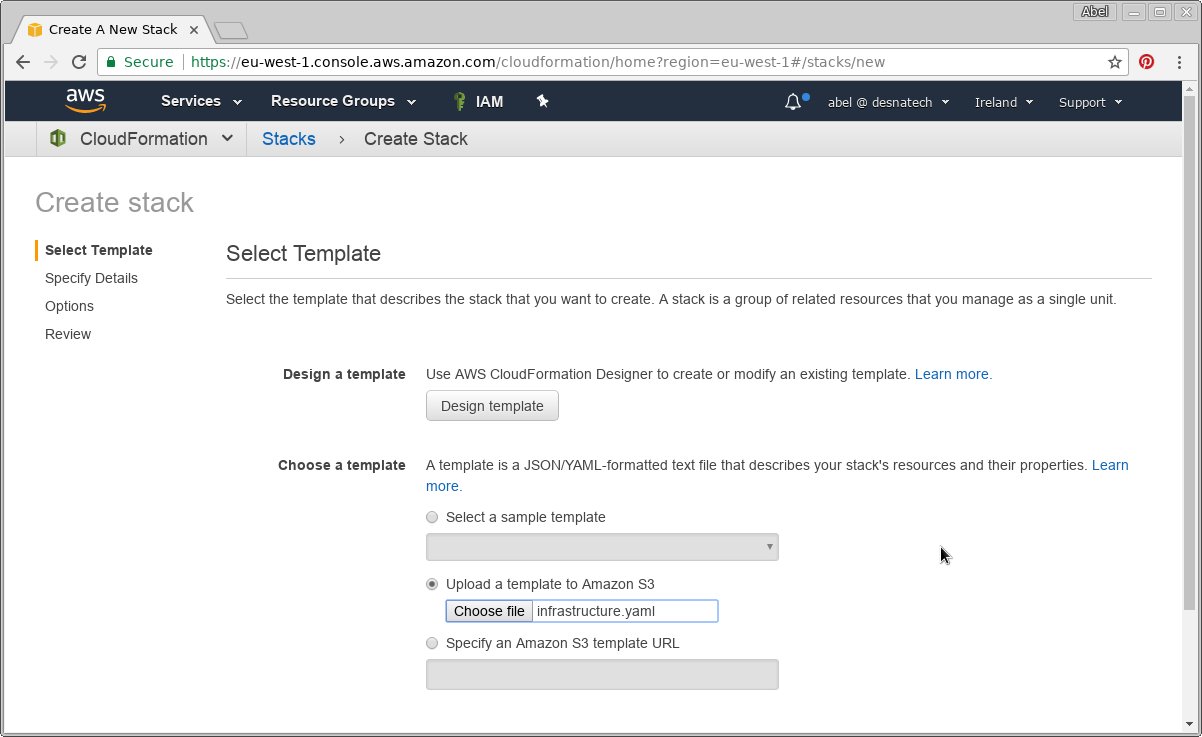
First, let's make sure we are in N. Virginia region. Go to CloudFormation console, once there, click Create Stack button. We are presented with Select Template screen, where we'll choose a template from my repository (ssl-certificate.yaml) by selecting Upload a template to Amazon S3 radio button.

Click Next, you'll see the input parameters page including the stack name which I'll name abelperez-info-ssl-stack to give it some meaningful name.

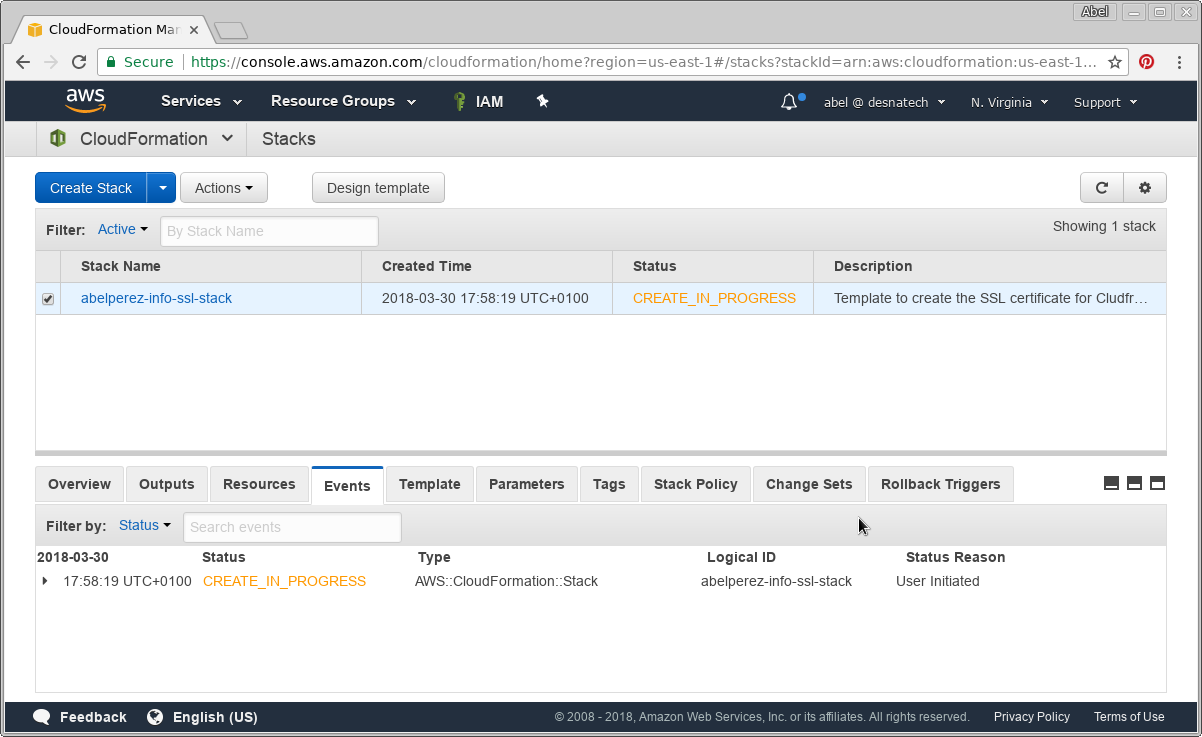
After entering the required information, click Next and Next again, then on Create button. You'll see the Create in progress status in the stack.

At this point, the SSL certificate is being created and will require the identity verification just like when it was created manually, this will block the stack creation until the validation process is finished, so go ahead and check your email and follow the link to validate the identity to proceed with the stack creation.

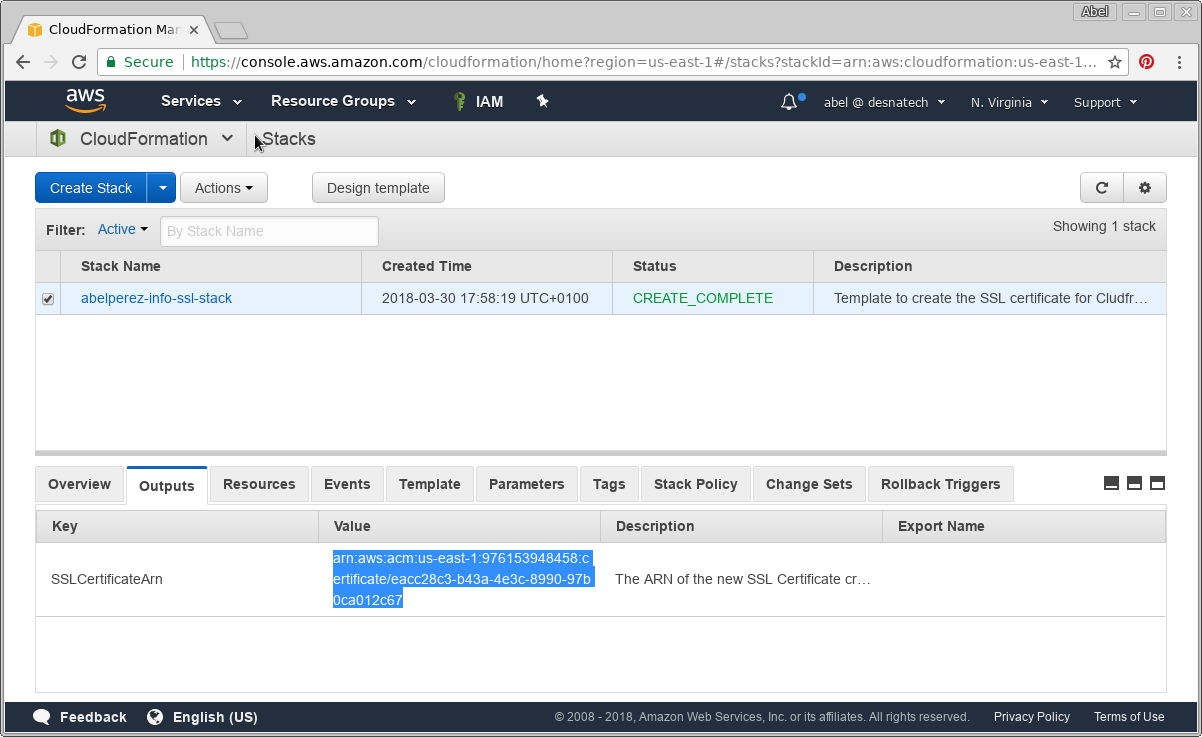
Once the creation is done you'll see the Create complete status in the stack, on the lower pane, select Outputs, you'll find SSLCertificateArn. Take that value and copy it somewhere temporarily, we'll need it for our next stack.

Creating Infrastructure Stack

Following a similar process, let's create the second stack containing most of the resources to provision. In this case we are not forced to create it in any specific region, we can choose any provided all the services are available, for this example I'll Ireland (EU-West-1). The template can be downloaded from my repository (infrastructure.yaml).

This time, you are presented a different set of parameters, SSL Certificate will be the output of the previous stack as explained above. Domain name will be exactly the same as in the previous stack, give we are using the SSL certificate for this domain. Subdomain will be www and I'll include a redirection as I expect users to be redirected from abelperez.info to www.abelperez.info. I'll name the stack abelperez-info-infra-stack just to make it meaningful.

Since this template will create IAM users, roles and policies, we need to acknowledge this by ticking the box.

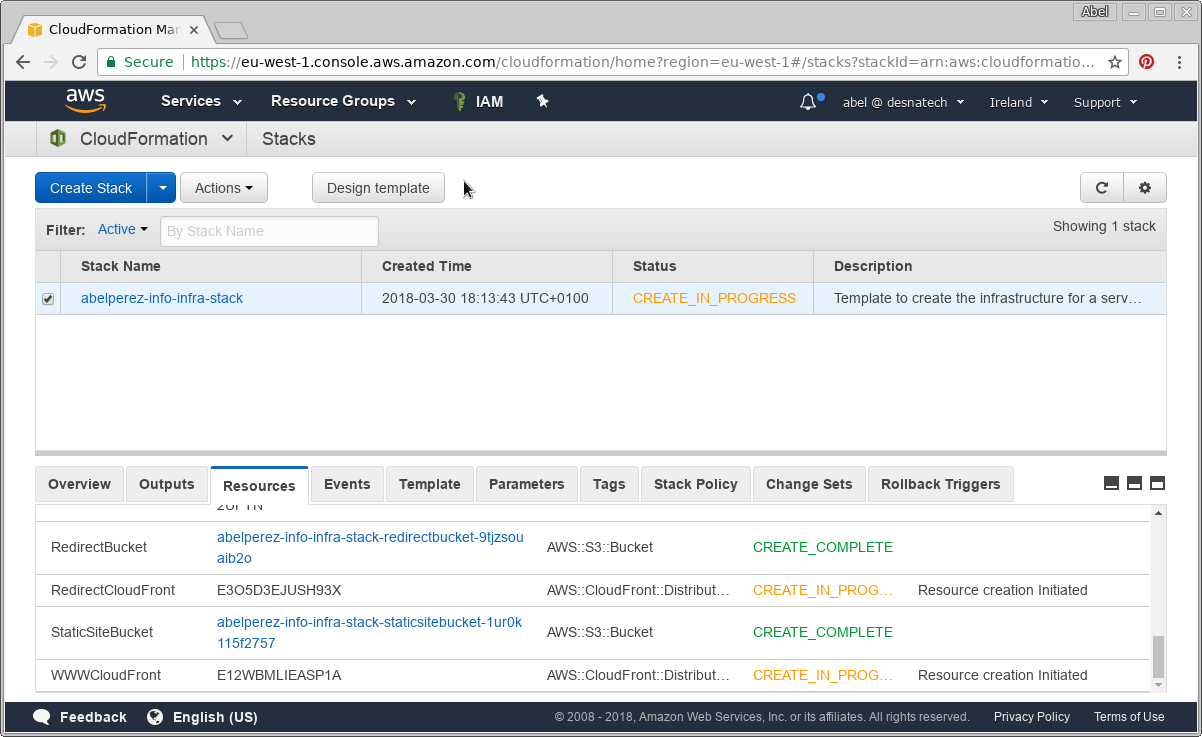
Once we hit Create, we can see the Create in progress screen.

This process can take up to 30 minutes, so please be patient, this takes so long time to create the stack because we are provisioning CloudFront distributions and they can take some time to propagate.

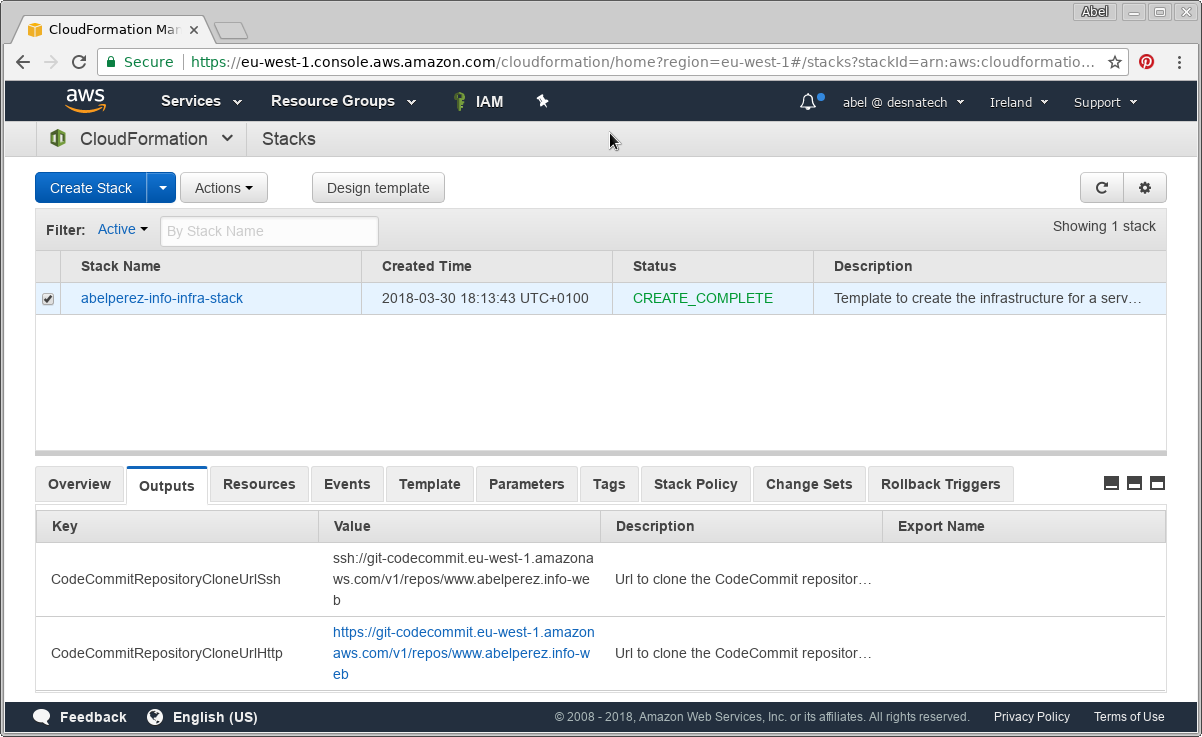
Once the stack is created, we can take note of a couple of values from the output: CodeCommit repository url (either SSH or HTTPS) and the Static bucket name.

Manual steps to finish the set up.

With all resource automatically provisioned by the templates, we are in a position where the only thing we need is to link our local SSH key with the IAM user. To do that, let's do exactly what we did when it was set up manually in part 6.

In my case, I chose to use SSH key, so I went to IAM console, found the user, under Security Credentials, I uploaded my SSH public key.

We also need to update the buildspec.yml to run our build, can be downloaded from the above linked GitHub repository. The placeholder <INSERT-YOUR-BUCKET-NAME-HERE> must be replaced with the actual bucket name, in this instance the bucket name generated is abelperez-info-infra-stack-staticsitebucket-1ur0k115f2757 and my buildspec.yml looks like:

version: 0.2

phases:
  build:
    commands:
      - mkdir dist
      - cp *.html dist/

  post_build:
    commands:
      - aws s3 sync ./dist 
        s3://abelperez-info-infra-stack-staticsitebucket-1ur0k115f2757/ 
        --delete --acl=public-read

Let's test it!

Our test consist of cloning the git repository from CodeCommit, add two files: index.html and buildspec.yml. Then we'll perform a git push and we expect it will trigger the build executing the s3 sync command and copying the index.html to our destination bucket which will be behind CloudFront and CNamed by Route 53. In the end, we should be able to just browse www.abelperez.info and get whatever the result is in index.html just uploaded.

Just a note, if you get a HTTP 403 instead of the expected HTML, then just wait for a few minutes, CloudFront/Route 53 might not be fully propagated just yet.

abel@ABEL-DESKTOP:~$ git clone ssh://git-codecommit.eu-west-1.amazonaws.com/v1/repos/www.abelperez.info-web
Cloning into 'www.abelperez.info-web'...
warning: You appear to have cloned an empty repository.
abel@ABEL-DESKTOP:~$ cd www.abelperez.info-web/
abel@ABEL-DESKTOP:~/www.abelperez.info-web$ git add buildspec.yml index.html 
abel@ABEL-DESKTOP:~/www.abelperez.info-web$ git commit -m "initial commit"
[master (root-commit) dc40888] initial commit
 Committer: Abel Perez Martinez 
Your name and email address were configured automatically based
on your username and hostname. Please check that they are accurate.
You can suppress this message by setting them explicitly. Run the
following command and follow the instructions in your editor to edit
your configuration file:

    git config --global --edit

After doing this, you may fix the identity used for this commit with:

    git commit --amend --reset-author

 2 files changed, 16 insertions(+)
 create mode 100644 buildspec.yml
 create mode 100644 index.html
abel@ABEL-DESKTOP:~/www.abelperez.info-web$ git push
Counting objects: 4, done.
Delta compression using up to 4 threads.
Compressing objects: 100% (4/4), done.
Writing objects: 100% (4/4), 480 bytes | 0 bytes/s, done.
Total 4 (delta 0), reused 0 (delta 0)
To ssh://git-codecommit.eu-west-1.amazonaws.com/v1/repos/www.abelperez.info-web
 * [new branch]      master -> master
abel@ABEL-DESKTOP:~/www.abelperez.info-web$ curl https://www.abelperez.info
<html>
<body>
<h1>Hello from S3 bucket :) </h1>
</body>
</html>

Saturday, 24 February 2018

Serverless static website - part 8

All the way to this point, we have created the resources that allow us to store our source code and deploy it to S3 bucket. However, this build/deploy process has to be triggered manually by going to the console, finding the CodeBuild project and clicking Start build button.

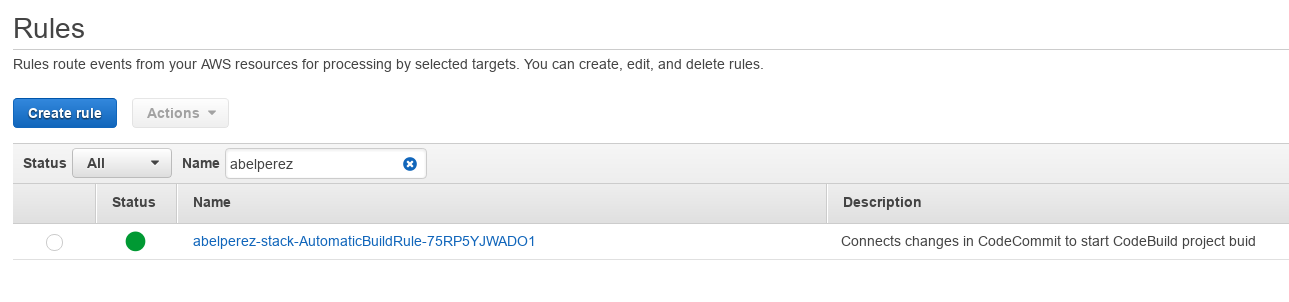
This doesn't sound good enough for a complete development cycle. We need something that links changes in CodeCommit repository and CodeBuild project together so the build process is triggered automatically when changes are pushed to git. That magic link is called CloudWatch

Amazon CloudWatch is a monitoring service for AWS cloud resources and applications you run on AWS. Amongst other things it allows to create event rules that watch service events and trigger actions on target services. In this case we are going to watch changes in CodeCommit repository and link that to the Start build action on CodeBuild.

Creating the Rule

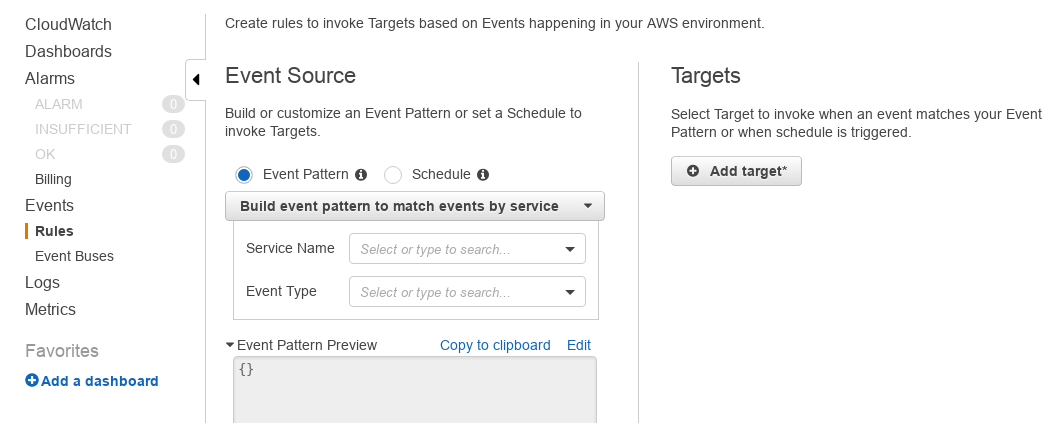
First, we need to go to CloudWatch console, to get there, select Services from the top menu, then under Management Tools, select CloudWatch. Once there, select Rules from the left hand side menu, under Events category.

Configure the Event source

We'll see two panes, the left hand side is for the event source, the right one is to choose the target of our rule.

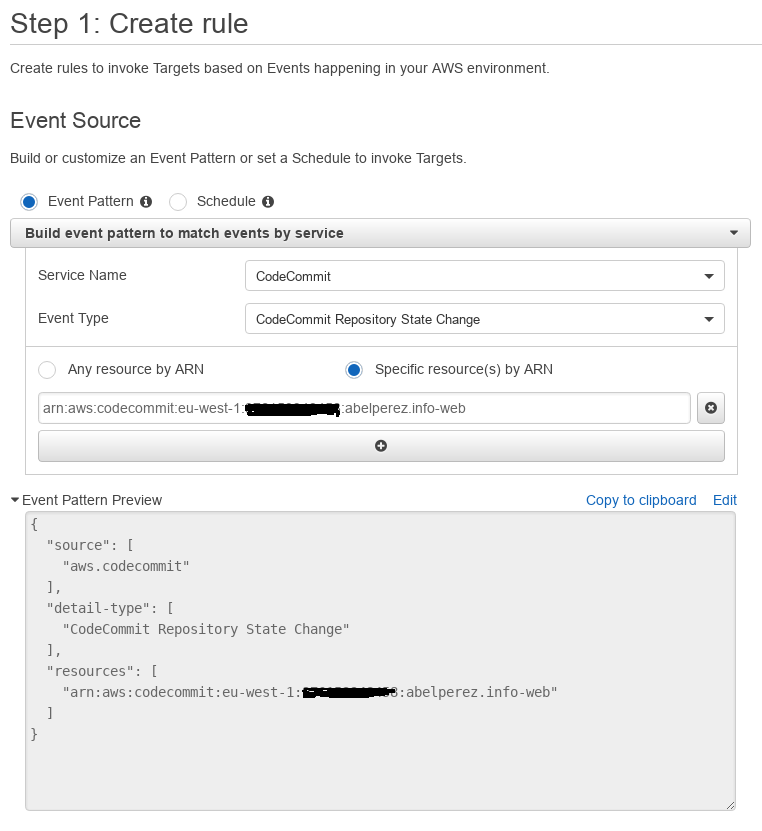
On the left side, select Event Pattern radio button option (default one), next from the drop down menu, select Events by Service. For Service Name, find the option corresponding to CodeCommit and Event Type CodeCommit Repository State Change.

Since we are only interested in the changes of the repository we previously created, select Specific resource(s) by ARN radio button option. Then, enter the ARN of the corresponding CodeCommit repository, which can be found by going to Settings in CodeCommit console. It should be something like arn:aws:codecommit:eu-west-1:111111111111:abelperez.info-web.

Configure the Target

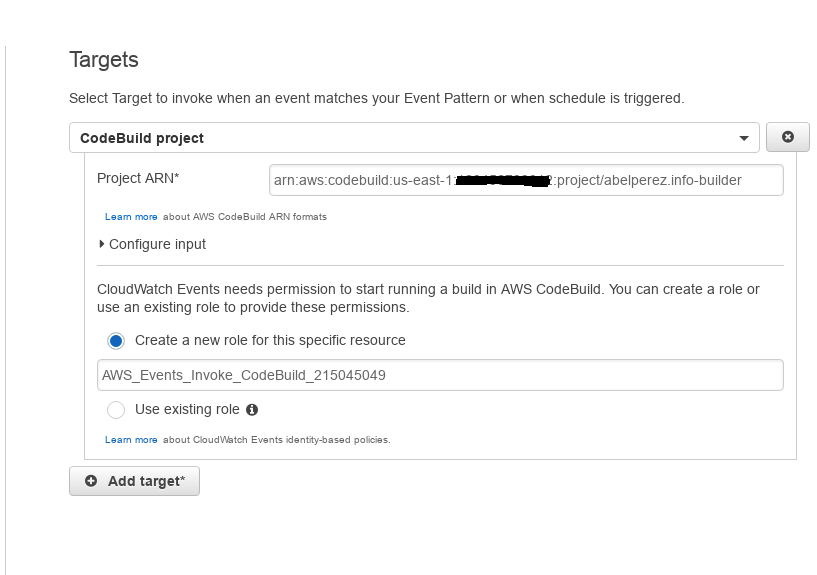
On the right side, click Add Target, then from the drop down menu, select CodeBuild project. A new form is displayed where we need to enter the project ARN, this is a bit tricky because for some reason, CodeBuild console doesn't show this information. Head to ARN namespaces documentation page and find CodeBuild, the format will be something like arn:aws:codebuild:us-east-1:111111111111:project/abelperez.info-builder.

Next step is to define the role, which in this case, we'll leave as it is proposed to Create a new role for this specific resource, AWS will figure out what permissions based on the type of resource we set as target, this might not be entirely accurate in the case of Lambda as target, we'd need to edit the role and add some policy for specific access.

We skipped Configure input on purpose as no input is required to trigger the build, so no need to change that setting.

Finish the process

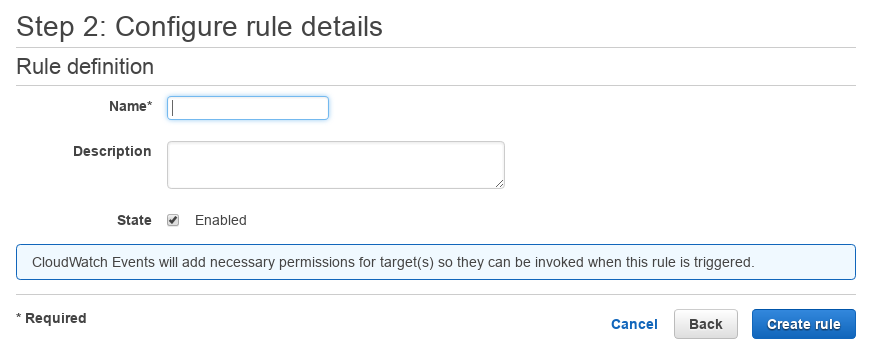
Click on Configure details to go to step 2 where the process will finish.

Enter name and optionally a description, leave State as Enabled so it will be active from the moment we create it. Click on Create rule finish the process.

Let's test it

How can we know if the rule is working as expected? Since we connected changes on CodeCommit repository with starting a build on CodeBuild, let's do some changes to our repository, for example, adding a new file index3.html

abel@ABEL-DESKTOP:~/Downloads/abelperez.info-web$ git add index3.html 
abel@ABEL-DESKTOP:~/Downloads/abelperez.info-web$ git commit -m "3rd file"
[master e953674] 3rd file
 1 file changed, 1 insertion(+)
 create mode 100644 index3.html
abel@ABEL-DESKTOP:~/Downloads/abelperez.info-web$ git push
Counting objects: 3, done.
Delta compression using up to 4 threads.
Compressing objects: 100% (2/2), done.
Writing objects: 100% (3/3), 328 bytes | 0 bytes/s, done.
Total 3 (delta 1), reused 0 (delta 0)
To ssh://git-codecommit.eu-west-1.amazonaws.com/v1/repos/abelperez.info-web
   27967c1..e953674  master -> master

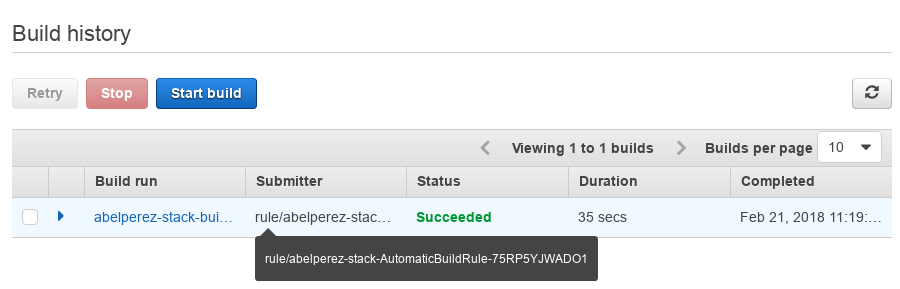
Now let's check CodeBuild console to see the build being triggered by the rule we've created

As expected, the build ran without any human intervention, which was the goal of the CloudWatch Event rule. Since the build succeeded, we can also check the existence of the new file in the bucket.

abel@ABEL-DESKTOP:~/Downloads$ aws s3 ls s3://www.abelperez.info
2018-02-21 23:19:53         18 index.html
2018-02-21 23:19:53         49 index2.html
2018-02-21 23:19:53         49 index3.html

Tuesday, 24 January 2012

Publish using MSBuild like VS2010

A few weeks ago I talked about automating the process of updating, compiling and deploying from the source code to running web application. I’ve done some improvements since then; the most relevant was to apply the web.config transformation phase. I admit it, it’s something I’ve read once at a glance and almost forgot it, in part because I didn’t understand very well on the fly. But this I really needed it and made a second review and Voilà! By the way, Great job in the book “Pro ASP.NET MVC 3 Framework” from Apress. All I needed was to invoke MSBuild with the appropriate arguments so it makes exactly the same as in the Publish Dialog from Visual Studio 2010.

After spending some time making Google-research and consequently StackOverflowing a lot, almost everybody agreed that the solution was modify the .csproj or .vbproj and include something like this:

<Target Name="PublishToFileSystem" DependsOnTargets="PipelinePreDeployCopyAllFilesToOneFolder">
    <Error Condition="'$(PublishDestination)'==''" 
 Text="The PublishDestination property must be set to the intended publishing destination." />
        <MakeDir Condition="!Exists($(PublishDestination))" 
  Directories="$(PublishDestination)" />
        <ItemGroup>
            <PublishFiles Include="$(_PackageTempDir)\**\*.*" />
        </ItemGroup>
        <Copy SourceFiles="@(PublishFiles)"
  DestinationFiles="@(PublishFiles->'$(PublishDestination)\%(RecursiveDir)%(Filename)%(Extension)')"
  SkipUnchangedFiles="True" />
</Target>
 

And invoke the MSBuild with /t: PublishToFileSystem and include in the property parameter /p: PublishDestination with the location where to put the final compiled files. Everything looks great? But there is small problem, I don’t want to modify the .csproj file, I just want to do exactly what VS2010 does when you right-click and select Publish, as I said before. I want my script to be reusable and do not have to remember in each project to include obscure XML fragments. So the quest begins.

I started to learn a little about MSBuild syntax and quickly went to the file Microsoft.WebApplication.targets, which is located very deep in MSBuild Folder but easily located by opening any .csproj file. Well, what’s inside this odd file? This file defines all target used by VS2010 when compiling or deploying a project. Since the new target defined by stackoverflow.com people depends on PipelinePreDeployCopyAllFilesToOneFolder target, I went to hunt it and I discovered vital information about the parameters that target use for to copy the files. I started the experimentation phase, and finally I lined up the stars and Voilà encore une fois! The magic combination is as follows:

The MSBuild receives a positional parameter with the .csproj, no change with it. The target as commented before is /t:PipelinePreDeployCopyAllFilesToOneFolder, the properties are /p:Configuration=Release; BuildInParallel=true; PackageAsSingleFile=False; AutoParameterizationWebConfigConnectionStrings=false. All this for the following: build in release mode, optimal settings for production server, take advantages of multi core processing, do not package as a .zip file the result and do not set replaceable garbage in web.config, this is not necessary because I don’t want to import the result with IIS wizard. Another important property is /p:IntermediateOutputPath=..\TempObjWeb\ this is specified to avoid a mysterious compilation error after a deploy, it’s something related with the web.config remains inside the project file and it can’t be parsed because it’s not inside a folder configured as virtual directory or application in IIS. The most important property is /p:_PackageTempDir= compilation target, that’s I’ve found following the trace from target to dependent target inside the Microsoft.WebApplication.targets file, when setting this property, the destination path (like the dialog in VS2010) for the compiled web elements.

Other improvements I’ve done in my script are at clean phase, this time all the temporary folders are deleted totally before the compilation begins. Continuing with the delete elements, when I copy the final compilation results (using aspnet_compiler) this time I make a smart delete excluding vital folders for specific use in my application, using the -Exclude in powershell. I also added some new parameters to promote its maintenance. I think there are still too many things to do but as I am still learning I continuously improve my toolbox. I let you the entire script code.

$aspnetcompiler = $env:SystemRoot + "\Microsoft.NET\Framework\v4.0.30319\aspnet_compiler.exe"
$msbuild = $env:SystemRoot + "\Microsoft.NET\Framework\v4.0.30319\MSBuild.exe"
$repo = "C:\Users\Administrator\Desktop\livost-repo"
$webapp = $repo + "\LivostWeb"
$webtarget = $repo + "\LivostWebPublish"
$fullcomptarget = $repo + "\WebCompiled"
$comptarget = "..\WebCompiled\"
$sitename = "IIS:\Sites\mvclivost"
$urltest = "http://localhost:8000/Home"
#$destitny = "Debug"
$destitny = "Release"

import-module .\PScommon\psake\psake.psm1
import-module .\PSCommon\WebAdministration
Set-Alias -Name ipsake -Value Invoke-psake

$old_pwd = pwd
cd $repo
hg pull
hg update

$msbuild_arg0 = $repo + "\Livost.sln"
$msbuild_arg1 = "/p:Configuration=$destitny;BuildInParallel=true"
$msbuild_arg2 = "/t:Clean"
$msbuild_arg3 = "/m"
$msbuild_arg4 = "/v:m"
$msbuild_arg5 = "/nologo"
$msbuild_arg6 = "/clp:Verbosity=minimal"
$msbuild_args = @($msbuild_arg0, $msbuild_arg1, $msbuild_arg2, $msbuild_arg3, 
$msbuild_arg4, $msbuild_arg5, $msbuild_arg6)

Write-Host "Cleaning the solution"
Write-Host "Executing $msbuild $msbuild_args"
& $msbuild $msbuild_args > out.txt

# removing temporary folders
$cleanwebtarget = $webtarget + "\*"
rm $cleanwebtarget -Force -Recurse
$cleanfullcomptarget = $fullcomptarget + "\*"
rm $cleanfullcomptarget -Force -Recurse
$cleantempobj = $repo + "\TempObjWeb\*"
rm $cleantempobj -Force -Recurse

# keep the rebuild step 
$msbuild_arg2 = "/t:Rebuild"
$msbuild_args = @($msbuild_arg0, $msbuild_arg1, $msbuild_arg2, $msbuild_arg3, 
$msbuild_arg4, $msbuild_arg5, $msbuild_arg6)

Write-Host "Rebluilding the solution"
Write-Host "Executing $msbuild $msbuild_args"
& $msbuild $msbuild_args >> out.txt


# modified here (publish instead of rebuild) this change allows to apply the 
web.config transformation 
$msbuild_arg0 = '"' + $webapp + '\LivostWeb.csproj"'
$msbuild_arg1 = "/t:PipelinePreDeployCopyAllFilesToOneFolder"
$msbuild_arg2 = "/p:Configuration=$destitny;BuildInParallel=true;
PackageAsSingleFile=False;
AutoParameterizationWebConfigConnectionStrings=false"
$msbuild_arg3 = "/p:IntermediateOutputPath=..\TempObjWeb\"
$msbuild_arg4 = "/p:_PackageTempDir=$comptarget"
$msbuild_arg5 = "/nologo"
$msbuild_arg6 = "/clp:Verbosity=minimal"
$msbuild_args = @($msbuild_arg0, $msbuild_arg1, $msbuild_arg2, $msbuild_arg3, 
$msbuild_arg4, $msbuild_arg5, $msbuild_arg6)

Write-Host "Building the Web Application"
Write-Host "Executing $msbuild $msbuild_args"
& $msbuild $msbuild_args >> out.txt

$anc_arg0 = "-v"
$anc_arg1 = "/"
$anc_arg2 = "-p"
$anc_arg3 = $fullcomptarget
$anc_arg4 = "-f"
$anc_arg5 = $webtarget
$anc_arg6 = "-c"

$asncargs = @($anc_arg0, $anc_arg1, $anc_arg2, $anc_arg3, $anc_arg4, $anc_arg5, 
$anc_arg6)

if (-not (Test-Path $webtarget)) {
    mkdir $webtarget > $null
}

Write-Host "Precompiling web application"
Write-Host "Executing $aspnetcompiler $asncargs"
& $aspnetcompiler $asncargs >> out.txt

$webSite = Get-Item $sitename

$poolName = $webSite.applicationPool
$pool = Get-Item "IIS:\AppPools\$poolName"
    
if ((Get-WebAppPoolState -Name $poolName).Value -ne "Stopped") {
    Write-Host "Stopping the Application Pool"
    $pool.Stop()
    Start-Sleep 3
}

Write-Host "Smart delete..."
$todelete = $webSite.physicalPath + "\*"
rm $todelete -Force -Recurse -Exclude @("Files","_temp_upload", "App_Data")

Write-Host "Copying files..."
$source = $webtarget + "\*"
cp $source $webSite.physicalPath -Force -Recurse

Write-Host "Waiting a few seconds..."
Start-Sleep 5
Write-Host "Starting the Application Pool"
$pool.Start()

& "${env:ProgramFiles(x86)}\Internet Explorer\iexplore.exe" $urltest

cd $old_pwd
 

Saturday, 7 January 2012

Automate source code to running web process on testing server

For those who develop web applications and share code with others developers, the process of keep up to date the test server may be a little tedious and boring, even if you have the server at one click RDP distance. Well, as an aside, I also have it, but with a slight difference in bandwidth (I use a dialup connection @ 56Kbps and the RDP window is 800x600), and believe me, this can be annoying.
The process consists in the following steps, when we (the developers) want to make a test in “production” scenario the first is commit all changes to the repository. I am using Mercurial as VCS, surprise?! I’ve set up as an IIS website following the guide found in http://stackingcode.com/blog/2011/02/24/running-a-mercurial-server-on-iis-7-5-windows-server-2008-r2 and it helped me a lot, I recommend it for the HG fans. Let’s continue, after commit all changes to the repository on the server, we’ve to pull and update the local copy there in the server. Then make a clean and rebuild the solution, and the real deploy with aspnet_compiler for to have a folder with the content fully compiled according to MSDN. The deploy continues with the IIS, go to Application Pools stop the selected Pool, copy the files to the destination folder and finally start the Pool again. Optionally you can start a web browser with the url for verify everything is ok.
As you can see there are several steps involved, and several clicks as well (remember, for me, every click in the server is like a needle ticking in the arm) how to resolve it? There are two requirements for use the solution I propose: the hg executable must be in Windows PATH and the other thing I’ve done I don’t know if It’s really necessary but it worked to me, Replace the content of “C:\Program Files (x86)\MSBuild” folder from a machine with Visual Studio installed to the server (there was something about Microsoft.target not found) I admit it, I didn’t dig in that problem, I someone can understand why that happens, comments will be welcome.
After quickly analysis of ways to do it, I decided to use PowerShell as script engine, due to its flexibility and high integration level with .NET and any Windows component.  This is how my script is done:
$aspnetcompiler = $env:SystemRoot + "\Microsoft.NET\Framework\v4.0.30319\aspnet_compiler.exe"
$msbuild = $env:SystemRoot + "\Microsoft.NET\Framework\v4.0.30319\MSBuild.exe"
$repo = "C:\Users\Administrator\Desktop\livost-repo"
$webapp = $repo + "\LivostWeb"
$webtarget = $repo + "\LivostWebPublish"
$sitename = "IIS:\Sites\Default Web Site\mvclivost"
$urltest = "http://localhost/mvclivost/Home"

These are some variables that may change between servers and projects, such as the MSBuild and aspnet_compiler location, the folder where I have the repository, web and target folders, site name.
import-module .\PScommon\psake\psake.psm1
import-module .\PSCommon\WebAdministration
Set-Alias -Name ipsake -Value Invoke-psake

These imports are taken from this guide that explains how to interact with IIS from powershell http://www.yangq.org/2011/04/09/automate-asp-net-deployment-with-powershell-install-and-update
$old_pwd = pwd
cd $repo
hg pull
hg update

Here I save the original Working directory and move to local repository directory, then pull and update, really easy.
$msbuild_arg0 = $repo + "\Livost.sln"
$msbuild_arg1 = "/p:Configuration=Release;BuildInParallel=true"
$msbuild_arg2 = "/t:Clean"
$msbuild_arg3 = "/m"
$msbuild_arg4 = "/v:m"
$msbuild_arg5 = "/nologo"
$msbuild_arg6 = "/clp:PerformanceSummary;Verbosity=minimal"
$msbuild_args = @($msbuild_arg0, $msbuild_arg1, $msbuild_arg2, $msbuild_arg3, $msbuild_arg4, $msbuild_arg5, $msbuild_arg6)

Write-Host "Cleaning the solution"
Write-Host "Executing $msbuild $msbuild_args"
& $msbuild $msbuild_args > out.txt

Here I set up the parameters for clean and write to the output properly what’s going on and to a file the text waterfall with all msbuild details.
$msbuild_arg2 = "/t:Rebuild"
$msbuild_args = @($msbuild_arg0, $msbuild_arg1, $msbuild_arg2, $msbuild_arg3, $msbuild_arg4, $msbuild_arg5, $msbuild_arg6)

Write-Host "Rebluilding the solution"
Write-Host "Executing $msbuild $msbuild_args"
& $msbuild $msbuild_args >> out.txt

The same for rebuild the solution after to have cleaned up old compiled files.
$anc_arg0 = "-v"
$anc_arg1 = "/"
$anc_arg2 = "-p"
$anc_arg3 = $webapp
$anc_arg4 = "-f"
$anc_arg5 = $webtarget
$anc_arg6 = "-c"

$asncargs = @($anc_arg0, $anc_arg1, $anc_arg2, $anc_arg3, $anc_arg4, $anc_arg5, $anc_arg6)

if (-not (Test-Path $webtarget)) {
    mkdir $webtarget > $null
}

Write-Host "Precompiling web application"
Write-Host "Executing $aspnetcompiler $asncargs"
& $aspnetcompiler $asncargs >> out.txt

Setting up the parameters for aspnet_compiler, for me this was the hardest part; there are so many arguments combinations to try! But finally I got it, I also ensure that the target folder exists before proceed with precompilation.
$webSite = Get-Item $sitename

$poolName = $webSite.applicationPool
$pool = Get-Item "IIS:\AppPools\$poolName"
   
if ((Get-WebAppPoolState -Name $poolName).Value -ne "Stopped") {
    Write-Host "Stopping the Application Pool"
    $pool.Stop()
}

Write-Host "Copying files..."
$source = $webtarget + "\*"
cp $source $webSite.physicalPath -Force -Recurse

Write-Host "Waiting a few seconds..."
Start-Sleep 5
Write-Host "Starting the Application Pool"
$pool.Start()

As I mentioned before I’ve taken from that fellow’s blog, here is when I interact with IIS, first I grab the AppPool object by its name and if it isn’t stopped then stop it. After that copy everything to the target physicalpath and wait about 5 seconds, why? Sometimes these steps may be executed too fast and the services stay in an “irregular state” such as starting-up or stopping and at this stage the services control doesn’t receive control messages, such as start or stop, at least this is what Microsoft says in the documentation for the error I receive sometimes if I don’t wait these few seconds.
& "${env:ProgramFiles(x86)}\Internet Explorer\iexplore.exe" $urltest

cd $old_pwd

And finally start a new instance of Internet Explorer for verify everything is ok and the ASP.NET makes its first and long runtime compilation with me and any other bad lucky guy.
Now, how to use it, in the server must be allowed the scripts execution, this can be done using a powershell console as administrator, then type ‘Set-Executionpolicy remotesigned’, in the example I’ve put a run.cmd with this text ‘powershell -command ./automate.ps1’ where this informs to powershell to execute the script. Important this script must be run with administrator privileges because of its interaction with IIS. Maybe you have to modify the content of run.cmd and instead of ./automate.ps1 to make a cd to the folder where the script is and then execute it as before. This occurs because when you execute a cmd as administrator the current directory is changed automatically and mysteriously to C:\Windows\system32. I hope this post to be useful to you, till the next!