Showing posts with label powershell. Show all posts

Thursday, 26 July 2018

How to push Windows and IIS logs to CloudWatch using unified CloudWatch Agent automatically

CloudWatch is a powerful monitoring and management tool, collects monitoring and operational data in the form of logs, metrics, and events, providing you with a unified view of AWS resources. One of the most common use cases is collecting logs from web applications.

Log files are generated locally in the form of text files and some running process monitor them and then decide where to send them. This is usually performed by the SSM Agent, however, as per AWS documents:

"Important The unified CloudWatch Agent has replaced SSM Agent as the tool for sending log data to Amazon CloudWatch Logs. Support for using SSM Agent to send log data will be deprecated in the near future. We recommend that you begin using the unified CloudWatch Agent for your log collection processes as soon as possible."

Assigning permissions to EC2 instances

EC2 instances need permission to access CloudWatch logs, if your current instances don’t have any roles associated, then create one with the CloudWatchAgentServerPolicy managed policy attached.

If your instances already have a role then you can add the policy to the existing role. In either case, the instance needs to perform operations such as CreateLogGroup, CreateLogStream, PutLogEvents and so on.

Install the CloudWatch Agent

On Windows Server, the installation process consists of three basic steps:

  1. Download the package from https://s3.amazonaws.com/amazoncloudwatch-agent/windows/amd64/latest/AmazonCloudWatchAgent.zip
  2. Unzip to a local folder
  3. Change directory to the folder containing unzipped package and run install.ps1

For more information about how to install the agent, see AWS documents.

Here is a powershell snippet to automate this process.

# Install the CloudWatch Agent
$zipfile = "AmazonCloudWatchAgent.zip"
$tempDir = Join-Path $env:TEMP "AmazonCloudWatchAgent"
Invoke-WebRequest -Uri "https://s3.amazonaws.com/amazoncloudwatch-agent/windows/amd64/latest/AmazonCloudWatchAgent.zip" -OutFile $zipfile
Expand-Archive -Path $zipfile -DestinationPath $tempDir -Force
cd $tempDir
Write-Host "Trying to uninstall any previous version of CloudWatch Agent"
.\uninstall.ps1

Write-Host "install the new version of CloudWatch Agent"
.\install.ps1

Creating configuration file

Before launching the agent, a configuration file is required, this configuration file can seem daunting at first, especially because it’s a different format from one used in SSM Agent. This configuration file contain three sections: agent, metrics and logs.

In this case, we are interested only in section logs which in turn has two main parts: windows_events (system or application events we can find in Windows Event Viewer) and files (any log files including IIS logs).

There are two common parameters required:

  • log_group_name - Used in CloudWatch to identify a log group, it should be something meaningful such as the event type or website name.
  • log_stream_name - Used in CloudWatch to identify a log stream within a log group, typically it’s a reference to the current EC2 instance.

Collecting Windows Events

Here is an example of a Windows Event log

{
    "event_levels": ["ERROR","INFORMATION"],
    "log_group_name": "/eventlog/application",
    "event_format": "text",
    "log_stream_name": "EC2AMAZ-NPQGPRK",
    "event_name": "Application"
}

Key points:

  • event_levels can be one or more of (INFORMATION, WARNING, ERROR, CRITICAL,VERBOSE).
  • event_name is typically one of (System, Security, Application)
  • event_format is text or xml.

Collecting IIS logs

Here is an example of an IIS website logs

{
    "log_group_name": "/iis/website1",
    "timezone": "UTC",
    "timestamp_format": "%Y-%m-%d %H:%M:%S",
    "encoding": "utf-8",
    "log_stream_name": "EC2AMAZ-NPQGPRK",
    "file_path": "C:\\inetpub\\logs\\LogFiles\\W3SVC2\\*.log"
}

Key points:

  • timezone and timestamp_format are optional.
  • encoding defaults to utf-8
  • file_path uses the standard Unix glob matching rules to match files, while all the examples in AWS docs display concrete log files, the example above matches all .log files within IIS logs folder, this is important since IIS create new files based on a rotation and we can’t predict their names.

These sections can be repeated for every website and for every Windows Event we’d like to push logs to CloudWatch. If we have several EC2 instances as web servers, this process can be tedious and error prone, therefore it should be automated. Here is an example of a powershell snippet.

$windowsLogs = @("Application", "System", "Security")
$windowsLoglevel = @("ERROR", "INFORMATION")
$instance = hostname

$iissites = Get-Website | Where-Object {$_.Name -ne "Default Web Site"}

$iislogs = @()
foreach ($site in $iissites) {
    $iislog = @{
        file_path = "$($site.logFile.directory)\w3svc$($site.id)\*.log"
        log_group_name = "/iis/$($site.Name.ToLower())"
        log_stream_name = $instance
        timestamp_format = "%Y-%m-%d %H:%M:%S"
        timezone = "UTC"
        encoding = "utf-8"
    }
    $iislogs += $iislog
}

$winlogs = @()
foreach ($event in $windowsLogs) {
    $winlog = @{
        event_name = $event
        event_levels = $windowsLoglevel
        event_format ="text"
        log_group_name = "/eventlog/$($event.ToLower())"
        log_stream_name = $instance
    }
    $winlogs += $winlog
}

$config = @{
    logs = @{
        logs_collected = @{
            files = @{
                collect_list = $iislogs
            }
            windows_events = @{
                collect_list = $winlogs
            }
        }
        log_stream_name = "generic-logs"
    }
}

# this could be any other location as long as it’s absolute
$configfile = "C:\Users\Administrator\amazon-cloudwatch-agent.json"

$json = $config | ConvertTo-Json -Depth 6 

# Encoding oem is important as the file is required without any BOM 
$json | Out-File -Force -Encoding oem $configfile

For more information on how to create this file, see AWS documents.

Starting the agent

With the configuration file in place, it’s time to start the agent, to do that, change directory to CloudWatch Agent installation path, typically within Program Files\Amazon\AmazonCloudWatchAgent and run the following command line:

.\amazon-cloudwatch-agent-ctl.ps1 -a fetch-config -m ec2 -c file:configuration-file-path -s 

Key points:

  • -a is short for -Action, fetch-config indicates it will reload configuration file.
  • -m is short for -Mode, in this case ec2 as opposed to onPrem.
  • -c is short for -ConfigLocation which is the configuration file previously generated.
  • -s is short for -Start which indicates to start the service after loading configuration.

Here is a powershell snippet covering this part of the process.

cd "${env:ProgramFiles}\Amazon\AmazonCloudWatchAgent"
Write-Host "Starting CloudWatch Agent"
.\amazon-cloudwatch-agent-ctl.ps1 -a fetch-config -m ec2 -c file:$configfile -s

Let’s test it.

Assuming we have 3 websites running in our test EC2 instance, let’s name them.

  • website1 - hostname: web1.local
  • website2 - hostname: web2.local
  • website3 - hostname: web3.local

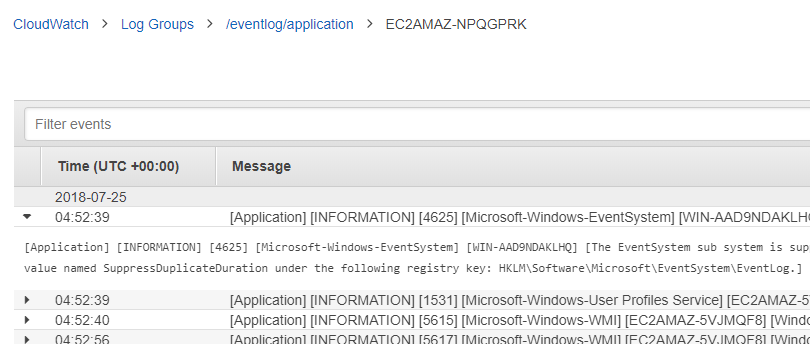
After some browsing to generate some traffic, let’s inspect CloudWatch.

Some Windows Events also in CloudWatch Logs
Here is the complete powershell script.

Tuesday, 24 January 2012

Publish using MSBuild like VS2010

A few weeks ago I talked about automating the process of updating, compiling and deploying from the source code to running web application. I’ve done some improvements since then; the most relevant was to apply the web.config transformation phase. I admit it, it’s something I’ve read once at a glance and almost forgot it, in part because I didn’t understand very well on the fly. But this I really needed it and made a second review and Voilà! By the way, Great job in the book “Pro ASP.NET MVC 3 Framework” from Apress. All I needed was to invoke MSBuild with the appropriate arguments so it makes exactly the same as in the Publish Dialog from Visual Studio 2010.

After spending some time making Google-research and consequently StackOverflowing a lot, almost everybody agreed that the solution was modify the .csproj or .vbproj and include something like this:

<Target Name="PublishToFileSystem" DependsOnTargets="PipelinePreDeployCopyAllFilesToOneFolder">
    <Error Condition="'$(PublishDestination)'==''" 
 Text="The PublishDestination property must be set to the intended publishing destination." />
        <MakeDir Condition="!Exists($(PublishDestination))" 
  Directories="$(PublishDestination)" />
        <ItemGroup>
            <PublishFiles Include="$(_PackageTempDir)\**\*.*" />
        </ItemGroup>
        <Copy SourceFiles="@(PublishFiles)"
  DestinationFiles="@(PublishFiles->'$(PublishDestination)\%(RecursiveDir)%(Filename)%(Extension)')"
  SkipUnchangedFiles="True" />
</Target>
 

And invoke the MSBuild with /t: PublishToFileSystem and include in the property parameter /p: PublishDestination with the location where to put the final compiled files. Everything looks great? But there is small problem, I don’t want to modify the .csproj file, I just want to do exactly what VS2010 does when you right-click and select Publish, as I said before. I want my script to be reusable and do not have to remember in each project to include obscure XML fragments. So the quest begins.

I started to learn a little about MSBuild syntax and quickly went to the file Microsoft.WebApplication.targets, which is located very deep in MSBuild Folder but easily located by opening any .csproj file. Well, what’s inside this odd file? This file defines all target used by VS2010 when compiling or deploying a project. Since the new target defined by stackoverflow.com people depends on PipelinePreDeployCopyAllFilesToOneFolder target, I went to hunt it and I discovered vital information about the parameters that target use for to copy the files. I started the experimentation phase, and finally I lined up the stars and Voilà encore une fois! The magic combination is as follows:

The MSBuild receives a positional parameter with the .csproj, no change with it. The target as commented before is /t:PipelinePreDeployCopyAllFilesToOneFolder, the properties are /p:Configuration=Release; BuildInParallel=true; PackageAsSingleFile=False; AutoParameterizationWebConfigConnectionStrings=false. All this for the following: build in release mode, optimal settings for production server, take advantages of multi core processing, do not package as a .zip file the result and do not set replaceable garbage in web.config, this is not necessary because I don’t want to import the result with IIS wizard. Another important property is /p:IntermediateOutputPath=..\TempObjWeb\ this is specified to avoid a mysterious compilation error after a deploy, it’s something related with the web.config remains inside the project file and it can’t be parsed because it’s not inside a folder configured as virtual directory or application in IIS. The most important property is /p:_PackageTempDir= compilation target, that’s I’ve found following the trace from target to dependent target inside the Microsoft.WebApplication.targets file, when setting this property, the destination path (like the dialog in VS2010) for the compiled web elements.

Other improvements I’ve done in my script are at clean phase, this time all the temporary folders are deleted totally before the compilation begins. Continuing with the delete elements, when I copy the final compilation results (using aspnet_compiler) this time I make a smart delete excluding vital folders for specific use in my application, using the -Exclude in powershell. I also added some new parameters to promote its maintenance. I think there are still too many things to do but as I am still learning I continuously improve my toolbox. I let you the entire script code.

$aspnetcompiler = $env:SystemRoot + "\Microsoft.NET\Framework\v4.0.30319\aspnet_compiler.exe"
$msbuild = $env:SystemRoot + "\Microsoft.NET\Framework\v4.0.30319\MSBuild.exe"
$repo = "C:\Users\Administrator\Desktop\livost-repo"
$webapp = $repo + "\LivostWeb"
$webtarget = $repo + "\LivostWebPublish"
$fullcomptarget = $repo + "\WebCompiled"
$comptarget = "..\WebCompiled\"
$sitename = "IIS:\Sites\mvclivost"
$urltest = "http://localhost:8000/Home"
#$destitny = "Debug"
$destitny = "Release"

import-module .\PScommon\psake\psake.psm1
import-module .\PSCommon\WebAdministration
Set-Alias -Name ipsake -Value Invoke-psake

$old_pwd = pwd
cd $repo
hg pull
hg update

$msbuild_arg0 = $repo + "\Livost.sln"
$msbuild_arg1 = "/p:Configuration=$destitny;BuildInParallel=true"
$msbuild_arg2 = "/t:Clean"
$msbuild_arg3 = "/m"
$msbuild_arg4 = "/v:m"
$msbuild_arg5 = "/nologo"
$msbuild_arg6 = "/clp:Verbosity=minimal"
$msbuild_args = @($msbuild_arg0, $msbuild_arg1, $msbuild_arg2, $msbuild_arg3, 
$msbuild_arg4, $msbuild_arg5, $msbuild_arg6)

Write-Host "Cleaning the solution"
Write-Host "Executing $msbuild $msbuild_args"
& $msbuild $msbuild_args > out.txt

# removing temporary folders
$cleanwebtarget = $webtarget + "\*"
rm $cleanwebtarget -Force -Recurse
$cleanfullcomptarget = $fullcomptarget + "\*"
rm $cleanfullcomptarget -Force -Recurse
$cleantempobj = $repo + "\TempObjWeb\*"
rm $cleantempobj -Force -Recurse

# keep the rebuild step 
$msbuild_arg2 = "/t:Rebuild"
$msbuild_args = @($msbuild_arg0, $msbuild_arg1, $msbuild_arg2, $msbuild_arg3, 
$msbuild_arg4, $msbuild_arg5, $msbuild_arg6)

Write-Host "Rebluilding the solution"
Write-Host "Executing $msbuild $msbuild_args"
& $msbuild $msbuild_args >> out.txt


# modified here (publish instead of rebuild) this change allows to apply the 
web.config transformation 
$msbuild_arg0 = '"' + $webapp + '\LivostWeb.csproj"'
$msbuild_arg1 = "/t:PipelinePreDeployCopyAllFilesToOneFolder"
$msbuild_arg2 = "/p:Configuration=$destitny;BuildInParallel=true;
PackageAsSingleFile=False;
AutoParameterizationWebConfigConnectionStrings=false"
$msbuild_arg3 = "/p:IntermediateOutputPath=..\TempObjWeb\"
$msbuild_arg4 = "/p:_PackageTempDir=$comptarget"
$msbuild_arg5 = "/nologo"
$msbuild_arg6 = "/clp:Verbosity=minimal"
$msbuild_args = @($msbuild_arg0, $msbuild_arg1, $msbuild_arg2, $msbuild_arg3, 
$msbuild_arg4, $msbuild_arg5, $msbuild_arg6)

Write-Host "Building the Web Application"
Write-Host "Executing $msbuild $msbuild_args"
& $msbuild $msbuild_args >> out.txt

$anc_arg0 = "-v"
$anc_arg1 = "/"
$anc_arg2 = "-p"
$anc_arg3 = $fullcomptarget
$anc_arg4 = "-f"
$anc_arg5 = $webtarget
$anc_arg6 = "-c"

$asncargs = @($anc_arg0, $anc_arg1, $anc_arg2, $anc_arg3, $anc_arg4, $anc_arg5, 
$anc_arg6)

if (-not (Test-Path $webtarget)) {
    mkdir $webtarget > $null
}

Write-Host "Precompiling web application"
Write-Host "Executing $aspnetcompiler $asncargs"
& $aspnetcompiler $asncargs >> out.txt

$webSite = Get-Item $sitename

$poolName = $webSite.applicationPool
$pool = Get-Item "IIS:\AppPools\$poolName"
    
if ((Get-WebAppPoolState -Name $poolName).Value -ne "Stopped") {
    Write-Host "Stopping the Application Pool"
    $pool.Stop()
    Start-Sleep 3
}

Write-Host "Smart delete..."
$todelete = $webSite.physicalPath + "\*"
rm $todelete -Force -Recurse -Exclude @("Files","_temp_upload", "App_Data")

Write-Host "Copying files..."
$source = $webtarget + "\*"
cp $source $webSite.physicalPath -Force -Recurse

Write-Host "Waiting a few seconds..."
Start-Sleep 5
Write-Host "Starting the Application Pool"
$pool.Start()

& "${env:ProgramFiles(x86)}\Internet Explorer\iexplore.exe" $urltest

cd $old_pwd
 

Saturday, 7 January 2012

Automate source code to running web process on testing server

For those who develop web applications and share code with others developers, the process of keep up to date the test server may be a little tedious and boring, even if you have the server at one click RDP distance. Well, as an aside, I also have it, but with a slight difference in bandwidth (I use a dialup connection @ 56Kbps and the RDP window is 800x600), and believe me, this can be annoying.
The process consists in the following steps, when we (the developers) want to make a test in “production” scenario the first is commit all changes to the repository. I am using Mercurial as VCS, surprise?! I’ve set up as an IIS website following the guide found in http://stackingcode.com/blog/2011/02/24/running-a-mercurial-server-on-iis-7-5-windows-server-2008-r2 and it helped me a lot, I recommend it for the HG fans. Let’s continue, after commit all changes to the repository on the server, we’ve to pull and update the local copy there in the server. Then make a clean and rebuild the solution, and the real deploy with aspnet_compiler for to have a folder with the content fully compiled according to MSDN. The deploy continues with the IIS, go to Application Pools stop the selected Pool, copy the files to the destination folder and finally start the Pool again. Optionally you can start a web browser with the url for verify everything is ok.
As you can see there are several steps involved, and several clicks as well (remember, for me, every click in the server is like a needle ticking in the arm) how to resolve it? There are two requirements for use the solution I propose: the hg executable must be in Windows PATH and the other thing I’ve done I don’t know if It’s really necessary but it worked to me, Replace the content of “C:\Program Files (x86)\MSBuild” folder from a machine with Visual Studio installed to the server (there was something about Microsoft.target not found) I admit it, I didn’t dig in that problem, I someone can understand why that happens, comments will be welcome.
After quickly analysis of ways to do it, I decided to use PowerShell as script engine, due to its flexibility and high integration level with .NET and any Windows component.  This is how my script is done:
$aspnetcompiler = $env:SystemRoot + "\Microsoft.NET\Framework\v4.0.30319\aspnet_compiler.exe"
$msbuild = $env:SystemRoot + "\Microsoft.NET\Framework\v4.0.30319\MSBuild.exe"
$repo = "C:\Users\Administrator\Desktop\livost-repo"
$webapp = $repo + "\LivostWeb"
$webtarget = $repo + "\LivostWebPublish"
$sitename = "IIS:\Sites\Default Web Site\mvclivost"
$urltest = "http://localhost/mvclivost/Home"

These are some variables that may change between servers and projects, such as the MSBuild and aspnet_compiler location, the folder where I have the repository, web and target folders, site name.
import-module .\PScommon\psake\psake.psm1
import-module .\PSCommon\WebAdministration
Set-Alias -Name ipsake -Value Invoke-psake

These imports are taken from this guide that explains how to interact with IIS from powershell http://www.yangq.org/2011/04/09/automate-asp-net-deployment-with-powershell-install-and-update
$old_pwd = pwd
cd $repo
hg pull
hg update

Here I save the original Working directory and move to local repository directory, then pull and update, really easy.
$msbuild_arg0 = $repo + "\Livost.sln"
$msbuild_arg1 = "/p:Configuration=Release;BuildInParallel=true"
$msbuild_arg2 = "/t:Clean"
$msbuild_arg3 = "/m"
$msbuild_arg4 = "/v:m"
$msbuild_arg5 = "/nologo"
$msbuild_arg6 = "/clp:PerformanceSummary;Verbosity=minimal"
$msbuild_args = @($msbuild_arg0, $msbuild_arg1, $msbuild_arg2, $msbuild_arg3, $msbuild_arg4, $msbuild_arg5, $msbuild_arg6)

Write-Host "Cleaning the solution"
Write-Host "Executing $msbuild $msbuild_args"
& $msbuild $msbuild_args > out.txt

Here I set up the parameters for clean and write to the output properly what’s going on and to a file the text waterfall with all msbuild details.
$msbuild_arg2 = "/t:Rebuild"
$msbuild_args = @($msbuild_arg0, $msbuild_arg1, $msbuild_arg2, $msbuild_arg3, $msbuild_arg4, $msbuild_arg5, $msbuild_arg6)

Write-Host "Rebluilding the solution"
Write-Host "Executing $msbuild $msbuild_args"
& $msbuild $msbuild_args >> out.txt

The same for rebuild the solution after to have cleaned up old compiled files.
$anc_arg0 = "-v"
$anc_arg1 = "/"
$anc_arg2 = "-p"
$anc_arg3 = $webapp
$anc_arg4 = "-f"
$anc_arg5 = $webtarget
$anc_arg6 = "-c"

$asncargs = @($anc_arg0, $anc_arg1, $anc_arg2, $anc_arg3, $anc_arg4, $anc_arg5, $anc_arg6)

if (-not (Test-Path $webtarget)) {
    mkdir $webtarget > $null
}

Write-Host "Precompiling web application"
Write-Host "Executing $aspnetcompiler $asncargs"
& $aspnetcompiler $asncargs >> out.txt

Setting up the parameters for aspnet_compiler, for me this was the hardest part; there are so many arguments combinations to try! But finally I got it, I also ensure that the target folder exists before proceed with precompilation.
$webSite = Get-Item $sitename

$poolName = $webSite.applicationPool
$pool = Get-Item "IIS:\AppPools\$poolName"
   
if ((Get-WebAppPoolState -Name $poolName).Value -ne "Stopped") {
    Write-Host "Stopping the Application Pool"
    $pool.Stop()
}

Write-Host "Copying files..."
$source = $webtarget + "\*"
cp $source $webSite.physicalPath -Force -Recurse

Write-Host "Waiting a few seconds..."
Start-Sleep 5
Write-Host "Starting the Application Pool"
$pool.Start()

As I mentioned before I’ve taken from that fellow’s blog, here is when I interact with IIS, first I grab the AppPool object by its name and if it isn’t stopped then stop it. After that copy everything to the target physicalpath and wait about 5 seconds, why? Sometimes these steps may be executed too fast and the services stay in an “irregular state” such as starting-up or stopping and at this stage the services control doesn’t receive control messages, such as start or stop, at least this is what Microsoft says in the documentation for the error I receive sometimes if I don’t wait these few seconds.
& "${env:ProgramFiles(x86)}\Internet Explorer\iexplore.exe" $urltest

cd $old_pwd

And finally start a new instance of Internet Explorer for verify everything is ok and the ASP.NET makes its first and long runtime compilation with me and any other bad lucky guy.
Now, how to use it, in the server must be allowed the scripts execution, this can be done using a powershell console as administrator, then type ‘Set-Executionpolicy remotesigned’, in the example I’ve put a run.cmd with this text ‘powershell -command ./automate.ps1’ where this informs to powershell to execute the script. Important this script must be run with administrator privileges because of its interaction with IIS. Maybe you have to modify the content of run.cmd and instead of ./automate.ps1 to make a cd to the folder where the script is and then execute it as before. This occurs because when you execute a cmd as administrator the current directory is changed automatically and mysteriously to C:\Windows\system32. I hope this post to be useful to you, till the next!