Monday 30 April 2018

Using Lambda@Edge to reduce infrastructure complexity

In my previous series I went through the process of creating the cloud resources to host a static website as well as the development pipeline to automate the process from push code in source control to deploy on a S3 bucket.

One of the challenges was how to approach the www to non-www redirection, the proposed solution consisted of duplicating the CloudFront distributions and the S3 website buckets in order to get the traffic end to end, the reason why I took this approach was because CloudFront doesn't have (to the best of my knowledge at the time) the ability to issue redirect, instead it just pass traffic to different origins based on configuration.

What is Lamda@Edge ?

Well, I was wrong, there is in fact a way to make CloudFront to issue redirects, it's called Lambda@Edge, a special flavour of Lambda functions that are executed on Edge locations and therefore closer to the end user. It allows a lot more than just issuing HTTP redirects.

In practice this means we can intercept any of the four events that happen when the user request a page to CloudFront and execute our Lambda code.

  • After CloudFront receives a request from a viewer (viewer request)
  • Before CloudFront forwards the request to the origin (origin request)
  • After CloudFront receives the response from the origin (origin response)
  • Before CloudFront forwards the response to the viewer (viewer response)

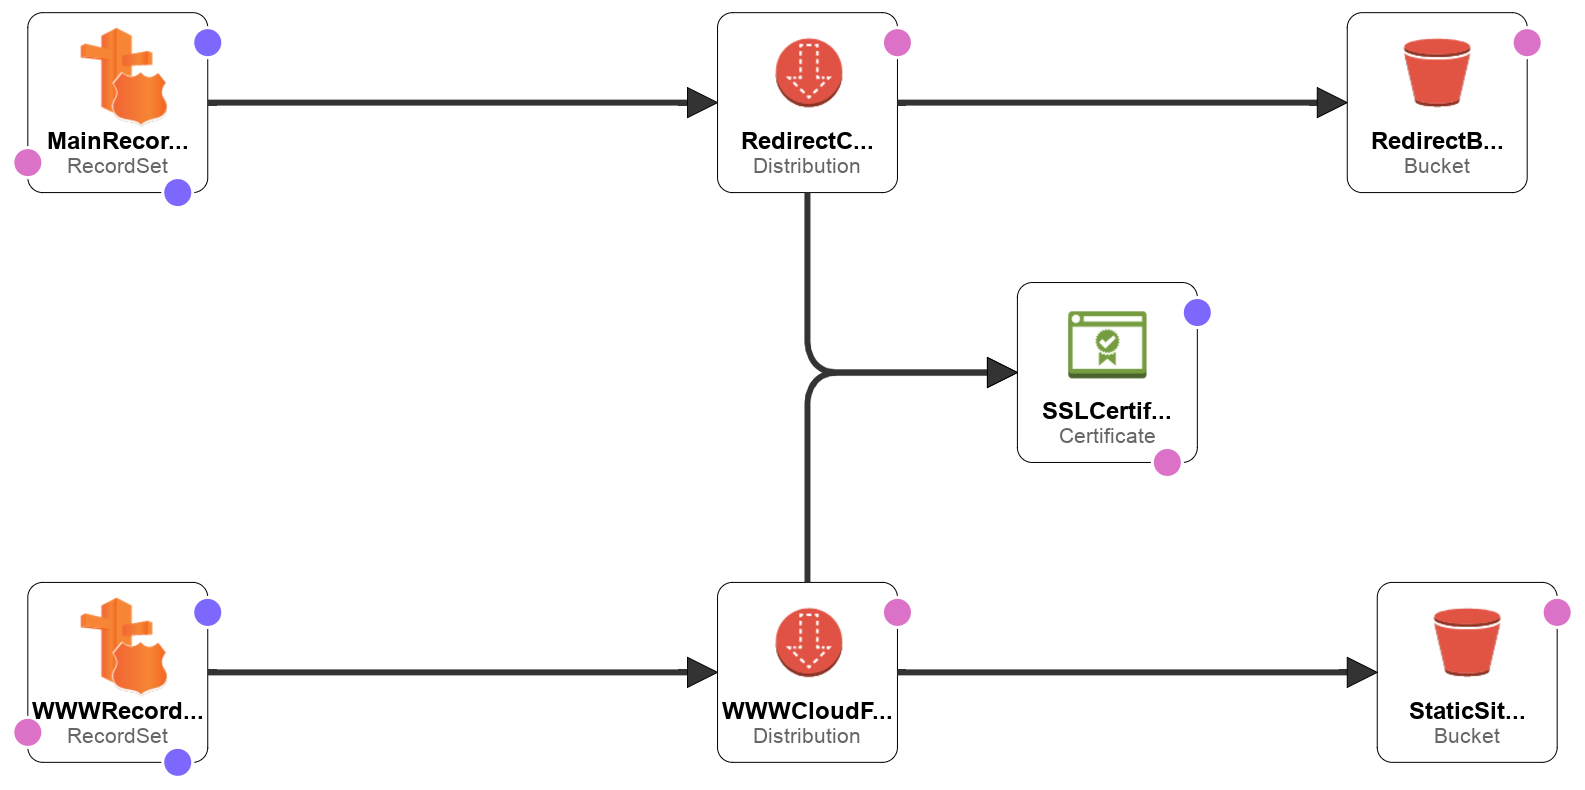
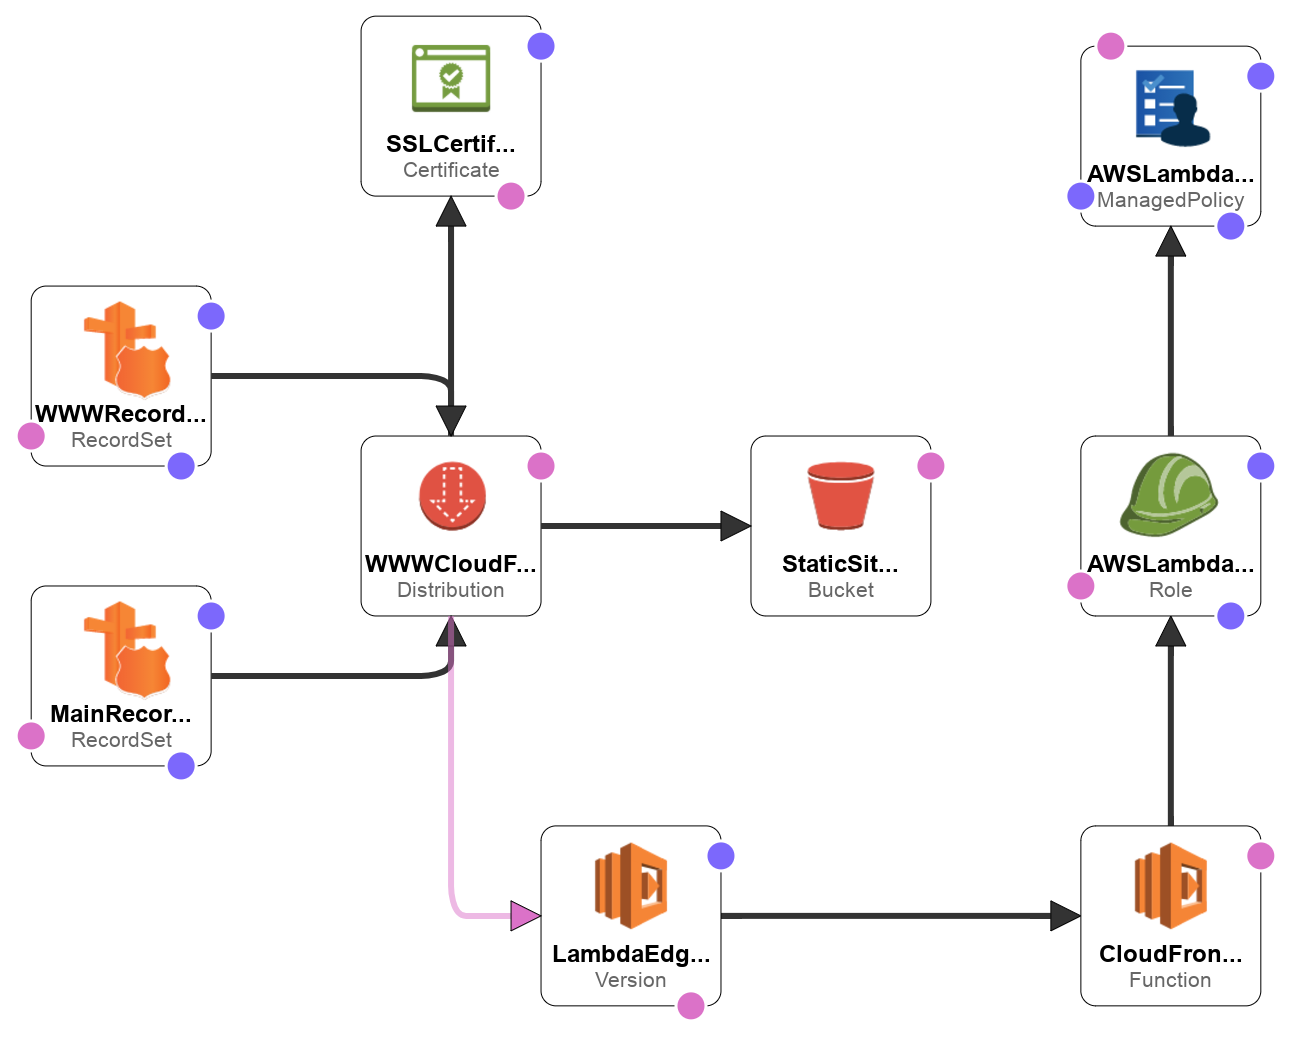
In this post, we're going to leverage Lambda@Edge to create another variation of the same infrastructure by using hooking our Lambda function to Viewer Request event, it will look like this one when finished.

How does it change from previous approach?

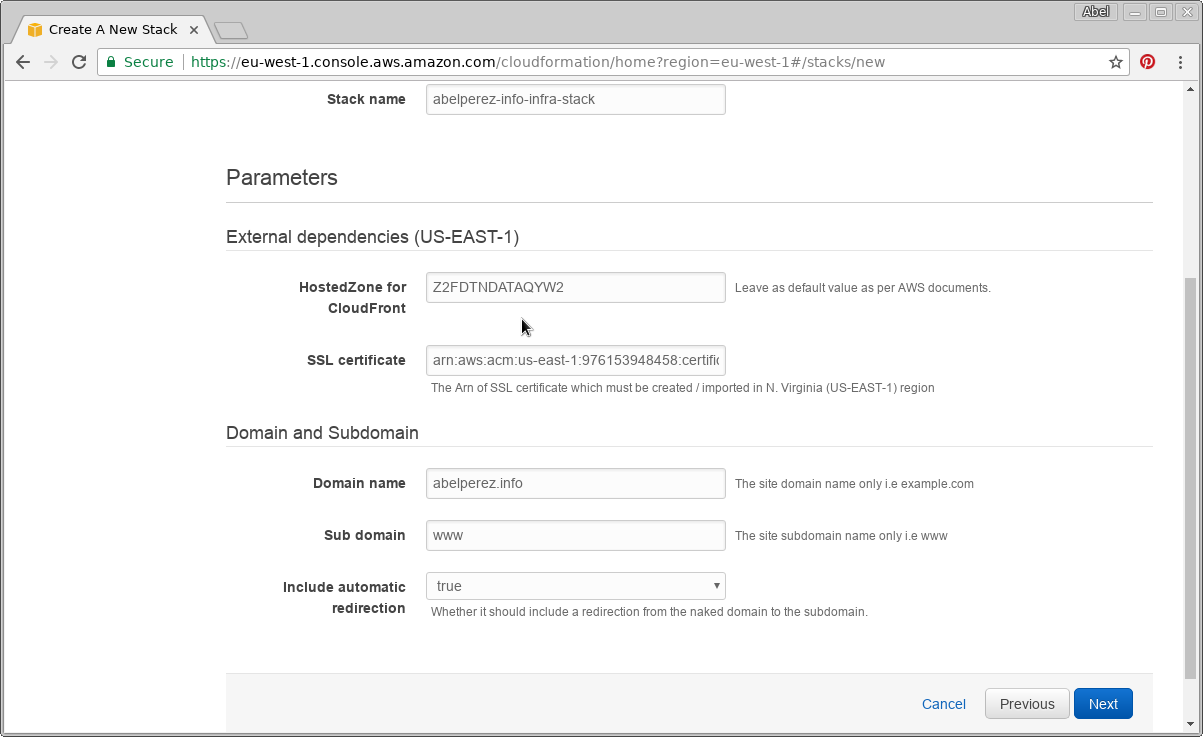
This time we still need two Route 53 record sets, because we're still handling both abelperez.info and www.abelperez.info.

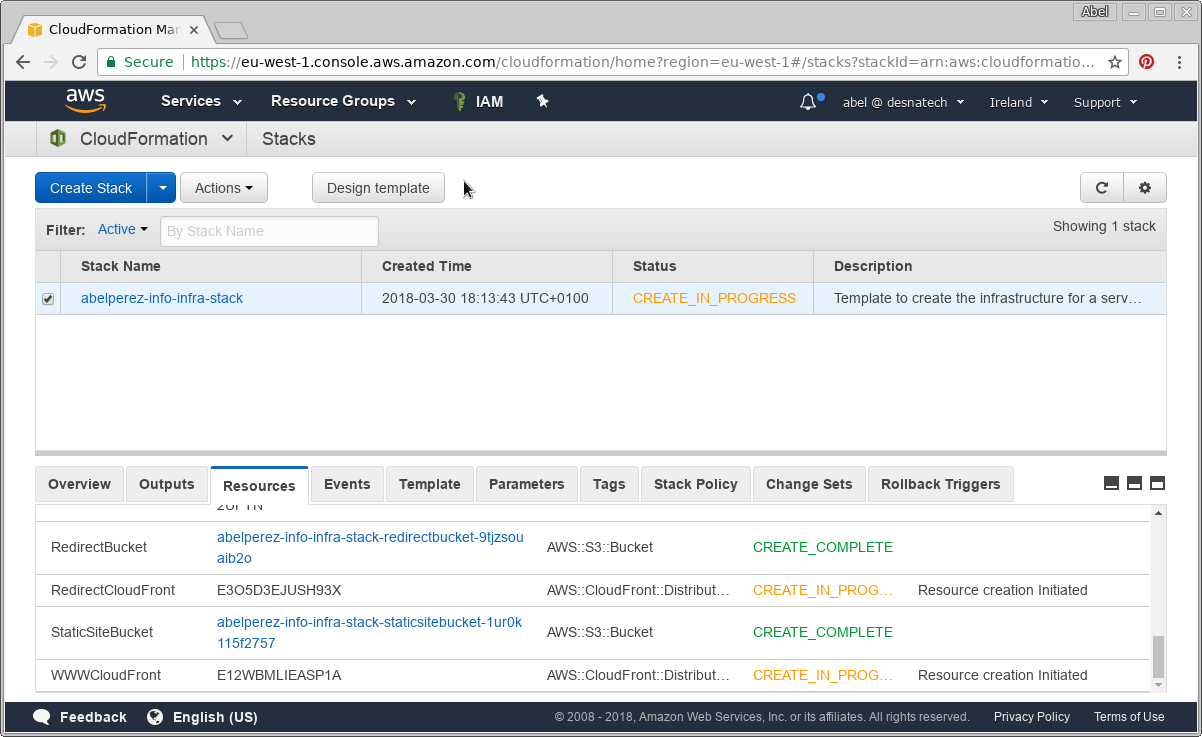
We need only one S3 bucket, since redirection will be issued by Lambda@Edge, so no need for Redirection Bucket resource.

We need only one CloudFront distribution as there a single origin, but this time the CloudFront distribution will have two CNAMEs in order to handle both www and non-www. We'll also link the lambda function with the event as part of default cache behaviour.

Finally we need to create a Lambda function to performs the redirection when necessary.

Creating Lambda@Edge function

Creating a Lambda@Edge function is not too far from creating an ordinary Lambda function, but we need to be aware of some limitations (at least at the moment of writing), they need to be created only in N. Virginia (US-East-1) region and the available runtime is NodeJs 6.10.

Following the steps from AWS CloudFront Developer Guide, you can create your own Lambda@Edge function and connect it to a CloudFront distribution. Here are some of my highlights:

  • Be aware of the required permissions, telling Lambda to create the role is handy.
  • Remove triggers before creating the function as it can take longer to replicate
  • You need to publish a version of the function before associating with any trigger.

The code I used is very simple, it only reads host header from the request and verify if it's equal to 'abelperez.info' to send a custom response with a HTTP 301 redirection to www domain host, in any other case, it just let it pass ignoring the request, therefore CloudFront will proceed with the request life cycle.

exports.handler = function(event, context, callback) {
  const request = event.Records[0].cf.request;
  const headers = request.headers;
  const host = headers.host[0].value;
  if (host !== 'abelperez.info') {
      callback(null, request);
      return;
  }
  const response = {
      status: '301',
      statusDescription: 'Moved Permanently',
      headers: {
          location: [{
              key: 'Location',
              value: 'https://www.abelperez.info',
          }],
      },
  };
  callback(null, response);
};

Adding the triggers

Once we have created and published the Lambda fuction, it's time to add the trigger, in this case it's CloudFront and we need to provide the CloudFront distribution Id and select the event type which is viewer-request as stated above.

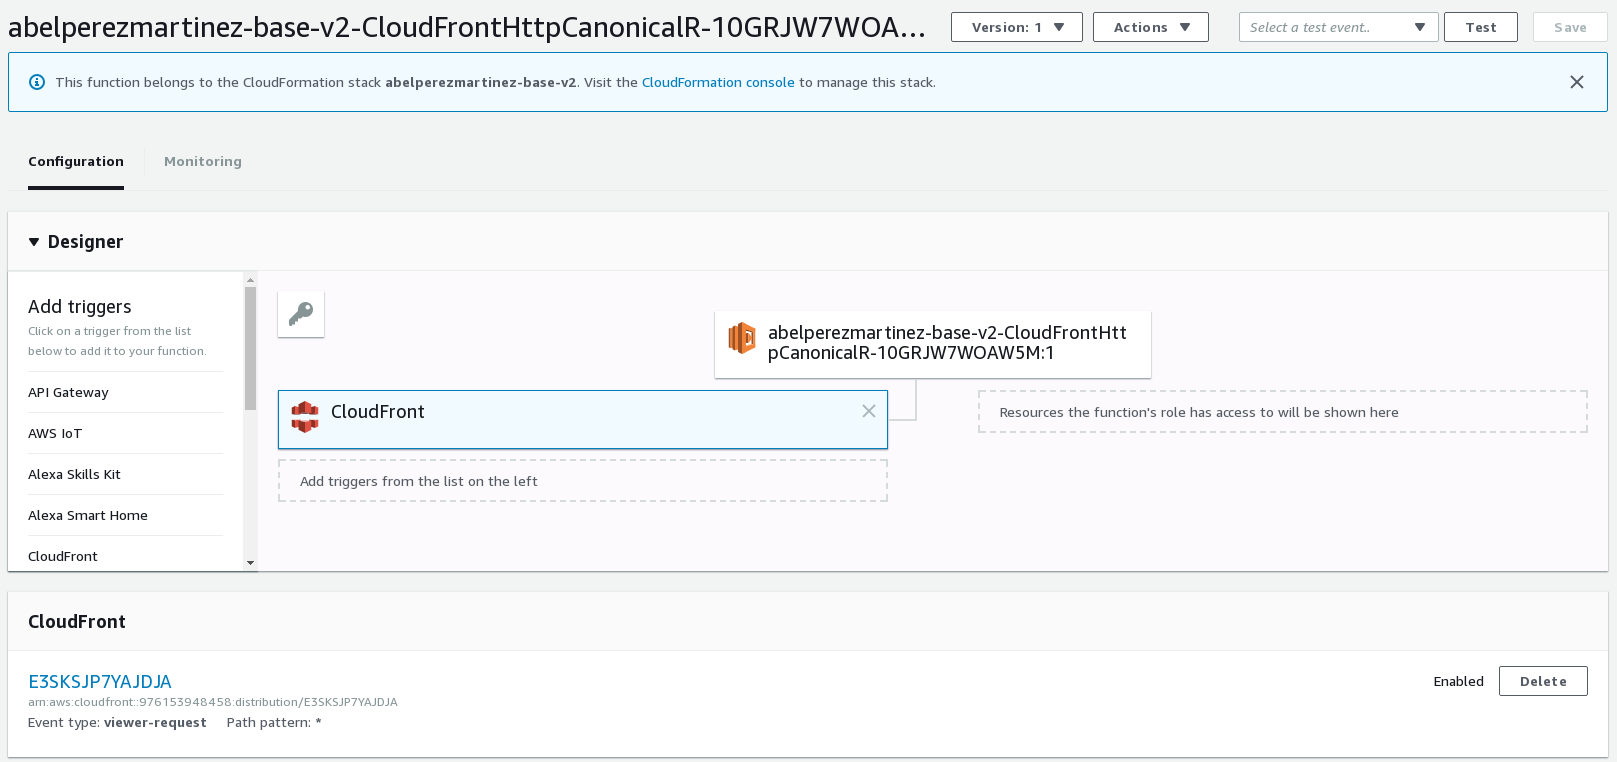
From this point, we've just created a Lambda@Edge function!

Let's test it

The easiest way to test what we've done is to issue a couple of curl commands, one requesting www over HTTPS expecting a HTTP 200 with our HTML and another one request to non-www over HTTP expecting a HTTP 302 with the location pointing to www domain. Here is the output.

abel@ABEL-DESKTOP:~$ curl https://www.abelperez.info
<html>
<body>
<h1>Hello from S3 bucket :) </h1>
</body>
</html>
abel@ABEL-DESKTOP:~$ 
abel@ABEL-DESKTOP:~$ curl http://abelperez.info
<html>
<head><title>301 Moved Permanently</title></head>
<body bgcolor="white">
<center><h1>301 Moved Permanently</h1></center>
<hr><center>CloudFront</center>
</body>
</html>

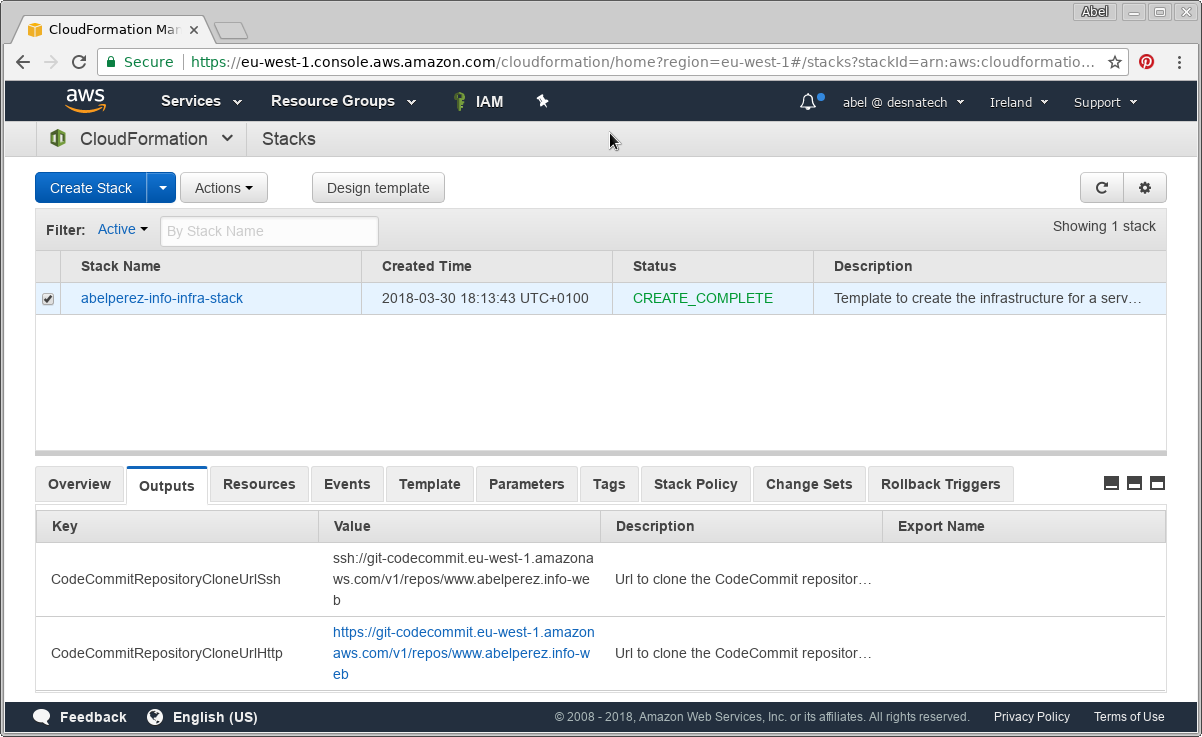
An automated version of this can be found at my github repo

Thursday 5 April 2018

Completely serverless static website on AWS

Why serverless ? The basic idea behind this is not to worry about the underlying infrastructure, the Cloud provider will expose services through several interfaces where we allocate resources and use them, and more importantly, pay only for what we use.

This approach helps to prove concepts with little or no budget, also allows to scale as the business grows on demand. All that solves the problem of over provisioning and paying for idle boxes.

One of the common scenarios is having a content website, in this case I'll focus on static website. In this series I'll explain step by step how to create all the environment from development to production on AWS.

At the end of this series we'll have created this infrastructure:

Serverless static website - part 1 - In this part you'll learn how to start with AWS and how to use Amazon S3 to host a static website, making it publicly accesible by its public endpoint url.

Serverless static website - part 2 - In this part you'll learn how to get your own domain and put it in use straight away with the static website.

Serverless static website - part 3 - In this part you'll learn how to get around the problem of having www as well as non-www domain, and how get always redirect to the www endpoint.

Serverless static website - part 4 - In this part you'll learn how to create a SSL certificate via Amazon Certificate Manager and verify the domain identity.

Serverless static website - part 5 - In this part you'll learn how to distribute the content throughout the AWS edge locations and handling SSL traffic.

Serverless static website - part 6 - In this part you'll learn how to set up a git repository using CodeCommit repository, so you can store your source files.

Serverless static website - part 7 - In this part you'll learn how to set up a simple build pipeline using a CodeBuild project.

Serverless static website - part 8 - In this part you'll learn how to automate the process of triggering the build start action when some changes are pushed to the git repository.

Serverless static website - part 9 - In this part you'll learn how the whole process can be automated by using CloudFormation templates to provision all the resources previously described manually.

Serverless static website - part 9

One of the greatest benefits of cloud computing is the ability to automate processes and up to this point, we've learned how to set everything up via AWS console web interface.

Why automate?

It is always good to know how to manage stuff via console in case we need to manually modify something, but we should aim to avoid this practice. Instead, limit the use of the console to a bare minimum and the rest of the time, aim for some automated way, this has the following advantages:

  • We can keep source code / templates under source control, allowing to keep track of changes.
  • It can be reused to replicate in case of a new customer / new environment / etc.
  • No need to remember where every single option is located as the UI can change.
  • It can be transferred to another account in a matter of a few minutes.

In AWS world, the automated process is achieved by creating templates in CloudFormation and deploying them to stacks.

I have already created a couple of CloudFormation templates to automate all the process described to this point, they can be found at my GitHub repo.

CloudFormation templates

In order to automate this infrastructure, I've divided resources into two separate templates: one containing the SSL certificate and the other containing all the rest of the resources. The reason why the SSL certificate is in another template is because it needs to be run on N. Virginia region (US-East-1) as explained earlier when we created it manually, it's a CloudFront requirement.

Templates can contain parameters that make them more flexible, in this case, there is a parameter that controls the creation of a redirection bucket, we might have a scenario when we want just a website on a sub domain and we might not want to redirect from the naked domain. These are the parameters:

SSL Certificate template

  • DomainName: The site domain name (naked domain only)

Infrastructure template

  • HostedZone: This is just for reference, it should not be changed
  • SSLCertificate: This should be taken from the output of the SSL certificate template
  • DomainName: Same as above, only naked domain
  • SubDomainName: specific sub domain, typically www
  • IncludeRedirectToSubDomain: Whether it should include a redirection bucket from the naked domain to the subdomain

Creating SSL certificate Stack

First, let's make sure we are in N. Virginia region. Go to CloudFormation console, once there, click Create Stack button. We are presented with Select Template screen, where we'll choose a template from my repository (ssl-certificate.yaml) by selecting Upload a template to Amazon S3 radio button.

Click Next, you'll see the input parameters page including the stack name which I'll name abelperez-info-ssl-stack to give it some meaningful name.

After entering the required information, click Next and Next again, then on Create button. You'll see the Create in progress status in the stack.

At this point, the SSL certificate is being created and will require the identity verification just like when it was created manually, this will block the stack creation until the validation process is finished, so go ahead and check your email and follow the link to validate the identity to proceed with the stack creation.

Once the creation is done you'll see the Create complete status in the stack, on the lower pane, select Outputs, you'll find SSLCertificateArn. Take that value and copy it somewhere temporarily, we'll need it for our next stack.

Creating Infrastructure Stack

Following a similar process, let's create the second stack containing most of the resources to provision. In this case we are not forced to create it in any specific region, we can choose any provided all the services are available, for this example I'll Ireland (EU-West-1). The template can be downloaded from my repository (infrastructure.yaml).

This time, you are presented a different set of parameters, SSL Certificate will be the output of the previous stack as explained above. Domain name will be exactly the same as in the previous stack, give we are using the SSL certificate for this domain. Subdomain will be www and I'll include a redirection as I expect users to be redirected from abelperez.info to www.abelperez.info. I'll name the stack abelperez-info-infra-stack just to make it meaningful.

Since this template will create IAM users, roles and policies, we need to acknowledge this by ticking the box.

Once we hit Create, we can see the Create in progress screen.

This process can take up to 30 minutes, so please be patient, this takes so long time to create the stack because we are provisioning CloudFront distributions and they can take some time to propagate.

Once the stack is created, we can take note of a couple of values from the output: CodeCommit repository url (either SSH or HTTPS) and the Static bucket name.

Manual steps to finish the set up.

With all resource automatically provisioned by the templates, we are in a position where the only thing we need is to link our local SSH key with the IAM user. To do that, let's do exactly what we did when it was set up manually in part 6.

In my case, I chose to use SSH key, so I went to IAM console, found the user, under Security Credentials, I uploaded my SSH public key.

We also need to update the buildspec.yml to run our build, can be downloaded from the above linked GitHub repository. The placeholder <INSERT-YOUR-BUCKET-NAME-HERE> must be replaced with the actual bucket name, in this instance the bucket name generated is abelperez-info-infra-stack-staticsitebucket-1ur0k115f2757 and my buildspec.yml looks like:

version: 0.2

phases:
  build:
    commands:
      - mkdir dist
      - cp *.html dist/

  post_build:
    commands:
      - aws s3 sync ./dist 
        s3://abelperez-info-infra-stack-staticsitebucket-1ur0k115f2757/ 
        --delete --acl=public-read

Let's test it!

Our test consist of cloning the git repository from CodeCommit, add two files: index.html and buildspec.yml. Then we'll perform a git push and we expect it will trigger the build executing the s3 sync command and copying the index.html to our destination bucket which will be behind CloudFront and CNamed by Route 53. In the end, we should be able to just browse www.abelperez.info and get whatever the result is in index.html just uploaded.

Just a note, if you get a HTTP 403 instead of the expected HTML, then just wait for a few minutes, CloudFront/Route 53 might not be fully propagated just yet.

abel@ABEL-DESKTOP:~$ git clone ssh://git-codecommit.eu-west-1.amazonaws.com/v1/repos/www.abelperez.info-web
Cloning into 'www.abelperez.info-web'...
warning: You appear to have cloned an empty repository.
abel@ABEL-DESKTOP:~$ cd www.abelperez.info-web/
abel@ABEL-DESKTOP:~/www.abelperez.info-web$ git add buildspec.yml index.html 
abel@ABEL-DESKTOP:~/www.abelperez.info-web$ git commit -m "initial commit"
[master (root-commit) dc40888] initial commit
 Committer: Abel Perez Martinez 
Your name and email address were configured automatically based
on your username and hostname. Please check that they are accurate.
You can suppress this message by setting them explicitly. Run the
following command and follow the instructions in your editor to edit
your configuration file:

    git config --global --edit

After doing this, you may fix the identity used for this commit with:

    git commit --amend --reset-author

 2 files changed, 16 insertions(+)
 create mode 100644 buildspec.yml
 create mode 100644 index.html
abel@ABEL-DESKTOP:~/www.abelperez.info-web$ git push
Counting objects: 4, done.
Delta compression using up to 4 threads.
Compressing objects: 100% (4/4), done.
Writing objects: 100% (4/4), 480 bytes | 0 bytes/s, done.
Total 4 (delta 0), reused 0 (delta 0)
To ssh://git-codecommit.eu-west-1.amazonaws.com/v1/repos/www.abelperez.info-web
 * [new branch]      master -> master
abel@ABEL-DESKTOP:~/www.abelperez.info-web$ curl https://www.abelperez.info
<html>
<body>
<h1>Hello from S3 bucket :) </h1>
</body>
</html>