Showing posts with label route 53. Show all posts

Monday, 23 March 2020

AWS Serverless Web Application Architecture

Recently, I've been exploring ideas about how to put together different AWS services to achieve a totally serverless architecture for web applications. One of the new services is the HTTP API which simplifies the integration with Lambda.

One general principle I want to follow when designing these architectural models is the separation of three main subsystems:

  • Identity service to handle authentication and authorization
  • Static assets traffic being segregated
  • Dynamic page rendering and server side logic
  • Application configuration outside the code

All these component will be publicly accessible via Route 53 DNS record sets pointing to the relevant endpoints.

Other general ideas across all design diagrams below are:

  • Cognito will handle authentication and authorization
  • S3 will store all static assets
  • Lambda will execute server side logic
  • SSM Parameter Store will hold all configuration settings

Architecture variant 1 - HTTP API and CDN publicly exposed

In this first approach, we have the S3 bucket behind CloudFront which is a common pattern when creating CDN-like structures. CloudFront takes care of all the caching behaviours as well as distributing the cached versions all over the Edge locations, so subsequent requests will be dispatched at a reduced latency. Also, CloudFront has only one cache behaviour, which is the default and one origin which is the S3 bucket.

It's also important to notice the CloudFront distribution has an Alternative Domain Name set to the relevant record set e.g. media.example.com and let's not forget about referencing the ACM SSL certificate so we can use the custom url and not the random one from CloudFront.

From the HTTP API perspective, it has only one integration which is a Lambda integration on the $default route, which means all requests coming from the HTTP endpoint will be directed to the Lambda function in question.

Similar to the case of CloudFront, the HTTP API requires a Custom Domain and Certificate to be able to use a custom url as opposed to the random one given by the API service on creation.

Architecture variant 2 - HTTP API behind CloudFront

In this second approach, we still have the S3 bucket behind CloudFront following the same pattern. However we've placed the HTTP API also behind CloudFront.

CloudFront becomes the traffic controller in this case, where several cache behaviours can be defined to make the correct decision where to route the request to.

Both record sets (media and webapp) are pointing to the same CloudFront distribution, it's the application logic's responsibility to request all static assets using the appropriated domain nam.

Since the HTTP API is behind a CF distribution, I'd suggest to set it up as Regional endpoint.

Architecture variant 3 - No CloudFront at all

Continue playing with this idea, what if we don't use CloudFront distribution at all? I gave it a go and it turns out that it's possible to achieve similar results.

We can use two HTTP APIs and set one to forward traffic to S3 for static assets and the other one to Lambda as per the usual pattern, each of those with Custom Domain and that solves the problem.

But I wanted to push it a little bit further, this time I tried with only one HTTP API and setting several routes e.g "/css/*", "/js/*" integrates with S3 and any other integrates with Lambda, it's then, application logic's responsibility to request all static assets using the appropriated url

Conclusion

These are some ideas I've been experimenting with, the choice of including or not a CloudFront distribution is dependent on the concrete use case, whether the source of our requests is local or globally diverse. Also, whether it is more suitable to have static assets under a subdomain or virtual directory under the same host name.

Never underestimate the power and flexibility of an API Gateway, especially the new HTTP API where it can front any number of combination of resources in the back end.

Saturday, 2 March 2019

How to create a dynamic DNS with AWS Route 53

Have you ever wanted to host some pet project or even a small website on your own domestic network? If so, you must have stumbled across the DNS resolution issue: since we depend on our ISP to get our "real IP address", there's no guarantee that the IP we see today will stay any longer the same.

You could update your domain's DNS records every time you detect the IP has changed, but obviously that's tedious and error prone. That's when dynamic DNS (DDNS) comes in. Services like No-IP,Duck DNS,etc can be helpful.

In this post I'll go through the steps involved when it comes to setting up your own DDNS service when you own a domain that has been registered in AWS Route 53.

Prerequisites

Before running the commands I suggest here, we need a couple of things to set up. Let's start by installing the required packages if you haven't already installed them.

  • sudo apt-get install awscli
  • sudo apt-get install jq

Configure AWS credentials

$ aws configure
AWS Access Key ID [None]: AKIAIOSFODNN7EXAMPLE
AWS Secret Access Key [None]: wJalrXUtnFEMI/K7MDENG/bPxRfiCYEXAMPLEKEY
Default region name [None]: eu-west-1
Default output format [None]: json

A hosted zone in AWS Route 53

$ aws route53 list-hosted-zones
{
    "HostedZones": [
        {
            "ResourceRecordSetCount": 5, 
            "CallerReference": " ... ", 
            "Config": {
                "Comment": "HostedZone created by Route53 Registrar", 
                "PrivateZone": false
            }, 
            "Id": "/hostedzone/Z2TLEXAMPLEZONE", 
            "Name": "abelperez.info."
        }
    ]
}

What's the plan?

The scenario I'm covering here is probably one of the most common. I want to create a new subdomain that points to my external IP and update that record as the external IP changes. To achieve that, we'll follow the steps:

  • Find out the external IP.
  • Get the desired hosted zone.
  • Create the A record (or update it if it already exists).
  • Set it up to run regularly (cron job).

Script step by step

Lest's start like any script, the shebang indicator. Then, input variables, in this case we define the domain name and the public record, notice the "." at the end of the public record, this is required by route 53.

#!/bin/bash
DOMAIN_NAME=abelperez.info
PUBLIC_RECORD=rpi.$DOMAIN_NAME.

Find the external IP, there are many ways to obtain this value, but since we're using AWS, let's get it from checkip endpoint. For debugging purposes we echo the IP found.

IP=$(curl -s http://checkip.amazonaws.com)
echo Found IP=$IP

Determine the hosted zone id, this step is optional if you want to use a hard-coded zone id that can be copied from the AWS Route 53 console. In this case I've invoked list-zones-by-name command which gives the hosted zone information for a specific domain, the format is as above in the prerequisites section. To extract the exact id I used a combination of jq and sed commands.

R53_HOSTED_ZONE=`aws route53 list-hosted-zones-by-name \
--dns-name $DOMAIN_NAME \
--query HostedZones \
| jq -r ".[] | select(.Name == \"$DOMAIN_NAME.\").Id" \
| sed 's/\/hostedzone\///'`

Now that we have all the required information, let's prepare the A record JSON input that will be used by aws route53 change-resource-record-sets command. the action "UPSERT" creates or updates the record accordingly, otherwise we'd need to manually check if it exists or not before updating it. Again for debugging purposes, we echo the final JSON.

read -r -d '' R53_ARECORD_JSON << EOM
{
  "Changes": [
    {
      "Action": "UPSERT",
      "ResourceRecordSet": {
        "Name": "$PUBLIC_RECORD",
        "Type": "A",
        "TTL": 300,
        "ResourceRecords": [
          {
            "Value": "$IP"
          }
        ]
      }
    }
  ]
}
EOM

echo About to execute change
echo "$R53_ARECORD_JSON" 

With the input ready, we invoke the Route 53 command to create/update the A record. This command will return immediately but the operation will take a few seconds to complete. If we want to make sure we know when it's completed, then we need to get the change id returned by the command, in this case, it's stored in the variable. This is optional, as well as the next step.

R53_ARECORD_ID=`aws route53 change-resource-record-sets \
--hosted-zone-id $R53_HOSTED_ZONE \
--change-batch "$R53_ARECORD_JSON" \
--query ChangeInfo.Id \
--output text`

echo Waiting for the change to update.

At this point, the request to create/update the A record is in progress, we could finish the script right now. However, I'd like to get a final confirmation that the operation has been completed. To do that, we can use the wait command providing the change id from the previous request.

aws route53 wait resource-record-sets-changed --id $R53_ARECORD_ID

echo Done.

And now it's actually completed. You should save this to a file, maybe name it update-dns.sh. It will need execute permission.

$ chmod u+x ./update-dns.sh

Set up cron job

In this particular instance I want this script to run in one of my raspberry pis, so I proceeded to copy the script file to pi user's home directory (/home/pi/)

pi@raspberrypi:~ $ ls
update-dns.sh

Now we'll set up a user cron job, we do that by running the command crontab -u followed by the user under which the job should run, this job doesn't require any system-wide privilege therefore it can run as the regular user, pi. -e to edit the file.

pi@raspberrypi:~ $ crontab -u pi -e

All we need to do is append the following text to the file content you are prompted with. The first two numbers correspond to minute and hour to run. For testing purposes I set it near the current time at the moment of testing it. The script output is appended/redirected to a text file so we can review afterwards if desired.

23 22 * * * /home/pi/update-dns.sh >> /home/pi/cron-update-dns.txt

See it in action

Once we've saved the crontab file, if it's the time where the cron job is about to start, we can test it by running tail -f command

pi@raspberrypi:~ $ tail -f cron-update-dns.txt

Finally, don't forget to update the port forwarding section on your home router so your open port directs traffic to a specific device, in my case, to that particular raspberry pi.

Tuesday, 17 July 2018

Automate SSL certificate validation in AWS Certificate Manager using DNS via Route 53

When creating SSL certificates in AWS Certificate Manager, there is a required step before getting the certificate: Validate domain ownership. This seems obvious but to get a certificate you need to prove that you have control over the requested domain(s). There are two ways to validate domain ownership: by email or by DNS.

Use Email to Validate Domain Ownership

When using this option, ACM will send an email to the three registered contact addresses in WHOIS (Domain registrant, Technical contact, Administrative contact) then will wait for up to 72h for confirmation or it will time out.

This approach requires manual intervention which is not great for automation although there might be scenarios where this is applicable. See official AWS documentation.

Use DNS to Validate Domain Ownership

When using this option, ACM will need to know that you have control over the DNS settings on the domain, it will provide a pair name/value to be created as a CNAME record which it will use to validate and to renew if you wish so.

This approach is more suitable for automation since it doesn't require manual intervention. However, as of this writing, it's not supported yet by CloudFormation and therefore it will need to be done by using AWS CLI or API calls. Follow up the official announcement and comments. See official AWS documentation.

How to do this in the command line?

The following commands have been tested in bash on Linux 4.9.0-4-amd64 #1 SMP Debian 4.9.65-3+deb9u1, there shouldn't be much trouble if trying this on a different operation system, not tested on Windows though.

Some prerequisites:

  • AWS CLI installed and configured.
  • jq package installed and available in PATH.

Set the variable to store domain name and request the certificate to AWS ACM CLI command request-certificate

$ DOMAIN_NAME=abelperez.info

$ SSL_CERT_ARN=`aws acm request-certificate \
--domain-name $DOMAIN_NAME \
--subject-alternative-names *.$DOMAIN_NAME \
--validation-method DNS \
--query CertificateArn \
--region us-east-1 \
--output text`

At this point we have the certificate but it's not validated yet. ACM provides values for us to create a CNAME record so they can verify domain ownership. To do that, use aws acm describe-certificate command to retrieve those values.

Now, let's store the result in a variable to prepare for extracting name and value later.

$ SSL_CERT_JSON=`aws acm describe-certificate \
--certificate-arn $SSL_CERT_ARN \
--query Certificate.DomainValidationOptions \
--region us-east-1`

Extract name and value querying the previous json using jq.

$ SSL_CERT_NAME=`echo $SSL_CERT_JSON \
| jq -r ".[] | select(.DomainName == \"$DOMAIN_NAME\").ResourceRecord.Name"`

$ SSL_CERT_VALUE=`echo $SSL_CERT_JSON \
| jq -r ".[] | select(.DomainName == \"$DOMAIN_NAME\").ResourceRecord.Value"`

Let's verify that SSL_CERT_NAME and SSL_CERT_VALUE captured the right values.

$ echo $SSL_CERT_NAME
_3f88376edb1eda680bd44991197xxxxx.abelperez.info.

$ echo $SSL_CERT_VALUE
_f528dff0e3e6cd0b637169a885xxxxxx.acm-validations.aws.

At this point, we are ready to interact with Route 53 to create the record set using the proposed values from ACM, but first we need the Hosted Zone Id, it can be copied from the console, but we can also get it from Route 53 command line filtering by domain name.

$ R53_HOSTED_ZONE=`aws route53 list-hosted-zones-by-name \
--dns-name $DOMAIN_NAME \
--query HostedZones \
| jq -r ".[] | select(.Name == \"$DOMAIN_NAME.\").Id" \
| sed 's/\/hostedzone\///'`

Route 53 gives us the hosted zone id in the form of "/hostedzone/Z2TXYZQWVABDCE", the leading "/hostedzone/" bit is stripped out using sed command. Let's verify the hosted zone is captured in the variable.

$ echo $R53_HOSTED_ZONE
Z2TXYZQWVABDCE

With the hosted zone id, name and value from ACM, prepare the JSON input for route 53 change-resource-record-sets command, in this is case, Action is a CREATE, TTL can be the default 300 seconds (which is what AWS does itself through the console).

$ read -r -d '' R53_CNAME_JSON << EOM
{
  "Comment": "DNS Validation CNAME record",
  "Changes": [
    {
      "Action": "CREATE",
      "ResourceRecordSet": {
        "Name": "$SSL_CERT_NAME",
        "Type": "CNAME",
        "TTL": 300,
        "ResourceRecords": [
          {
            "Value": "$SSL_CERT_VALUE"
          }
        ]
      }
    }
  ]
}
EOM

We can check all variables were expanded correctly before preparing the command line.

$ echo "$R53_CNAME_JSON"
{
  "Comment": "DNS Validation CNAME record",
  "Changes": [
    {
      "Action": "CREATE",
      "ResourceRecordSet": {
        "Name": "_3f88376edb1eda680bd44991197xxxxx.abelperez.info.",
        "Type": "CNAME",
        "TTL": 300,
        "ResourceRecords": [
          {
            "Value": "_f528dff0e3e6cd0b637169a885xxxxxx.acm-validations.aws."
          }
        ]
      }
    }
  ]
}

Now we've verified everything is in place, finally we can create the record set using route 53 cli.

$ R53_CNAME_ID=`aws route53 change-resource-record-sets \
--hosted-zone-id $R53_HOSTED_ZONE \
--change-batch "$R53_CNAME_JSON" \
--query ChangeInfo.Id \
--output text`

This operation will return a change-id, since route 53 needs to propagate the change, it won't be available immediately, usually within 60 seconds, to ensure we can proceed, we can use the wait command. This command will block the console/script until the record set change is ready.

$ aws route53 wait resource-record-sets-changed --id $R53_CNAME_ID

After the wait, the record set is ready, now ACM needs to validate it, as per AWS docs, it can take up to several hours but in my experience it's not that long. By using another wait command, we'll block the console/script until the certificate is validated.

$ aws acm wait certificate-validated \
--certificate-arn $SSL_CERT_ARN \
--region us-east-1

Once this wait is done, we can verify that our certificate is in fact issued.

$ aws acm describe-certificate \
--certificate-arn $SSL_CERT_ARN \
--query Certificate.Status \
--region us-east-1
"ISSUED"

And this is how it's done, 100% end to end commands, no manual intervention, no console clicks, ready for automation.

Friday, 2 February 2018

Serverless static website - part 5

Once we have created the certificate, we need a bridge between a secure endpoint and the current buckets. One of the most common ways to address this is by using CloudFront content distribution service. By using this, we'll make our website to be distributed to some (depending on the pricing) of the Amazon AWS edge locations, which means that if we have some international audience for our website, it will be served to the client by the closest edge location.

Creating WWW Distribution

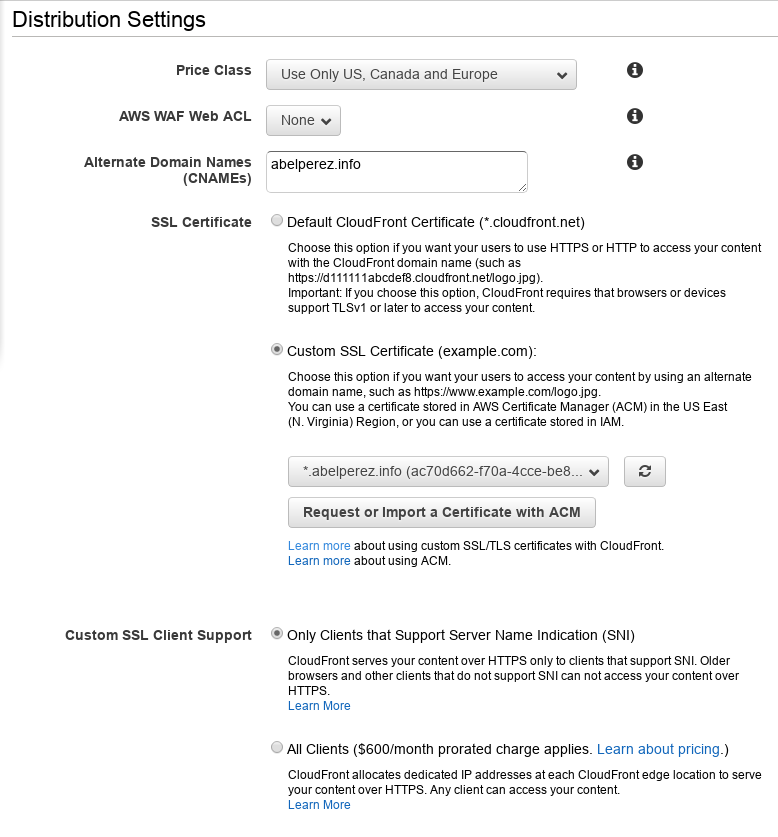
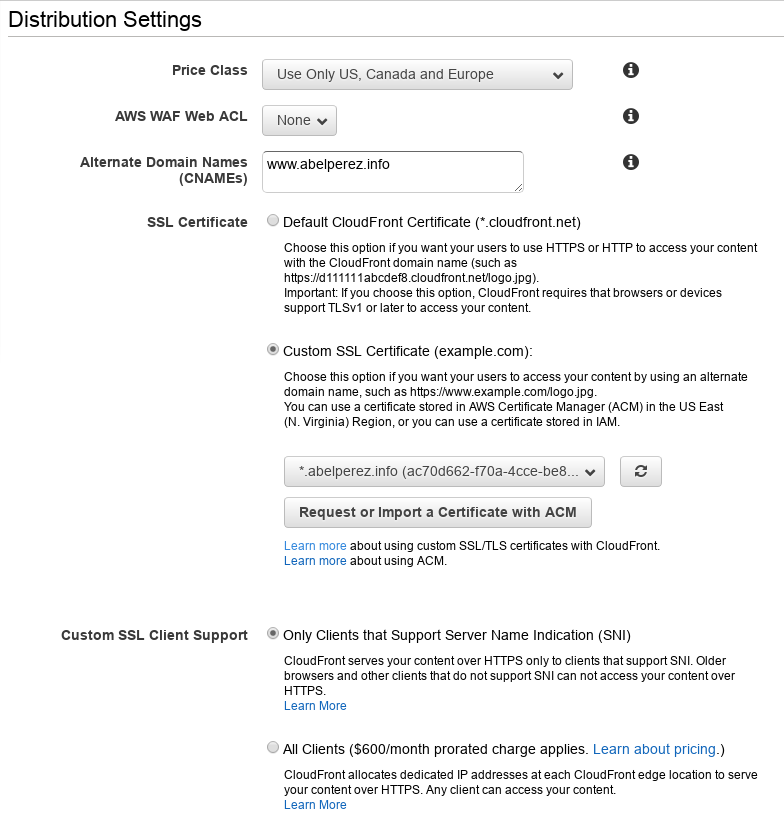
First, on AWS Console select CloudFront from the services list, under Networking & Content Delivery category. Once there, click on Create Distribution button, in this case, we are interested in a Web Distribution, so under Web, select Get Started. In the create distribution form, there are some key values that are required to enter in order to make this configuration to work. The rest can stay with default value

  • Origin Domain Name: www.abelperez.info.s3-website-eu-west-1.amazonaws.com (which is the endpoint for the bucket)
  • Viewer Protocol Policy: HTTP and HTTPS (this way if anyone tries to visit through HTTP, it will be redirected to HTTPS endpoint)
  • Price Class: Depending on your needs, in my case, US, Canada en Europe is enough
  • Alternate Domain Names(CNAMEs): www.abelperez.info
  • SSL Certificate: Custom SSL Certificate (example.com): and select your certificate from the dropdown menu
  • Default Root Object: index.html

Note: If you can't see your certificate in the dropdown, make sure you've created / imported in the region N. Virginia.

Once entered all this information, click Create Distribution

Creating non-WWW Distribution

Let's repeat the process to create another distribution, this time some values will be different, as we'll point to the non-www bucket and domain name.

  • Origin Domain Name: abelperez.info.s3-website-eu-west-1.amazonaws.com (which is the endpoint for the bucket)
  • Viewer Protocol Policy: HTTP and HTTPS (this way if anyone tries to visit through HTTP, it will be redirected to HTTPS endpoint)
  • Price Class: Depending on your needs, in my case, US, Canada en Europe is enough
  • Alternate Domain Names(CNAMEs): abelperez.info
  • SSL Certificate: Custom SSL Certificate (example.com): and select your certificate from the dropdown menu (the same as above)
  • Default Root Object: leave empty, since this distribution won't serve any file.

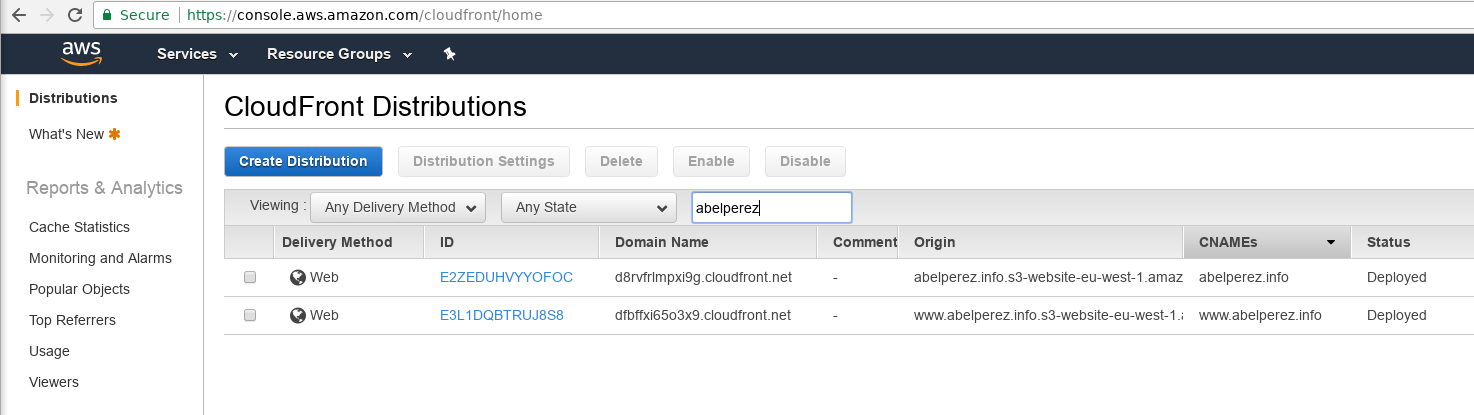
Once entered all this information, click Create Distribution, the creation process will take about 30 minutes, so be patient. When they're done, the status changes to Deployed and they can start receiving traffic. You'll see something like this:

Updating DNS records

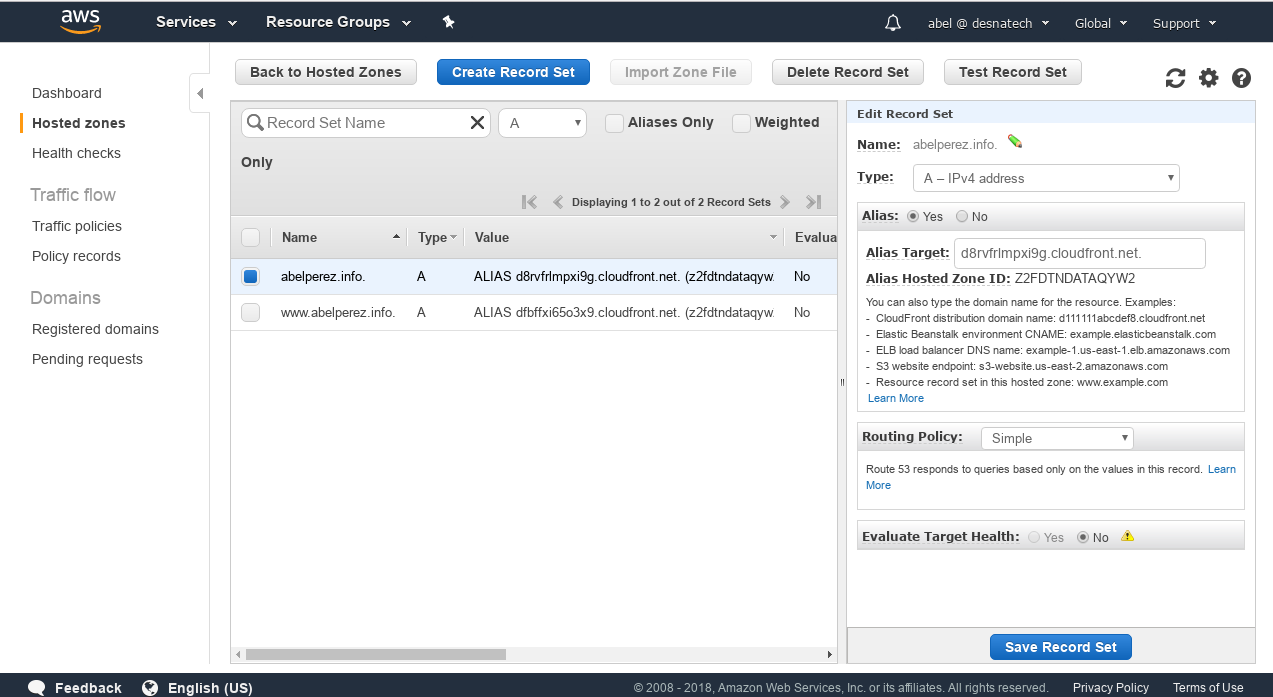
Now that we have created the distributions, it's time to update how Route 53 is going to resolve DNS requests to CloudFront distributions instead of the S3 bucket previously configured. To do that, on Route 53 console, select the Hosted Zone, then select one record set, and updated the Alias Target to the corresponding CloudFront distribution Domain Name. Then repeat the process for the other record set.

The following diagram illustrates the interaction between the AWS services we've used up this point. The browser first queries DNS for the given domain name, Route 53, will resolve to the appropriate CloudFront distribution, which can serve the content if it has already cached, otherwise it will request from the bucket and then serve the content. If the request is over HTTP to CloudFront, it will issue a HTTP 301 redirection to the HTTPS endpoint. If the request is over HTTPS to CloudFront, it will use the assigned certificate, which in this case is the same for both www and non-www endpoints.


     < HTTP 301 - Redirecto to HTTPS
 +----------------------------+
 |                            |                                         
 |       GET HTTP >     +-----+------+             +----------------+
 |     abelperez.info   | CloudFront |  GET HTTPS  |   S3 Bucket    |
 |           +--------> | (non-www)  |-----------> | abelperez.info +--+
 |           |          |            |             |                |  |
 |           |          +------+-----+             +----------------+  |
 |     +-----+-----+            \                                      |
 |     |           |             V                                     |
 | +-> | Route 53  |       (SSL certficate)                            |
 | |   |           |             A                                     |
 | |   +-----+-----+            /                                      |
 | |         |          +------+-----+          +--------------------+ |
 | |         |          | CloudFront |GET HTTPS |     S3 Bucket      | |
 | |         +--------> |   (www)    |--------> | www.abelperez.info | |
 | |   GET HTTP >       |            |          |                    | |
 | | www.abelperez.info +-----+------+          +----------+---------+ |
 | |                          |                            |           |
 V |                          |                            |           |
+--+--------+ <---------------+                            |           |
|           |      < HTTP 301 - Redirecto to HTTPS         |           |
|           | <--------------------------------------------+           |
|  Browser  |      < HTTP 200 - OK                                     |
|           | <--------------------------------------------------------+
+-----------+      < HTTP 301 - Redirect to www

One more step

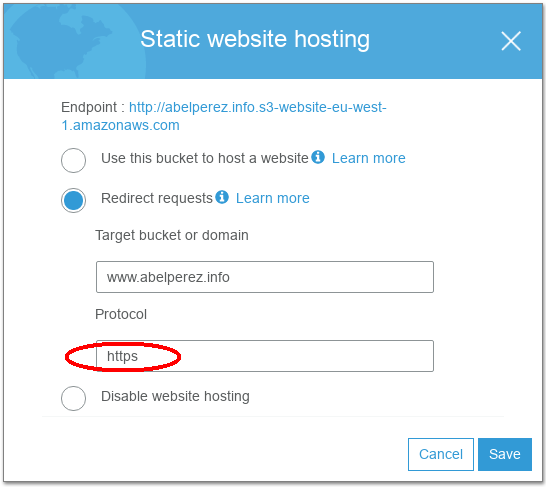
There is a bucket that its sole purpose is to redirect requests from non-www to www domain name, this bucket was set to use HTTP protocol, in this case, we are going to update it to HTTPS, so we can save one redirection step in the process.

Let's test it

Once again, we'll use curl to test all the scenarios, in this case we have four scenarios to test (HTTP/HTTPS and www/non-www)

(1) HTTPS on www.abelperez.info - Expected 200

abel@ABEL-DESKTOP:~$ curl -L -I https://www.abelperez.info
HTTP/2 200 
content-type: text/html
content-length: 79
date: Fri, 02 Feb 2018 00:57:25 GMT
last-modified: Mon, 22 Jan 2018 18:58:47 GMT
etag: "87fa2caa5dc0f75975554d6291b2da71"
server: AmazonS3
x-cache: Miss from cloudfront
via: 1.1 19d823478cf075f6fae7a5cb1336751a.cloudfront.net (CloudFront)
x-amz-cf-id: 7np_vqutTogm9pKceNZ82Zim61Eb0E0D9fJBkFaqNHUz3LF63fEh2w==

(2) HTTPS on abelperez.info - Expected 301 to https://www.abelperez.info

abel@ABEL-DESKTOP:~$ curl -L -I https://abelperez.info
HTTP/2 301 
content-length: 0
location: https://www.abelperez.info/
date: Fri, 02 Feb 2018 01:00:11 GMT
server: AmazonS3
x-cache: Miss from cloudfront
via: 1.1 75235d68607fb64805e0649c6268c52b.cloudfront.net (CloudFront)
x-amz-cf-id: 6WSECgHhkvCqZLW7kInopHnovCPcKU56oNQCZiCv7gaQLv2wSu-Vcw==

HTTP/2 200 
content-type: text/html
content-length: 79
date: Fri, 02 Feb 2018 00:57:25 GMT
last-modified: Mon, 22 Jan 2018 18:58:47 GMT
etag: "87fa2caa5dc0f75975554d6291b2da71"
server: AmazonS3
x-cache: RefreshHit from cloudfront
via: 1.1 7158f458652a2c59cfcb688d5dc80347.cloudfront.net (CloudFront)
x-amz-cf-id: _U7qobfP61P2aYyOakzzfwWjkKYrBeKObtWziPv7NVb5M3yPMlsbrQ==

(3) HTTP on www.abelperez.info - Expected 301 to https://www.abelperez.info

abel@ABEL-DESKTOP:~$ curl -L -I http://www.abelperez.info
HTTP/1.1 301 Moved Permanently
Server: CloudFront
Date: Fri, 02 Feb 2018 01:00:32 GMT
Content-Type: text/html
Content-Length: 183
Connection: keep-alive
Location: https://www.abelperez.info/
X-Cache: Redirect from cloudfront
Via: 1.1 2c7c2f0c6eb6b2586e9f36a7740aa616.cloudfront.net (CloudFront)
X-Amz-Cf-Id: qVYxI7z1DSVpzGrIfGWtHI8dZ1Ywx6dPUf4qGmtXbxl71IvC5R6P6Q==

HTTP/2 200 
content-type: text/html
content-length: 79
date: Fri, 02 Feb 2018 00:57:25 GMT
last-modified: Mon, 22 Jan 2018 18:58:47 GMT
etag: "87fa2caa5dc0f75975554d6291b2da71"
server: AmazonS3
x-cache: RefreshHit from cloudfront
via: 1.1 6b11bd43fbd97ec7bb8917017ae0f954.cloudfront.net (CloudFront)
x-amz-cf-id: w1YRlI4QR5W_bxXVXftmGioMCWoeCpwcCqlj0ucPlizOZVev22RU6g==

(4) HTTP on abelperez.info - Expected 301 to https://abelperez.info which in turn will be another 301 to https://www.abelperez.info

abel@ABEL-DESKTOP:~$ curl -L -I http://abelperez.info
HTTP/1.1 301 Moved Permanently
Server: CloudFront
Date: Fri, 02 Feb 2018 01:01:00 GMT
Content-Type: text/html
Content-Length: 183
Connection: keep-alive
Location: https://abelperez.info/
X-Cache: Redirect from cloudfront
Via: 1.1 60d859e64626d7b8d0cc73d27d6f8134.cloudfront.net (CloudFront)
X-Amz-Cf-Id: eiJCl56CO6aUNA3xRnbf8J_liGfY3oI5jdLdhRRW4LoNFbCMunYyPg==

HTTP/2 301 
content-length: 0
location: https://www.abelperez.info/
date: Fri, 02 Feb 2018 01:01:01 GMT
server: AmazonS3
x-cache: Miss from cloudfront
via: 1.1 f030bd6bd539e06a932b0638e025c51d.cloudfront.net (CloudFront)
x-amz-cf-id: 7KfYWyxPhIXXJjybnISt25apbbHUKx74r9TUI9Kguhn2iQATZELfHg==

HTTP/2 200 
content-type: text/html
content-length: 79
date: Fri, 02 Feb 2018 00:57:25 GMT
last-modified: Mon, 22 Jan 2018 18:58:47 GMT
etag: "87fa2caa5dc0f75975554d6291b2da71"
server: AmazonS3
x-cache: RefreshHit from cloudfront
via: 1.1 3eebab739de5f3b3016088352ebea37f.cloudfront.net (CloudFront)
x-amz-cf-id: R8kB6ndn1K8YOiF6J2deG0QkHh-3QD65q0hfV5vdXm5-_1sNNlc3Ng==

Saturday, 27 January 2018

Serverless static website - part 3

To www or not to www ? well, that's not the real question. Apparently, nowadays this topic has changed a little bit from the early times of the World Wide Web. In this article, there are some interesting pieces of information for those interested in that topic.

The bottom line is whatever your choice is, there has to be consistency, in this example, the canonical name will be www.abelperez.info, but I also want that if anyone browses just abelperez.info, they have to be redirected to the www version. How do we do that on AWS ?

Creating the redirect bucket

As discussed earlier, an S3 bucket can be configured as a website, but it will only listen on a single hostname (www.abelperez.info), therefore if we want to listen on another hostname (abelperez.info), we need another S3 bucket, again matching the bucket name with the hostname.

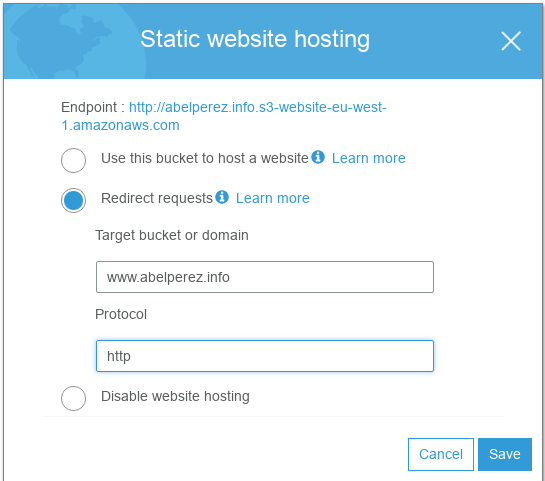
On AWS S3 console, create a new bucket named (your domain name without www). This time, instead of selecting Use this bucket to host a website, let's select Redirect requests where:

  • Target bucket or domain: is the www hosthame
  • Protocol: will be http for now

The configuration should look like this

Creating the Record set

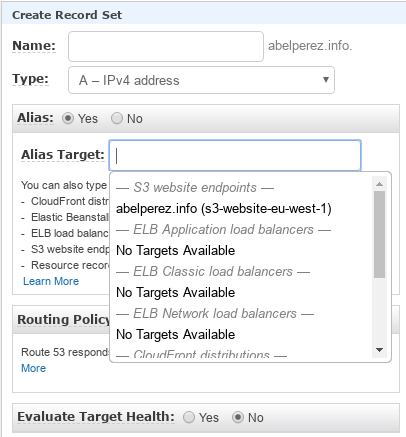
Now, we need to route DNS requests to the new website previously created. To do that, let's go to Route 53 console, select your hosted zone, then click on Create Record Set button. Specify the following values:

  • Name: leave in blank - it will be non www DNS entry
  • Type: A
  • Alias: Yes
  • Alias Target: You should see the bucket name in the list

What have we done so far ?

We have created two DNS entries pointing to two different S3 buckets (effectively two web servers). One web server (www) will serve the content as explained earlier. The other web server (non www) will issue 301 redirect code to the www version. This way, the browser will request again, but now with the www version which will get served by the www web server, delivering the content as expected.

The following diagram illustrates the workflow

                                                 +----------------+
                GET abelperez.info               |   S3 Bucket    |
                +------------------------------> | abelperez.info +----+
                |                                |                |    |
          +-----+-----+                          +----------------+    |
          |           |                                                |
      +-> | Route 53  |                                                |
      |   |           |                                                |
      |   +-----+-----+                      +--------------------+    |
      |         |                            |     S3 Bucket      |    |
      |         +--------------------------> | www.abelperez.info |    |
      |         GET www.abelperez.info       |                    |    |
      |                                      +----------+---------+    |
+-----+-----+                                           |              |
|           | <-----------------------------------------+              |
|  Browser  |        HTTP 200 - OK                                     |
|           | <--------------------------------------------------------+
+-----------+        HTTP 301 - Permanent Redirect to www

Let's test it

To test this behaviour, one easy way is using the universal tool CURL, we'll use two switches:

  • -L Follows the redirects
  • -I Fetches headers only

For more information about CURL, see the manpage.

There are two scenarios to test: first, when we try to hit non www host. We can see the first request gets HTTP 301 code and the second gets HTTP 200.

abel@ABEL-DESKTOP:~$ curl -L -I http://abelperez.info
HTTP/1.1 301 Moved Permanently
x-amz-id-2: pLVO9p67k51FJpZCSbF2LxJyrB8w9WyEkgNXHF0Zq8twe3Dw1ud3OiIHRzN0y5B4wDvwngLGEBg=
x-amz-request-id: AD13DD8436422AAC
Date: Sat, 27 Jan 2018 17:50:19 GMT
Location: http://www.abelperez.info/
Content-Length: 0
Server: AmazonS3

HTTP/1.1 200 OK
x-amz-id-2: s/6E2lV7nYtfBq96Qftwip7lzMvIkOMuIq0jbwCisYU0V7ujMRisPuqPsNt2vMuBWFIYuwkqLFs=
x-amz-request-id: 1C258F07FD183836
Date: Sat, 27 Jan 2018 17:50:19 GMT
Last-Modified: Wed, 08 Nov 2017 09:10:40 GMT
ETag: "a339a5d4a0ad6bb215a1cef5221b0f6a"
Content-Type: text/html
Content-Length: 85
Server: AmazonS3

The second scenario is trying to go directly to www host, and the request gets HTTP 200 straight away.

abel@ABEL-DESKTOP:~$ curl -L -I http://www.abelperez.info
HTTP/1.1 200 OK
x-amz-id-2: apCkPouaYzoy5gjemxU+BjDLbQxxE46EUhDXBHirq6PK0OZbubP2BVhWllxlSV99zg5UB3tGbd8=
x-amz-request-id: D928A1DF3B3EB0DE
Date: Sat, 27 Jan 2018 18:18:19 GMT
Last-Modified: Wed, 08 Nov 2017 09:10:40 GMT
ETag: "a339a5d4a0ad6bb215a1cef5221b0f6a"
Content-Type: text/html
Content-Length: 85
Server: AmazonS3

Wednesday, 24 January 2018

Serverless static website - part 2

In the previous part I explained how to create a s3 bucket and make it behave like a web server, then we put some files on it and were able to publicly browse using the HTTP endpoint provided by s3. However, this is not the most appealing url to associate with our website, we most likely want to own a domain name.

Buying a domain name

If we want a domain, there are a lot of places where you can buy one, they are usually cheap, unless we go crazy with the name. Here is the list of ICANN-Accredited Registrars where you can choose your favourite. There is one particular domain registrar that might be convenient, if you search amazon in that list, it will come up, yes, Amazon also sell domain names. In this example I purchased mine through them, just to keep everything in the same place, you are free to choose your domain registrar, it doesn't make a big difference when setting everything up.

Route 53 is the service that manages DNS on AWS. To register a domain, once in Route 53 console, go to Domains / Registered domains. Then Choose a domain name with your favourite TLD and follow the process, it's that simple.

When you register a new domain, it can take some times a couple of days to complete the process, this is indicated in the console by listing the new domain under Pending requests, once the process is complete it will appear under Registered domain. Your console should look like this by then. More information about registering a domain with Route 53, see here.

Creating a Public Hosted Zone

Once you have domain name of yours, whether registered with Route 53 or with another registrar, it's the time to create a public hosted zone, which is basically a container for all DNS records associated with your domain and subdomains. To do that, go to Route 53 console, choose Hosted Zones, hit the Create Hosted Zone button, then provide the domain name, and optionally a comment, also make sure Public Hosted Zone is selected. When it's done, it should look like this.

If you chose to buy your domain with a different registrar, then you'll have to update your name servers with the new ones created by the Hosted Zone. See AWS docs on how to do that, here.

Creating a Record Set

In AWS world, a Record Set is similar to standard DNS record, but with some extensions. In this particular case, we'll use Alias. To create a record, select the Hosted Zone and click Create Record Set button. Specify the following values:

  • Name: www
  • Type: A
  • Alias: Yes
  • Alias Target: You should see the bucket name in the list

It's important to note that the name of the bucket where we are hosting our files must match the record name. So in this case, my record is www.abelperez.info, that's exactly the name of the bucket, otherwise Route 53 won't be able to make the association between those two.

Click on Create button, and that's it. We've just linked the domain name to a serverless web server for static files.

Let's test it

To test all this, it's very simple, let's browse to http://www.abelperez.info (your domain of course) and see what happens

Your browser content should display this

For more information about Route 53 Alias records values, see here.