Thursday 27 September 2018

How to implement a CloudFormation Include custom tag using YamlDotNet

YAML has become a popular format used to describe a wide range of information in a more readable way. Depending on the concrete use case, these files can grow significantly. One example of this is AWS CloudFormation templates which can be written either in JSON or YAML.

Especially when working on Serverless projects, it doesn’t matter if it’s serverless framework, AWS SAM or just pure CloudFormation. The fact is the main file to maintain is (most of the time) a YAML template that grows over time.

I’d like to focus on a more concrete example: a typical serverless microservice architecture consists of a backend database, a function and a HTTP endpoint (i.e DynamoDB, Lambda and API Gateway). It’s also a common practice to use OpenAPI specification aka Swagger to describe the Web API interface.

In this case, when trying to use Lambda integration (either custom or proxy) we can’t use variables or intrinsic functions within the swagger file (we have to hardcode the lambda invocation url including account number and region, apart from the fact that function name might change if using autogenerated by CloudFormation), unless swagger content is inline in the Body property, which makes the file to grow by a great deal.

As of this writing, there are some strategies proposed by AWS to mitigate this problem, I personally find them a bit cumbersome to use on a daily basis:

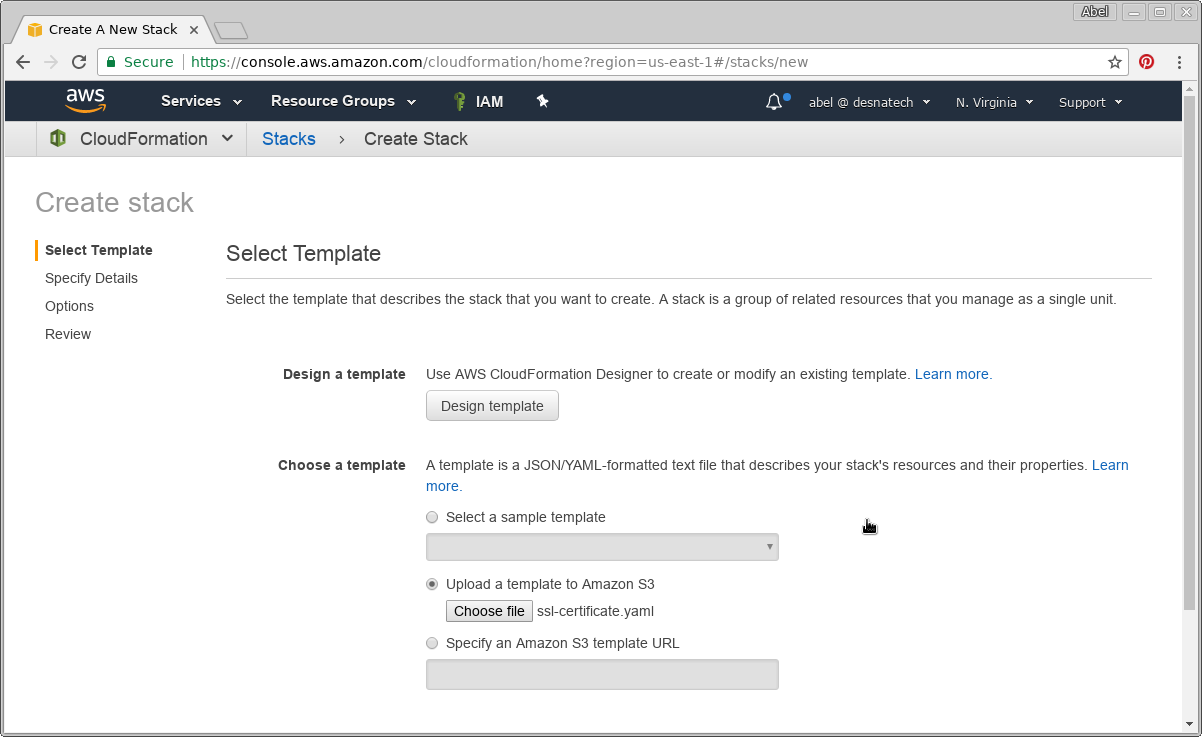
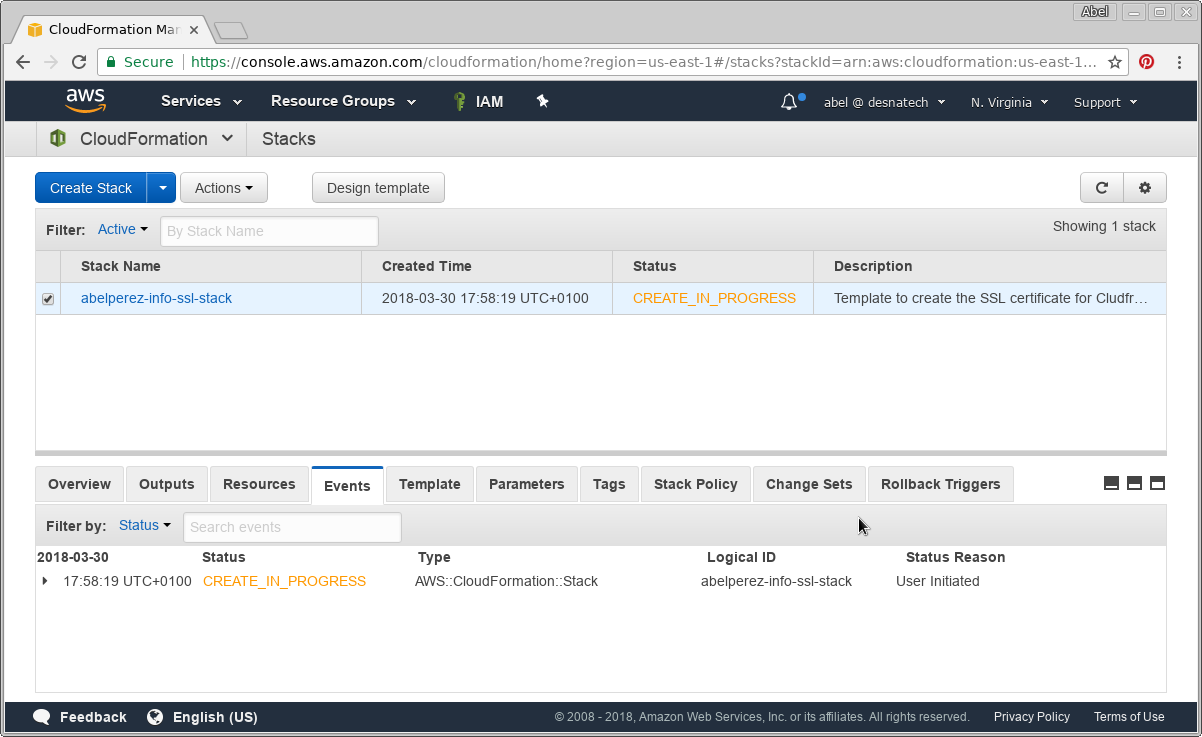
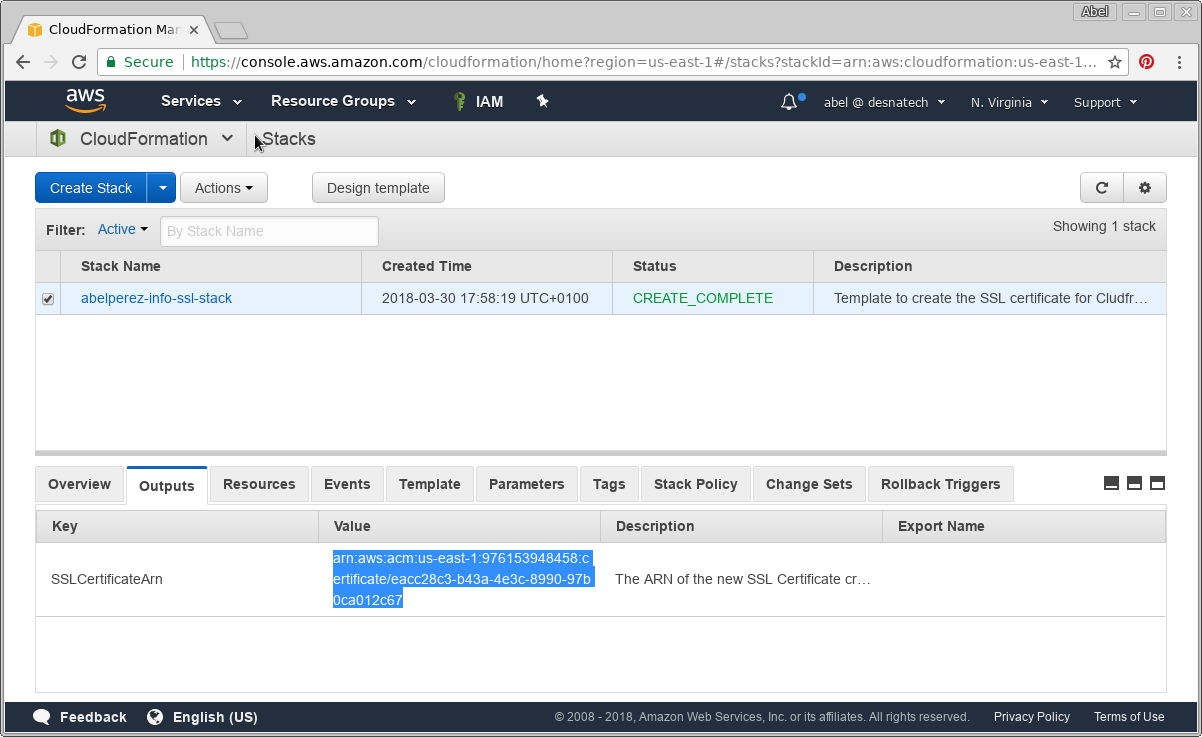
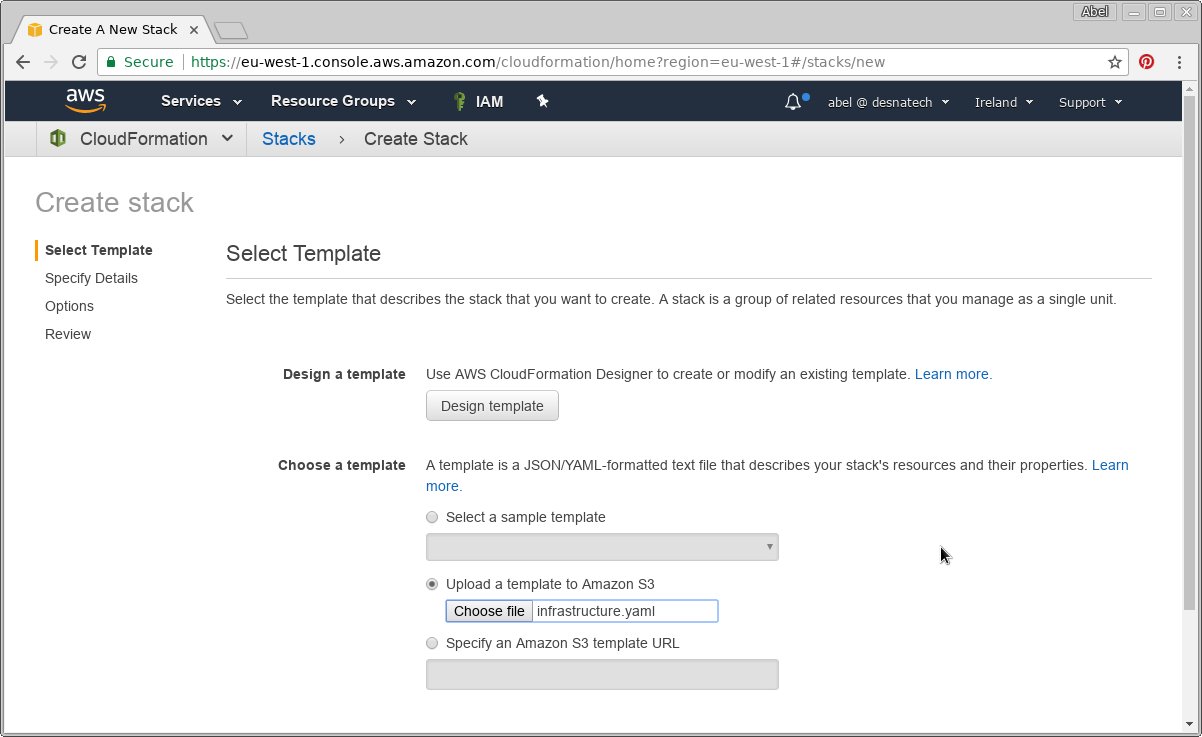
  • AWS::CloudFormation::Stack It adds complexity to the whole process since we have to pass parameters to nested stacks and retrieve outputs from them in order to access information from both parties. The template for the nested stack must be stored on an Amazon S3 bucket, which adds friction to our development workflow while building.
  • AWS::Include Transform which is a form of macro hosted by AWS CloudFormation, is simpler than nested stacks but currently it still has some limiations:
    • The snippet has to be stored on an Amazon S3 bucket.
    • If the snippets change, your stack doesn't automatically pick up those changes.
    • It does not currently support using shorthand notations for YAML snippets.

Personally, I prefer a solution where at development time I can split the template in logical parts and then, before deploying it to AWS, compose them in one piece. I like the idea of include partials in specific parts of the parent file.

How to implement this include mechanism ?

YAML provides an extension mechanism named tags, where we can associate a particular data type with a tag (it’s basically a prefix added to a value). In YamlDotNet this is implemented by creating a custom type converter and mapping the new tag with the custom type converter.

IncludeTagConverter (custom type converter)

public class IncludeTagConverter: IYamlTypeConverter
{
    public bool Accepts(Type type)
    {
        return typeof(IncludeTag).IsAssignableFrom(type);
    }

    public object ReadYaml(IParser parser, Type type)
    {
        parser.Expect<MappingStart>();
        var key = parser.Expect<Scalar>();
        var val = parser.Expect<Scalar>();
        parser.Expect<MappingEnd>();

        if (key.Value != "File")
        {
            throw new YamlException(key.Start, val.End, "Expected a scalar named 'File'");
        }

        var input = File.ReadAllText(val.Value);
        var data = YamlSerializer.Deserialize(input);
        return data;
    }

    public void WriteYaml(IEmitter emitter, object value, Type type)
    {
    }
}

IncludeTag class

public class IncludeTag
{
    public string File { get; set; }
}

In this case we are indicating that IncludeTagConverter class should be used if the desiralization mechanism needs to deserialize an object of type IncludeTag. At the end of ReadYaml method, we call a helper class that starts deserialization process again with the content of the “included file”.

YamlSerializer helper class

public class YamlSerializer
{
    private const string IncludeTag = "!Include";

    public static object Deserialize(string yaml)
    {
        var reader = new StringReader(yaml);
        var deserializer = new DeserializerBuilder()
            .WithTypeConverter(new IncludeTagConverter())
            .WithTagMapping(IncludeTag, typeof(IncludeTag))
            .Build();
        var data = deserializer.Deserialize(reader);
        return data;
    }

    public static string Serialize(object data)
    {
        var serializer = new SerializerBuilder().Build();
        var yaml = serializer.Serialize(data);
        return yaml;
    }
}

In this helper class, we tell the deserializer that we are using a type converter and that it has to map !Include tags to data type of IncludeTag. This way, when it encounters an !Include in the yaml file, it will use our type converter to deserialize the content instead, which in turn, will read whatever file we put the name in File: key and will trigger the deserialization process again, thus, allowing us to execute this at several levels in a recursive way.

How do we compose a yaml ?

Once we have the whole file yaml object in memory, by triggering the deserialization process on the main yaml file, like this:

var data = YamlSerializer.Deserialize(input);

We only need to call Serialize again, and since we converted all the !Include tags into normal maps, sequence or scalars, there’s nothing extra we need to do to serialize it back using the default implementation.

var output = YamlSerializer.Serialize(data);

The output will be the composed file which can be saved and used after that.

Example:

Main yaml file (cloud-api.yaml)

Description: Template to create a serverless web api 

Resources:
  ApiGatewayRestApi:
    Type: AWS::ApiGateway::RestApi
    Properties:
      Name: Serverless API
      Description: Serverless API - Using CloudFormation and Swagger
      Body: !Include
        File: simple-swagger.yaml

simple-swagger.yaml file

swagger: "2.0"

info:
  version: 1.0.0
  title: Simple API
  description: A simple API to learn how to write OpenAPI Specification

paths:
  /persons: !Include
    File: persons.yaml
  /pets: !Include
    File: pets.yaml

persons.yaml file

get:
  summary: Gets some persons
  description: Returns a list containing all persons.
  responses:
    200:
      description: A list of Person
      schema:
        type: array
        items:
          required:
            - username
          properties:
            firstName:
              type: string
            lastName:
              type: string
            username:
              type: string

pets.yaml file

get:
  summary: Gets some pets
  description: Returns a list containing all pets.
  responses:
    200:
      description: A list of pets
      schema:
        type: array
        items:
          required:
            - petname
          properties:
            petname:
              type: string
            ownerName:
              type: string
            breed:
              type: string

Final result (composed file)

Description: Template to create a serverless web api
Resources:
  ApiGatewayRestApi:
    Type: AWS::ApiGateway::RestApi
    Properties:
      Name: Serverless API
      Description: Serverless API - Using CloudFormation and Swagger
      Body:
        swagger: 2.0
        info:
          version: 1.0.0
          title: Simple API
          description: A simple API to learn how to write OpenAPI Specification
        paths:
          /persons:
            get:
              summary: Gets some persons
              description: Returns a list containing all persons.
              responses:
                200:
                  description: A list of Person
                  schema:
                    type: array
                    items:
                      required:
                      - username
                      properties:
                        firstName:
                          type: string
                        lastName:
                          type: string
                        username:
                          type: string
          /pets:
            get:
              summary: Gets some pets
              description: Returns a list containing all pets.
              responses:
                200:
                  description: A list of pets
                  schema:
                    type: array
                    items:
                      required:
                      - petname
                      properties:
                        petname:
                          type: string
                        ownerName:
                          type: string
                        breed:
                          type: string

Thursday 26 July 2018

How to push Windows and IIS logs to CloudWatch using unified CloudWatch Agent automatically

CloudWatch is a powerful monitoring and management tool, collects monitoring and operational data in the form of logs, metrics, and events, providing you with a unified view of AWS resources. One of the most common use cases is collecting logs from web applications.

Log files are generated locally in the form of text files and some running process monitor them and then decide where to send them. This is usually performed by the SSM Agent, however, as per AWS documents:

"Important The unified CloudWatch Agent has replaced SSM Agent as the tool for sending log data to Amazon CloudWatch Logs. Support for using SSM Agent to send log data will be deprecated in the near future. We recommend that you begin using the unified CloudWatch Agent for your log collection processes as soon as possible."

Assigning permissions to EC2 instances

EC2 instances need permission to access CloudWatch logs, if your current instances don’t have any roles associated, then create one with the CloudWatchAgentServerPolicy managed policy attached.

If your instances already have a role then you can add the policy to the existing role. In either case, the instance needs to perform operations such as CreateLogGroup, CreateLogStream, PutLogEvents and so on.

Install the CloudWatch Agent

On Windows Server, the installation process consists of three basic steps:

  1. Download the package from https://s3.amazonaws.com/amazoncloudwatch-agent/windows/amd64/latest/AmazonCloudWatchAgent.zip
  2. Unzip to a local folder
  3. Change directory to the folder containing unzipped package and run install.ps1

For more information about how to install the agent, see AWS documents.

Here is a powershell snippet to automate this process.

# Install the CloudWatch Agent
$zipfile = "AmazonCloudWatchAgent.zip"
$tempDir = Join-Path $env:TEMP "AmazonCloudWatchAgent"
Invoke-WebRequest -Uri "https://s3.amazonaws.com/amazoncloudwatch-agent/windows/amd64/latest/AmazonCloudWatchAgent.zip" -OutFile $zipfile
Expand-Archive -Path $zipfile -DestinationPath $tempDir -Force
cd $tempDir
Write-Host "Trying to uninstall any previous version of CloudWatch Agent"
.\uninstall.ps1

Write-Host "install the new version of CloudWatch Agent"
.\install.ps1

Creating configuration file

Before launching the agent, a configuration file is required, this configuration file can seem daunting at first, especially because it’s a different format from one used in SSM Agent. This configuration file contain three sections: agent, metrics and logs.

In this case, we are interested only in section logs which in turn has two main parts: windows_events (system or application events we can find in Windows Event Viewer) and files (any log files including IIS logs).

There are two common parameters required:

  • log_group_name - Used in CloudWatch to identify a log group, it should be something meaningful such as the event type or website name.
  • log_stream_name - Used in CloudWatch to identify a log stream within a log group, typically it’s a reference to the current EC2 instance.

Collecting Windows Events

Here is an example of a Windows Event log

{
    "event_levels": ["ERROR","INFORMATION"],
    "log_group_name": "/eventlog/application",
    "event_format": "text",
    "log_stream_name": "EC2AMAZ-NPQGPRK",
    "event_name": "Application"
}

Key points:

  • event_levels can be one or more of (INFORMATION, WARNING, ERROR, CRITICAL,VERBOSE).
  • event_name is typically one of (System, Security, Application)
  • event_format is text or xml.

Collecting IIS logs

Here is an example of an IIS website logs

{
    "log_group_name": "/iis/website1",
    "timezone": "UTC",
    "timestamp_format": "%Y-%m-%d %H:%M:%S",
    "encoding": "utf-8",
    "log_stream_name": "EC2AMAZ-NPQGPRK",
    "file_path": "C:\\inetpub\\logs\\LogFiles\\W3SVC2\\*.log"
}

Key points:

  • timezone and timestamp_format are optional.
  • encoding defaults to utf-8
  • file_path uses the standard Unix glob matching rules to match files, while all the examples in AWS docs display concrete log files, the example above matches all .log files within IIS logs folder, this is important since IIS create new files based on a rotation and we can’t predict their names.

These sections can be repeated for every website and for every Windows Event we’d like to push logs to CloudWatch. If we have several EC2 instances as web servers, this process can be tedious and error prone, therefore it should be automated. Here is an example of a powershell snippet.

$windowsLogs = @("Application", "System", "Security")
$windowsLoglevel = @("ERROR", "INFORMATION")
$instance = hostname

$iissites = Get-Website | Where-Object {$_.Name -ne "Default Web Site"}

$iislogs = @()
foreach ($site in $iissites) {
    $iislog = @{
        file_path = "$($site.logFile.directory)\w3svc$($site.id)\*.log"
        log_group_name = "/iis/$($site.Name.ToLower())"
        log_stream_name = $instance
        timestamp_format = "%Y-%m-%d %H:%M:%S"
        timezone = "UTC"
        encoding = "utf-8"
    }
    $iislogs += $iislog
}

$winlogs = @()
foreach ($event in $windowsLogs) {
    $winlog = @{
        event_name = $event
        event_levels = $windowsLoglevel
        event_format ="text"
        log_group_name = "/eventlog/$($event.ToLower())"
        log_stream_name = $instance
    }
    $winlogs += $winlog
}

$config = @{
    logs = @{
        logs_collected = @{
            files = @{
                collect_list = $iislogs
            }
            windows_events = @{
                collect_list = $winlogs
            }
        }
        log_stream_name = "generic-logs"
    }
}

# this could be any other location as long as it’s absolute
$configfile = "C:\Users\Administrator\amazon-cloudwatch-agent.json"

$json = $config | ConvertTo-Json -Depth 6 

# Encoding oem is important as the file is required without any BOM 
$json | Out-File -Force -Encoding oem $configfile

For more information on how to create this file, see AWS documents.

Starting the agent

With the configuration file in place, it’s time to start the agent, to do that, change directory to CloudWatch Agent installation path, typically within Program Files\Amazon\AmazonCloudWatchAgent and run the following command line:

.\amazon-cloudwatch-agent-ctl.ps1 -a fetch-config -m ec2 -c file:configuration-file-path -s 

Key points:

  • -a is short for -Action, fetch-config indicates it will reload configuration file.
  • -m is short for -Mode, in this case ec2 as opposed to onPrem.
  • -c is short for -ConfigLocation which is the configuration file previously generated.
  • -s is short for -Start which indicates to start the service after loading configuration.

Here is a powershell snippet covering this part of the process.

cd "${env:ProgramFiles}\Amazon\AmazonCloudWatchAgent"
Write-Host "Starting CloudWatch Agent"
.\amazon-cloudwatch-agent-ctl.ps1 -a fetch-config -m ec2 -c file:$configfile -s

Let’s test it.

Assuming we have 3 websites running in our test EC2 instance, let’s name them.

  • website1 - hostname: web1.local
  • website2 - hostname: web2.local
  • website3 - hostname: web3.local

After some browsing to generate some traffic, let’s inspect CloudWatch.

Some Windows Events also in CloudWatch Logs

Here is the complete powershell script.

Tuesday 17 July 2018

Automate SSL certificate validation in AWS Certificate Manager using DNS via Route 53

When creating SSL certificates in AWS Certificate Manager, there is a required step before getting the certificate: Validate domain ownership. This seems obvious but to get a certificate you need to prove that you have control over the requested domain(s). There are two ways to validate domain ownership: by email or by DNS.

Use Email to Validate Domain Ownership

When using this option, ACM will send an email to the three registered contact addresses in WHOIS (Domain registrant, Technical contact, Administrative contact) then will wait for up to 72h for confirmation or it will time out.

This approach requires manual intervention which is not great for automation although there might be scenarios where this is applicable. See official AWS documentation.

Use DNS to Validate Domain Ownership

When using this option, ACM will need to know that you have control over the DNS settings on the domain, it will provide a pair name/value to be created as a CNAME record which it will use to validate and to renew if you wish so.

This approach is more suitable for automation since it doesn't require manual intervention. However, as of this writing, it's not supported yet by CloudFormation and therefore it will need to be done by using AWS CLI or API calls. Follow up the official announcement and comments. See official AWS documentation.

How to do this in the command line?

The following commands have been tested in bash on Linux 4.9.0-4-amd64 #1 SMP Debian 4.9.65-3+deb9u1, there shouldn't be much trouble if trying this on a different operation system, not tested on Windows though.

Some prerequisites:

  • AWS CLI installed and configured.
  • jq package installed and available in PATH.

Set the variable to store domain name and request the certificate to AWS ACM CLI command request-certificate

$ DOMAIN_NAME=abelperez.info

$ SSL_CERT_ARN=`aws acm request-certificate \
--domain-name $DOMAIN_NAME \
--subject-alternative-names *.$DOMAIN_NAME \
--validation-method DNS \
--query CertificateArn \
--region us-east-1 \
--output text`

At this point we have the certificate but it's not validated yet. ACM provides values for us to create a CNAME record so they can verify domain ownership. To do that, use aws acm describe-certificate command to retrieve those values.

Now, let's store the result in a variable to prepare for extracting name and value later.

$ SSL_CERT_JSON=`aws acm describe-certificate \
--certificate-arn $SSL_CERT_ARN \
--query Certificate.DomainValidationOptions \
--region us-east-1`

Extract name and value querying the previous json using jq.

$ SSL_CERT_NAME=`echo $SSL_CERT_JSON \
| jq -r ".[] | select(.DomainName == \"$DOMAIN_NAME\").ResourceRecord.Name"`

$ SSL_CERT_VALUE=`echo $SSL_CERT_JSON \
| jq -r ".[] | select(.DomainName == \"$DOMAIN_NAME\").ResourceRecord.Value"`

Let's verify that SSL_CERT_NAME and SSL_CERT_VALUE captured the right values.

$ echo $SSL_CERT_NAME
_3f88376edb1eda680bd44991197xxxxx.abelperez.info.

$ echo $SSL_CERT_VALUE
_f528dff0e3e6cd0b637169a885xxxxxx.acm-validations.aws.

At this point, we are ready to interact with Route 53 to create the record set using the proposed values from ACM, but first we need the Hosted Zone Id, it can be copied from the console, but we can also get it from Route 53 command line filtering by domain name.

$ R53_HOSTED_ZONE=`aws route53 list-hosted-zones-by-name \
--dns-name $DOMAIN_NAME \
--query HostedZones \
| jq -r ".[] | select(.Name == \"$DOMAIN_NAME.\").Id" \
| sed 's/\/hostedzone\///'`

Route 53 gives us the hosted zone id in the form of "/hostedzone/Z2TXYZQWVABDCE", the leading "/hostedzone/" bit is stripped out using sed command. Let's verify the hosted zone is captured in the variable.

$ echo $R53_HOSTED_ZONE
Z2TXYZQWVABDCE

With the hosted zone id, name and value from ACM, prepare the JSON input for route 53 change-resource-record-sets command, in this is case, Action is a CREATE, TTL can be the default 300 seconds (which is what AWS does itself through the console).

$ read -r -d '' R53_CNAME_JSON << EOM
{
  "Comment": "DNS Validation CNAME record",
  "Changes": [
    {
      "Action": "CREATE",
      "ResourceRecordSet": {
        "Name": "$SSL_CERT_NAME",
        "Type": "CNAME",
        "TTL": 300,
        "ResourceRecords": [
          {
            "Value": "$SSL_CERT_VALUE"
          }
        ]
      }
    }
  ]
}
EOM

We can check all variables were expanded correctly before preparing the command line.

$ echo "$R53_CNAME_JSON"
{
  "Comment": "DNS Validation CNAME record",
  "Changes": [
    {
      "Action": "CREATE",
      "ResourceRecordSet": {
        "Name": "_3f88376edb1eda680bd44991197xxxxx.abelperez.info.",
        "Type": "CNAME",
        "TTL": 300,
        "ResourceRecords": [
          {
            "Value": "_f528dff0e3e6cd0b637169a885xxxxxx.acm-validations.aws."
          }
        ]
      }
    }
  ]
}

Now we've verified everything is in place, finally we can create the record set using route 53 cli.

$ R53_CNAME_ID=`aws route53 change-resource-record-sets \
--hosted-zone-id $R53_HOSTED_ZONE \
--change-batch "$R53_CNAME_JSON" \
--query ChangeInfo.Id \
--output text`

This operation will return a change-id, since route 53 needs to propagate the change, it won't be available immediately, usually within 60 seconds, to ensure we can proceed, we can use the wait command. This command will block the console/script until the record set change is ready.

$ aws route53 wait resource-record-sets-changed --id $R53_CNAME_ID

After the wait, the record set is ready, now ACM needs to validate it, as per AWS docs, it can take up to several hours but in my experience it's not that long. By using another wait command, we'll block the console/script until the certificate is validated.

$ aws acm wait certificate-validated \
--certificate-arn $SSL_CERT_ARN \
--region us-east-1

Once this wait is done, we can verify that our certificate is in fact issued.

$ aws acm describe-certificate \
--certificate-arn $SSL_CERT_ARN \
--query Certificate.Status \
--region us-east-1
"ISSUED"

And this is how it's done, 100% end to end commands, no manual intervention, no console clicks, ready for automation.

Monday 30 April 2018

Using Lambda@Edge to reduce infrastructure complexity

In my previous series I went through the process of creating the cloud resources to host a static website as well as the development pipeline to automate the process from push code in source control to deploy on a S3 bucket.

One of the challenges was how to approach the www to non-www redirection, the proposed solution consisted of duplicating the CloudFront distributions and the S3 website buckets in order to get the traffic end to end, the reason why I took this approach was because CloudFront doesn't have (to the best of my knowledge at the time) the ability to issue redirect, instead it just pass traffic to different origins based on configuration.

What is Lamda@Edge ?

Well, I was wrong, there is in fact a way to make CloudFront to issue redirects, it's called Lambda@Edge, a special flavour of Lambda functions that are executed on Edge locations and therefore closer to the end user. It allows a lot more than just issuing HTTP redirects.

In practice this means we can intercept any of the four events that happen when the user request a page to CloudFront and execute our Lambda code.

  • After CloudFront receives a request from a viewer (viewer request)
  • Before CloudFront forwards the request to the origin (origin request)
  • After CloudFront receives the response from the origin (origin response)
  • Before CloudFront forwards the response to the viewer (viewer response)

In this post, we're going to leverage Lambda@Edge to create another variation of the same infrastructure by using hooking our Lambda function to Viewer Request event, it will look like this one when finished.

How does it change from previous approach?

This time we still need two Route 53 record sets, because we're still handling both abelperez.info and www.abelperez.info.

We need only one S3 bucket, since redirection will be issued by Lambda@Edge, so no need for Redirection Bucket resource.

We need only one CloudFront distribution as there a single origin, but this time the CloudFront distribution will have two CNAMEs in order to handle both www and non-www. We'll also link the lambda function with the event as part of default cache behaviour.

Finally we need to create a Lambda function to performs the redirection when necessary.

Creating Lambda@Edge function

Creating a Lambda@Edge function is not too far from creating an ordinary Lambda function, but we need to be aware of some limitations (at least at the moment of writing), they need to be created only in N. Virginia (US-East-1) region and the available runtime is NodeJs 6.10.

Following the steps from AWS CloudFront Developer Guide, you can create your own Lambda@Edge function and connect it to a CloudFront distribution. Here are some of my highlights:

  • Be aware of the required permissions, telling Lambda to create the role is handy.
  • Remove triggers before creating the function as it can take longer to replicate
  • You need to publish a version of the function before associating with any trigger.

The code I used is very simple, it only reads host header from the request and verify if it's equal to 'abelperez.info' to send a custom response with a HTTP 301 redirection to www domain host, in any other case, it just let it pass ignoring the request, therefore CloudFront will proceed with the request life cycle.

exports.handler = function(event, context, callback) {
  const request = event.Records[0].cf.request;
  const headers = request.headers;
  const host = headers.host[0].value;
  if (host !== 'abelperez.info') {
      callback(null, request);
      return;
  }
  const response = {
      status: '301',
      statusDescription: 'Moved Permanently',
      headers: {
          location: [{
              key: 'Location',
              value: 'https://www.abelperez.info',
          }],
      },
  };
  callback(null, response);
};

Adding the triggers

Once we have created and published the Lambda fuction, it's time to add the trigger, in this case it's CloudFront and we need to provide the CloudFront distribution Id and select the event type which is viewer-request as stated above.

From this point, we've just created a Lambda@Edge function!

Let's test it

The easiest way to test what we've done is to issue a couple of curl commands, one requesting www over HTTPS expecting a HTTP 200 with our HTML and another one request to non-www over HTTP expecting a HTTP 302 with the location pointing to www domain. Here is the output.

abel@ABEL-DESKTOP:~$ curl https://www.abelperez.info
<html>
<body>
<h1>Hello from S3 bucket :) </h1>
</body>
</html>
abel@ABEL-DESKTOP:~$ 
abel@ABEL-DESKTOP:~$ curl http://abelperez.info
<html>
<head><title>301 Moved Permanently</title></head>
<body bgcolor="white">
<center><h1>301 Moved Permanently</h1></center>
<hr><center>CloudFront</center>
</body>
</html>

An automated version of this can be found at my github repo

Thursday 5 April 2018

Completely serverless static website on AWS

Why serverless ? The basic idea behind this is not to worry about the underlying infrastructure, the Cloud provider will expose services through several interfaces where we allocate resources and use them, and more importantly, pay only for what we use.

This approach helps to prove concepts with little or no budget, also allows to scale as the business grows on demand. All that solves the problem of over provisioning and paying for idle boxes.

One of the common scenarios is having a content website, in this case I'll focus on static website. In this series I'll explain step by step how to create all the environment from development to production on AWS.

At the end of this series we'll have created this infrastructure:

Serverless static website - part 1 - In this part you'll learn how to start with AWS and how to use Amazon S3 to host a static website, making it publicly accesible by its public endpoint url.

Serverless static website - part 2 - In this part you'll learn how to get your own domain and put it in use straight away with the static website.

Serverless static website - part 3 - In this part you'll learn how to get around the problem of having www as well as non-www domain, and how get always redirect to the www endpoint.

Serverless static website - part 4 - In this part you'll learn how to create a SSL certificate via Amazon Certificate Manager and verify the domain identity.

Serverless static website - part 5 - In this part you'll learn how to distribute the content throughout the AWS edge locations and handling SSL traffic.

Serverless static website - part 6 - In this part you'll learn how to set up a git repository using CodeCommit repository, so you can store your source files.

Serverless static website - part 7 - In this part you'll learn how to set up a simple build pipeline using a CodeBuild project.

Serverless static website - part 8 - In this part you'll learn how to automate the process of triggering the build start action when some changes are pushed to the git repository.

Serverless static website - part 9 - In this part you'll learn how the whole process can be automated by using CloudFormation templates to provision all the resources previously described manually.

Serverless static website - part 9

One of the greatest benefits of cloud computing is the ability to automate processes and up to this point, we've learned how to set everything up via AWS console web interface.

Why automate?

It is always good to know how to manage stuff via console in case we need to manually modify something, but we should aim to avoid this practice. Instead, limit the use of the console to a bare minimum and the rest of the time, aim for some automated way, this has the following advantages:

  • We can keep source code / templates under source control, allowing to keep track of changes.
  • It can be reused to replicate in case of a new customer / new environment / etc.
  • No need to remember where every single option is located as the UI can change.
  • It can be transferred to another account in a matter of a few minutes.

In AWS world, the automated process is achieved by creating templates in CloudFormation and deploying them to stacks.

I have already created a couple of CloudFormation templates to automate all the process described to this point, they can be found at my GitHub repo.

CloudFormation templates

In order to automate this infrastructure, I've divided resources into two separate templates: one containing the SSL certificate and the other containing all the rest of the resources. The reason why the SSL certificate is in another template is because it needs to be run on N. Virginia region (US-East-1) as explained earlier when we created it manually, it's a CloudFront requirement.

Templates can contain parameters that make them more flexible, in this case, there is a parameter that controls the creation of a redirection bucket, we might have a scenario when we want just a website on a sub domain and we might not want to redirect from the naked domain. These are the parameters:

SSL Certificate template

  • DomainName: The site domain name (naked domain only)

Infrastructure template

  • HostedZone: This is just for reference, it should not be changed
  • SSLCertificate: This should be taken from the output of the SSL certificate template
  • DomainName: Same as above, only naked domain
  • SubDomainName: specific sub domain, typically www
  • IncludeRedirectToSubDomain: Whether it should include a redirection bucket from the naked domain to the subdomain

Creating SSL certificate Stack

First, let's make sure we are in N. Virginia region. Go to CloudFormation console, once there, click Create Stack button. We are presented with Select Template screen, where we'll choose a template from my repository (ssl-certificate.yaml) by selecting Upload a template to Amazon S3 radio button.

Click Next, you'll see the input parameters page including the stack name which I'll name abelperez-info-ssl-stack to give it some meaningful name.

After entering the required information, click Next and Next again, then on Create button. You'll see the Create in progress status in the stack.

At this point, the SSL certificate is being created and will require the identity verification just like when it was created manually, this will block the stack creation until the validation process is finished, so go ahead and check your email and follow the link to validate the identity to proceed with the stack creation.

Once the creation is done you'll see the Create complete status in the stack, on the lower pane, select Outputs, you'll find SSLCertificateArn. Take that value and copy it somewhere temporarily, we'll need it for our next stack.

Creating Infrastructure Stack

Following a similar process, let's create the second stack containing most of the resources to provision. In this case we are not forced to create it in any specific region, we can choose any provided all the services are available, for this example I'll Ireland (EU-West-1). The template can be downloaded from my repository (infrastructure.yaml).

This time, you are presented a different set of parameters, SSL Certificate will be the output of the previous stack as explained above. Domain name will be exactly the same as in the previous stack, give we are using the SSL certificate for this domain. Subdomain will be www and I'll include a redirection as I expect users to be redirected from abelperez.info to www.abelperez.info. I'll name the stack abelperez-info-infra-stack just to make it meaningful.

Since this template will create IAM users, roles and policies, we need to acknowledge this by ticking the box.

Once we hit Create, we can see the Create in progress screen.

This process can take up to 30 minutes, so please be patient, this takes so long time to create the stack because we are provisioning CloudFront distributions and they can take some time to propagate.

Once the stack is created, we can take note of a couple of values from the output: CodeCommit repository url (either SSH or HTTPS) and the Static bucket name.

Manual steps to finish the set up.

With all resource automatically provisioned by the templates, we are in a position where the only thing we need is to link our local SSH key with the IAM user. To do that, let's do exactly what we did when it was set up manually in part 6.

In my case, I chose to use SSH key, so I went to IAM console, found the user, under Security Credentials, I uploaded my SSH public key.

We also need to update the buildspec.yml to run our build, can be downloaded from the above linked GitHub repository. The placeholder <INSERT-YOUR-BUCKET-NAME-HERE> must be replaced with the actual bucket name, in this instance the bucket name generated is abelperez-info-infra-stack-staticsitebucket-1ur0k115f2757 and my buildspec.yml looks like:

version: 0.2

phases:
  build:
    commands:
      - mkdir dist
      - cp *.html dist/

  post_build:
    commands:
      - aws s3 sync ./dist 
        s3://abelperez-info-infra-stack-staticsitebucket-1ur0k115f2757/ 
        --delete --acl=public-read

Let's test it!

Our test consist of cloning the git repository from CodeCommit, add two files: index.html and buildspec.yml. Then we'll perform a git push and we expect it will trigger the build executing the s3 sync command and copying the index.html to our destination bucket which will be behind CloudFront and CNamed by Route 53. In the end, we should be able to just browse www.abelperez.info and get whatever the result is in index.html just uploaded.

Just a note, if you get a HTTP 403 instead of the expected HTML, then just wait for a few minutes, CloudFront/Route 53 might not be fully propagated just yet.

abel@ABEL-DESKTOP:~$ git clone ssh://git-codecommit.eu-west-1.amazonaws.com/v1/repos/www.abelperez.info-web
Cloning into 'www.abelperez.info-web'...
warning: You appear to have cloned an empty repository.
abel@ABEL-DESKTOP:~$ cd www.abelperez.info-web/
abel@ABEL-DESKTOP:~/www.abelperez.info-web$ git add buildspec.yml index.html 
abel@ABEL-DESKTOP:~/www.abelperez.info-web$ git commit -m "initial commit"
[master (root-commit) dc40888] initial commit
 Committer: Abel Perez Martinez 
Your name and email address were configured automatically based
on your username and hostname. Please check that they are accurate.
You can suppress this message by setting them explicitly. Run the
following command and follow the instructions in your editor to edit
your configuration file:

    git config --global --edit

After doing this, you may fix the identity used for this commit with:

    git commit --amend --reset-author

 2 files changed, 16 insertions(+)
 create mode 100644 buildspec.yml
 create mode 100644 index.html
abel@ABEL-DESKTOP:~/www.abelperez.info-web$ git push
Counting objects: 4, done.
Delta compression using up to 4 threads.
Compressing objects: 100% (4/4), done.
Writing objects: 100% (4/4), 480 bytes | 0 bytes/s, done.
Total 4 (delta 0), reused 0 (delta 0)
To ssh://git-codecommit.eu-west-1.amazonaws.com/v1/repos/www.abelperez.info-web
 * [new branch]      master -> master
abel@ABEL-DESKTOP:~/www.abelperez.info-web$ curl https://www.abelperez.info
<html>
<body>
<h1>Hello from S3 bucket :) </h1>
</body>
</html>

Saturday 24 February 2018

Serverless static website - part 8

All the way to this point, we have created the resources that allow us to store our source code and deploy it to S3 bucket. However, this build/deploy process has to be triggered manually by going to the console, finding the CodeBuild project and clicking Start build button.

This doesn't sound good enough for a complete development cycle. We need something that links changes in CodeCommit repository and CodeBuild project together so the build process is triggered automatically when changes are pushed to git. That magic link is called CloudWatch

Amazon CloudWatch is a monitoring service for AWS cloud resources and applications you run on AWS. Amongst other things it allows to create event rules that watch service events and trigger actions on target services. In this case we are going to watch changes in CodeCommit repository and link that to the Start build action on CodeBuild.

Creating the Rule

First, we need to go to CloudWatch console, to get there, select Services from the top menu, then under Management Tools, select CloudWatch. Once there, select Rules from the left hand side menu, under Events category.

Configure the Event source

We'll see two panes, the left hand side is for the event source, the right one is to choose the target of our rule.

On the left side, select Event Pattern radio button option (default one), next from the drop down menu, select Events by Service. For Service Name, find the option corresponding to CodeCommit and Event Type CodeCommit Repository State Change.

Since we are only interested in the changes of the repository we previously created, select Specific resource(s) by ARN radio button option. Then, enter the ARN of the corresponding CodeCommit repository, which can be found by going to Settings in CodeCommit console. It should be something like arn:aws:codecommit:eu-west-1:111111111111:abelperez.info-web.

Configure the Target

On the right side, click Add Target, then from the drop down menu, select CodeBuild project. A new form is displayed where we need to enter the project ARN, this is a bit tricky because for some reason, CodeBuild console doesn't show this information. Head to ARN namespaces documentation page and find CodeBuild, the format will be something like arn:aws:codebuild:us-east-1:111111111111:project/abelperez.info-builder.

Next step is to define the role, which in this case, we'll leave as it is proposed to Create a new role for this specific resource, AWS will figure out what permissions based on the type of resource we set as target, this might not be entirely accurate in the case of Lambda as target, we'd need to edit the role and add some policy for specific access.

We skipped Configure input on purpose as no input is required to trigger the build, so no need to change that setting.

Finish the process

Click on Configure details to go to step 2 where the process will finish.

Enter name and optionally a description, leave State as Enabled so it will be active from the moment we create it. Click on Create rule finish the process.

Let's test it

How can we know if the rule is working as expected? Since we connected changes on CodeCommit repository with starting a build on CodeBuild, let's do some changes to our repository, for example, adding a new file index3.html

abel@ABEL-DESKTOP:~/Downloads/abelperez.info-web$ git add index3.html 
abel@ABEL-DESKTOP:~/Downloads/abelperez.info-web$ git commit -m "3rd file"
[master e953674] 3rd file
 1 file changed, 1 insertion(+)
 create mode 100644 index3.html
abel@ABEL-DESKTOP:~/Downloads/abelperez.info-web$ git push
Counting objects: 3, done.
Delta compression using up to 4 threads.
Compressing objects: 100% (2/2), done.
Writing objects: 100% (3/3), 328 bytes | 0 bytes/s, done.
Total 3 (delta 1), reused 0 (delta 0)
To ssh://git-codecommit.eu-west-1.amazonaws.com/v1/repos/abelperez.info-web
   27967c1..e953674  master -> master

Now let's check CodeBuild console to see the build being triggered by the rule we've created

As expected, the build ran without any human intervention, which was the goal of the CloudWatch Event rule. Since the build succeeded, we can also check the existence of the new file in the bucket.

abel@ABEL-DESKTOP:~/Downloads$ aws s3 ls s3://www.abelperez.info
2018-02-21 23:19:53         18 index.html
2018-02-21 23:19:53         49 index2.html
2018-02-21 23:19:53         49 index3.html

Tuesday 20 February 2018

Serverless static website - part 7

Now that we have our source code versioned and safely stored, we need a way to make it go to our S3 bucket, otherwise it won't be visible to the public. There are, as usual, many ways to address this scenario, but as a developer, I can't live without CI/CD integration for all my processes. In this case, we have a very simple process, and we can combine the building and deploying steps in one go. To do that, once again, AWS offers some useful services, I'll be using CodeBuild for this task.

Creating the access policy

Just like anything in AWS, a CodeBuild project needs access to other AWS services and resources. The way this is done is by applying service roles with policies. As per AWS docs, a CodeBuild project needs the following permissions:

  • logs:CreateLogGroup
  • logs:CreateLogStream
  • logs:PutLogEvents
  • codecommit:GitPull
  • s3:GetObject
  • s3:GetObjectVersion
  • s3:PutObject

The difference is that the proposed policy in the docs does not restrict access to any resource, it suggests to change the * to something more specific. The following is the resulting policy restricting access to logs in the log group created by the CodeBuild project. Also I've added full access to the bucket, since we'll be copying files to that bucket. In summary, the policy below grants the following permissions (account id is masked with 111111111111):

  • Access to create new log groups in CloudWatch
  • Access to create new log streams within the log group created by the build project
  • Access to create new log events within the log stream created by the build project
  • Access to pull data through Git to CodeCommit repository
  • Full Access to our S3 bucket where the files will go
{
    "Version": "2012-10-17",
    "Statement": [
        {
            "Action": [
                "logs:CreateLogGroup",
                "s3:ListObjects"
            ],
            "Resource": "*",
            "Effect": "Allow",
            "Sid": "AccessLogGroupsS3ListObjects"
        },
        {
            "Action": [
                "codecommit:GitPull",
                "logs:CreateLogStream",
                "logs:PutLogEvents"
            ],
            "Resource": [
                "arn:aws:logs:eu-west-1:111111111111:log-group:/aws/codebuild/
                 abelperez-stack-builder",
                "arn:aws:logs:eu-west-1:111111111111:log-group:/aws/codebuild/
                 abelperez-stack-builder:*",
                "arn:aws:codecommit:eu-west-1:111111111111:abelperez.info-web"
            ],
            "Effect": "Allow",
            "Sid": "AccessGitLogs"
        },
        {
            "Action": "s3:*",
            "Resource": [
                "arn:aws:s3:::www.abelperez.info",
                "arn:aws:s3:::www.abelperez.info/*"
            ],
            "Effect": "Allow",
            "Sid": "AccessS3staticBucket"
        }
    ]
}

Creating the service role

Go to IAM console, select Roles from the left hand side menu, click on Create Role. On the Select type of trusted entity screen, select AWS service EC2, Lambda and others and from the options, CodeBuild

Click Next: Permissions, at this point, we can create a policy with the JSON above or continue to Review and then add the policy later. To create the policy, click Create Policy button, select JSON tab, paste the JSON above, Review and Create Policy, then back to role permission screen, refresh and select the policy. Give it a name, something like CodeBuildRole or anything meaningful and click on Create Role to finish the process.

Creating the CodeBuild project

With all permissions set, let's start with the actual CodeBuild project, where we'll specify the source code origin, build environment, artifacts and role. On CodeBuild console, if it's the first project, click Get Started, otherwise select Build projects from the left hand side menu, and click on Create Project

Enter the following values:

  • Project name* a meaningful name i.e "abelperez-stack-builder"
  • Source provider* select "AWS CodeCommit"
  • Repository* select the repository previously created
  • Environment image* select "Use an image managed by AWS CodeBuild"
  • Operating system* select "Ubuntu"
  • Runtime* select "Node.js"
  • Runtime version* select "aws/codebuild/nodejs:6.3.1"
  • Buildspec name leave default "buildspec.yml"
  • Artifacts: Type* select "No artifacts"
  • Role name* select the previously created role

After finishing all the input, review and save the project.

Creating the build spec file

When creating the CodeBuild project, one of the input parameters is the Buildspec file name, which refers to the description of our build process. In this case, it's very simple process:

  • BUILD: Create a directory dist to copy all output files
  • BUILD: Copy all .html file to dist
  • POST_BUILD: Synchronise all content of dist folder with www.abelperez.info S3 bucket

The complete buildspec.yml containing the above steps:

version: 0.2

phases:
  build:
    commands:
      - mkdir dist
      - cp *.html dist/

  post_build:
    commands:
      - aws s3 sync ./dist s3://www.abelperez.info/ --delete --acl=public-read

The last step is executed on post build phase, which is at the end of the all build steps when everything is ready to package / deploy or in this case ship to our S3 bucket. This is done by using the sync subcommand of s3 service from AWS Command line interface. It basically takes an origin and a destination and make them to be in sync.

--delete instructs to remove files in the destination that are not in the source, because by default they are not deleted.

--acl=public-read instructs to edit bucket objects' ACL, in this case read access to everyone.

At this point, we can remove the bucket policy previously created if we wish so, since every single file will be publicly accessible, that would allow to have other folders in the same bucket and not being accessible. It will depend on the use case for the website.

Let's test it

It's time to verify if everything is in the right place. We have the build project with some basic commands to run and assuming the above code is saved in a file named buildspec.yml at root level of the code repository, the next step is to commit and push that file to CodeCommit.

Let's go back to CodeBuild console, select the build project we've just created and click Start build, then choose the right branch (master in my case) and once again Start build.

Tuesday 6 February 2018

Serverless static website - part 6

Up to this point we've created a simple HTML page and set up all the plumbing to make it visible to the world in a distributed and secure way. Now, if we want to update the content, we can either go to S3 console and upload manually the files or from the AWS CLI synchronise a local folder with a bucket. None of those ways seem to scale in the long run. As a developer I like to keep things under control, even more, under source control.

It can be done by using any popular cloud hosted version control systems, such as github, but in this example I'll use the one provided by AWS, it's called CodeCommit and it's a Git repository compatible with all current git tools.

Creating the repository

In CodeCommit console, which can be accessed by selecting Services, then under Developer Tools, select CodeCommit. Once there, click on Create repository button, or Get started if you haven't created any repository before.

Next, give it a name and a description and you'll see something like this:

Creating the user

Now, we need a user for ourselves or if someone else is going to contribute to that repository. There are many ways to address this part, I'll go for creating a user with a specific policy to grant access to that particular CodeCommit repository

In IAM (Identity and Access Management) console, select Users from left hand side menu, then click Add user. Next, give it a name and Programmatic access, this user won't access the console so it doesn't need login and password, not even access keys.

Click Next, Skip permissions for now, we'll deal with that in the next section. Review and create the user.

Creating the policy

Back to IAM console dashboard, select Policies from the left menu, then click on Create policy, select JSON tab and copy the following:

{
    "Version": "2012-10-17",
    "Statement": [
        {
            "Sid": "AllowGitCommandlineOperations",
            "Effect": "Allow",
            "Action": [
                "codecommit:GitPull",
                "codecommit:GitPush"
            ],
            "Resource": [
                "arn:aws:codecommit:::abelperez.info-web"
            ]
        }
    ]
}

Details about creating policies is beyond the scope of this post, but essentially this policy grants pull and push operations on abelperez.info-web repository. Click Review Policy and give it a meaningful name such as CodeCommit-MyRepoUser-Policy or something that states what permissions are granted, just to keep everything organised. Create the policy and you'll be able to to see it if filtering by the name.

Assigning the policy to the user

Back to IAM console dashboard, select Users, select the user we've created before, on tab Permissions, click Add Permissions

Once there, select Attach existing policies directly from the top three buttons. Then, filter by Customer managed policies to make it easier to find our policy (the one created before). Select the policy, Review and Add Permissions.

When it's done, we can see the permission added to the user, like below.

Granting access via SSH key

Once we've assigned the policy, the user should have permission to use git pull / push operations, now we need to link that IAM user with a git user (so to speak). To do that, CodeCommit provides two options: via HTTPS and SSH. The simpler way is using SSH, it only requires to upload the SSH public key to IAM user settings, then add some host/key/id information to SSH configuration file and that's it.

In IAM console, select the previously created user, then on Security Credentials tab, scroll down all the way to SSH keys for AWS CodeCommit, then click on Upload SSH public key button, paste your SSH public key. If you don't have one created yet, have a look at here and for more info, here. Click Upload SSH public key button and we are good to go.

If you are interested in accessing via HTTPS, then have a look at this documentation page on AWS website.

Back to CodeCommit console, select the repository previously created, then on the right hand side, click Connect button. AWS will show a panel with instructions, depending on your operating system, but it's essentially like this:

The placeholder Your-IAM-SSH-Key-ID-Here refers to the ID auto generated by IAM when you upload your SSH key and it has the format like APKAIWBASSHIDEXAMPLE

Let's test it

The following command sequence has been executed after setting up all the previous steps on AWS console. Started by cloning an empty repo, then created a new file. Added and committed that file to the repository and finally pushed that commit to the remote repository

abel@ABEL-DESKTOP:~/Downloads$ git clone ssh://git-codecommit.eu-west-1
.amazonaws.com/v1/repos/abelperez.info-web
Cloning into 'abelperez.info-web'...
warning: You appear to have cloned an empty repository.
abel@ABEL-DESKTOP:~/Downloads$ cd abelperez.info-web/
abel@ABEL-DESKTOP:~/Downloads/abelperez.info-web$ ls
abel@ABEL-DESKTOP:~/Downloads/abelperez.info-web$ echo "<h1>New file</h1>" > index.html
abel@ABEL-DESKTOP:~/Downloads/abelperez.info-web$ cat index.html 
<h1>New file</h1>
abel@ABEL-DESKTOP:~/Downloads/abelperez.info-web$ git add index.html 
abel@ABEL-DESKTOP:~/Downloads/abelperez.info-web$ git commit -m "first file"
[master (root-commit) c81ad93] first file
 Committer: Abel Perez Martinez <abel@ABEL-DESKTOP>
Your name and email address were configured automatically based
on your username and hostname. Please check that they are accurate.
You can suppress this message by setting them explicitly. Run the
following command and follow the instructions in your editor to edit
your configuration file:

    git config --global --edit

After doing this, you may fix the identity used for this commit with:

    git commit --amend --reset-author

 1 file changed, 1 insertion(+)
 create mode 100644 index.html
abel@ABEL-DESKTOP:~/Downloads/abelperez.info-web$ git status
On branch master
Your branch is based on 'origin/master', but the upstream is gone.
  (use "git branch --unset-upstream" to fixup)
nothing to commit, working tree clean
abel@ABEL-DESKTOP:~/Downloads/abelperez.info-web$ git push
Counting objects: 3, done.
Writing objects: 100% (3/3), 239 bytes | 0 bytes/s, done.
Total 3 (delta 0), reused 0 (delta 0)
To ssh://git-codecommit.eu-west-1.amazonaws.com/v1/repos/abelperez.info-web
 * [new branch]      master -> master

After this, as expected, the new file is now visible from CodeCommit console.

Friday 2 February 2018

Serverless static website - part 5

Once we have created the certificate, we need a bridge between a secure endpoint and the current buckets. One of the most common ways to address this is by using CloudFront content distribution service. By using this, we'll make our website to be distributed to some (depending on the pricing) of the Amazon AWS edge locations, which means that if we have some international audience for our website, it will be served to the client by the closest edge location.

Creating WWW Distribution

First, on AWS Console select CloudFront from the services list, under Networking & Content Delivery category. Once there, click on Create Distribution button, in this case, we are interested in a Web Distribution, so under Web, select Get Started. In the create distribution form, there are some key values that are required to enter in order to make this configuration to work. The rest can stay with default value

  • Origin Domain Name: www.abelperez.info.s3-website-eu-west-1.amazonaws.com (which is the endpoint for the bucket)
  • Viewer Protocol Policy: HTTP and HTTPS (this way if anyone tries to visit through HTTP, it will be redirected to HTTPS endpoint)
  • Price Class: Depending on your needs, in my case, US, Canada en Europe is enough
  • Alternate Domain Names(CNAMEs): www.abelperez.info
  • SSL Certificate: Custom SSL Certificate (example.com): and select your certificate from the dropdown menu
  • Default Root Object: index.html

Note: If you can't see your certificate in the dropdown, make sure you've created / imported in the region N. Virginia.

Once entered all this information, click Create Distribution

Creating non-WWW Distribution

Let's repeat the process to create another distribution, this time some values will be different, as we'll point to the non-www bucket and domain name.

  • Origin Domain Name: abelperez.info.s3-website-eu-west-1.amazonaws.com (which is the endpoint for the bucket)
  • Viewer Protocol Policy: HTTP and HTTPS (this way if anyone tries to visit through HTTP, it will be redirected to HTTPS endpoint)
  • Price Class: Depending on your needs, in my case, US, Canada en Europe is enough
  • Alternate Domain Names(CNAMEs): abelperez.info
  • SSL Certificate: Custom SSL Certificate (example.com): and select your certificate from the dropdown menu (the same as above)
  • Default Root Object: leave empty, since this distribution won't serve any file.

Once entered all this information, click Create Distribution, the creation process will take about 30 minutes, so be patient. When they're done, the status changes to Deployed and they can start receiving traffic. You'll see something like this:

Updating DNS records

Now that we have created the distributions, it's time to update how Route 53 is going to resolve DNS requests to CloudFront distributions instead of the S3 bucket previously configured. To do that, on Route 53 console, select the Hosted Zone, then select one record set, and updated the Alias Target to the corresponding CloudFront distribution Domain Name. Then repeat the process for the other record set.

The following diagram illustrates the interaction between the AWS services we've used up this point. The browser first queries DNS for the given domain name, Route 53, will resolve to the appropriate CloudFront distribution, which can serve the content if it has already cached, otherwise it will request from the bucket and then serve the content. If the request is over HTTP to CloudFront, it will issue a HTTP 301 redirection to the HTTPS endpoint. If the request is over HTTPS to CloudFront, it will use the assigned certificate, which in this case is the same for both www and non-www endpoints.


     < HTTP 301 - Redirecto to HTTPS
 +----------------------------+
 |                            |                                         
 |       GET HTTP >     +-----+------+             +----------------+
 |     abelperez.info   | CloudFront |  GET HTTPS  |   S3 Bucket    |
 |           +--------> | (non-www)  |-----------> | abelperez.info +--+
 |           |          |            |             |                |  |
 |           |          +------+-----+             +----------------+  |
 |     +-----+-----+            \                                      |
 |     |           |             V                                     |
 | +-> | Route 53  |       (SSL certficate)                            |
 | |   |           |             A                                     |
 | |   +-----+-----+            /                                      |
 | |         |          +------+-----+          +--------------------+ |
 | |         |          | CloudFront |GET HTTPS |     S3 Bucket      | |
 | |         +--------> |   (www)    |--------> | www.abelperez.info | |
 | |   GET HTTP >       |            |          |                    | |
 | | www.abelperez.info +-----+------+          +----------+---------+ |
 | |                          |                            |           |
 V |                          |                            |           |
+--+--------+ <---------------+                            |           |
|           |      < HTTP 301 - Redirecto to HTTPS         |           |
|           | <--------------------------------------------+           |
|  Browser  |      < HTTP 200 - OK                                     |
|           | <--------------------------------------------------------+
+-----------+      < HTTP 301 - Redirect to www

One more step

There is a bucket that its sole purpose is to redirect requests from non-www to www domain name, this bucket was set to use HTTP protocol, in this case, we are going to update it to HTTPS, so we can save one redirection step in the process.

Let's test it

Once again, we'll use curl to test all the scenarios, in this case we have four scenarios to test (HTTP/HTTPS and www/non-www)

(1) HTTPS on www.abelperez.info - Expected 200

abel@ABEL-DESKTOP:~$ curl -L -I https://www.abelperez.info
HTTP/2 200 
content-type: text/html
content-length: 79
date: Fri, 02 Feb 2018 00:57:25 GMT
last-modified: Mon, 22 Jan 2018 18:58:47 GMT
etag: "87fa2caa5dc0f75975554d6291b2da71"
server: AmazonS3
x-cache: Miss from cloudfront
via: 1.1 19d823478cf075f6fae7a5cb1336751a.cloudfront.net (CloudFront)
x-amz-cf-id: 7np_vqutTogm9pKceNZ82Zim61Eb0E0D9fJBkFaqNHUz3LF63fEh2w==

(2) HTTPS on abelperez.info - Expected 301 to https://www.abelperez.info

abel@ABEL-DESKTOP:~$ curl -L -I https://abelperez.info
HTTP/2 301 
content-length: 0
location: https://www.abelperez.info/
date: Fri, 02 Feb 2018 01:00:11 GMT
server: AmazonS3
x-cache: Miss from cloudfront
via: 1.1 75235d68607fb64805e0649c6268c52b.cloudfront.net (CloudFront)
x-amz-cf-id: 6WSECgHhkvCqZLW7kInopHnovCPcKU56oNQCZiCv7gaQLv2wSu-Vcw==

HTTP/2 200 
content-type: text/html
content-length: 79
date: Fri, 02 Feb 2018 00:57:25 GMT
last-modified: Mon, 22 Jan 2018 18:58:47 GMT
etag: "87fa2caa5dc0f75975554d6291b2da71"
server: AmazonS3
x-cache: RefreshHit from cloudfront
via: 1.1 7158f458652a2c59cfcb688d5dc80347.cloudfront.net (CloudFront)
x-amz-cf-id: _U7qobfP61P2aYyOakzzfwWjkKYrBeKObtWziPv7NVb5M3yPMlsbrQ==

(3) HTTP on www.abelperez.info - Expected 301 to https://www.abelperez.info

abel@ABEL-DESKTOP:~$ curl -L -I http://www.abelperez.info
HTTP/1.1 301 Moved Permanently
Server: CloudFront
Date: Fri, 02 Feb 2018 01:00:32 GMT
Content-Type: text/html
Content-Length: 183
Connection: keep-alive
Location: https://www.abelperez.info/
X-Cache: Redirect from cloudfront
Via: 1.1 2c7c2f0c6eb6b2586e9f36a7740aa616.cloudfront.net (CloudFront)
X-Amz-Cf-Id: qVYxI7z1DSVpzGrIfGWtHI8dZ1Ywx6dPUf4qGmtXbxl71IvC5R6P6Q==

HTTP/2 200 
content-type: text/html
content-length: 79
date: Fri, 02 Feb 2018 00:57:25 GMT
last-modified: Mon, 22 Jan 2018 18:58:47 GMT
etag: "87fa2caa5dc0f75975554d6291b2da71"
server: AmazonS3
x-cache: RefreshHit from cloudfront
via: 1.1 6b11bd43fbd97ec7bb8917017ae0f954.cloudfront.net (CloudFront)
x-amz-cf-id: w1YRlI4QR5W_bxXVXftmGioMCWoeCpwcCqlj0ucPlizOZVev22RU6g==

(4) HTTP on abelperez.info - Expected 301 to https://abelperez.info which in turn will be another 301 to https://www.abelperez.info

abel@ABEL-DESKTOP:~$ curl -L -I http://abelperez.info
HTTP/1.1 301 Moved Permanently
Server: CloudFront
Date: Fri, 02 Feb 2018 01:01:00 GMT
Content-Type: text/html
Content-Length: 183
Connection: keep-alive
Location: https://abelperez.info/
X-Cache: Redirect from cloudfront
Via: 1.1 60d859e64626d7b8d0cc73d27d6f8134.cloudfront.net (CloudFront)
X-Amz-Cf-Id: eiJCl56CO6aUNA3xRnbf8J_liGfY3oI5jdLdhRRW4LoNFbCMunYyPg==

HTTP/2 301 
content-length: 0
location: https://www.abelperez.info/
date: Fri, 02 Feb 2018 01:01:01 GMT
server: AmazonS3
x-cache: Miss from cloudfront
via: 1.1 f030bd6bd539e06a932b0638e025c51d.cloudfront.net (CloudFront)
x-amz-cf-id: 7KfYWyxPhIXXJjybnISt25apbbHUKx74r9TUI9Kguhn2iQATZELfHg==

HTTP/2 200 
content-type: text/html
content-length: 79
date: Fri, 02 Feb 2018 00:57:25 GMT
last-modified: Mon, 22 Jan 2018 18:58:47 GMT
etag: "87fa2caa5dc0f75975554d6291b2da71"
server: AmazonS3
x-cache: RefreshHit from cloudfront
via: 1.1 3eebab739de5f3b3016088352ebea37f.cloudfront.net (CloudFront)
x-amz-cf-id: R8kB6ndn1K8YOiF6J2deG0QkHh-3QD65q0hfV5vdXm5-_1sNNlc3Ng==

Saturday 27 January 2018

Serverless static website - part 4

Security is an aspect that should never be left behind, even if we are only displaying content to general public. As per Google's strategy to favour secure traffic, they've started to penalise websites that are only on HTTP, we are going to follow this idea and add HTTPS and SSL certificate to this website.

Requesting a certificate

On AWS console, we have a Certificate Manager under Security, Identity & Compliance category. Once there, we have two choices: Import a certificate or Request a certificate. We'll use the request option. It's important for this to work with further steps to make sure we are in N. Virginia region before requesting a certificate. Click on Request a certificate button

In this example, I'm interested in creating a certificate that will validate the main domain abelperez.info, the subdomain www.abelperez.info and any subdomain I create in the future, that is done by using the wildcard *.abelperez.info.

Next step is validate the identity, basically we need to prove that we in fact own the domain we are creating the certificate for. In this case I chose Email validation. The request in progress should look like this.

Verifying domain ownership

At this point, we should receive an email (or a few of them) asking to validate our email address by following a link.

The verification page looks like this one, just click I approve.

It's important to note that in this case, because I'm requesting a certificate for *.abelperez.info and abelperez.info, I'll receive two requests and I have to verify both of them, if that's your case, make sure you've verified all the requests, otherwise the operation will be incomplete, and the certificate won't be issued until all validation are completed. Once it's verified, the certificate should look like this.

Now that we have valid certificate for our domain, it can be attached to other entities like CloundFront CDN distribution, Elastic Load balancer, etc.

Serverless static website - part 3

To www or not to www ? well, that's not the real question. Apparently, nowadays this topic has changed a little bit from the early times of the World Wide Web. In this article, there are some interesting pieces of information for those interested in that topic.

The bottom line is whatever your choice is, there has to be consistency, in this example, the canonical name will be www.abelperez.info, but I also want that if anyone browses just abelperez.info, they have to be redirected to the www version. How do we do that on AWS ?

Creating the redirect bucket

As discussed earlier, an S3 bucket can be configured as a website, but it will only listen on a single hostname (www.abelperez.info), therefore if we want to listen on another hostname (abelperez.info), we need another S3 bucket, again matching the bucket name with the hostname.

On AWS S3 console, create a new bucket named (your domain name without www). This time, instead of selecting Use this bucket to host a website, let's select Redirect requests where:

  • Target bucket or domain: is the www hosthame
  • Protocol: will be http for now

The configuration should look like this

Creating the Record set

Now, we need to route DNS requests to the new website previously created. To do that, let's go to Route 53 console, select your hosted zone, then click on Create Record Set button. Specify the following values:

  • Name: leave in blank - it will be non www DNS entry
  • Type: A
  • Alias: Yes
  • Alias Target: You should see the bucket name in the list

What have we done so far ?

We have created two DNS entries pointing to two different S3 buckets (effectively two web servers). One web server (www) will serve the content as explained earlier. The other web server (non www) will issue 301 redirect code to the www version. This way, the browser will request again, but now with the www version which will get served by the www web server, delivering the content as expected.

The following diagram illustrates the workflow

                                                 +----------------+
                GET abelperez.info               |   S3 Bucket    |
                +------------------------------> | abelperez.info +----+
                |                                |                |    |
          +-----+-----+                          +----------------+    |
          |           |                                                |
      +-> | Route 53  |                                                |
      |   |           |                                                |
      |   +-----+-----+                      +--------------------+    |
      |         |                            |     S3 Bucket      |    |
      |         +--------------------------> | www.abelperez.info |    |
      |         GET www.abelperez.info       |                    |    |
      |                                      +----------+---------+    |
+-----+-----+                                           |              |
|           | <-----------------------------------------+              |
|  Browser  |        HTTP 200 - OK                                     |
|           | <--------------------------------------------------------+
+-----------+        HTTP 301 - Permanent Redirect to www

Let's test it

To test this behaviour, one easy way is using the universal tool CURL, we'll use two switches:

  • -L Follows the redirects
  • -I Fetches headers only

For more information about CURL, see the manpage.

There are two scenarios to test: first, when we try to hit non www host. We can see the first request gets HTTP 301 code and the second gets HTTP 200.

abel@ABEL-DESKTOP:~$ curl -L -I http://abelperez.info
HTTP/1.1 301 Moved Permanently
x-amz-id-2: pLVO9p67k51FJpZCSbF2LxJyrB8w9WyEkgNXHF0Zq8twe3Dw1ud3OiIHRzN0y5B4wDvwngLGEBg=
x-amz-request-id: AD13DD8436422AAC
Date: Sat, 27 Jan 2018 17:50:19 GMT
Location: http://www.abelperez.info/
Content-Length: 0
Server: AmazonS3

HTTP/1.1 200 OK
x-amz-id-2: s/6E2lV7nYtfBq96Qftwip7lzMvIkOMuIq0jbwCisYU0V7ujMRisPuqPsNt2vMuBWFIYuwkqLFs=
x-amz-request-id: 1C258F07FD183836
Date: Sat, 27 Jan 2018 17:50:19 GMT
Last-Modified: Wed, 08 Nov 2017 09:10:40 GMT
ETag: "a339a5d4a0ad6bb215a1cef5221b0f6a"
Content-Type: text/html
Content-Length: 85
Server: AmazonS3

The second scenario is trying to go directly to www host, and the request gets HTTP 200 straight away.

abel@ABEL-DESKTOP:~$ curl -L -I http://www.abelperez.info
HTTP/1.1 200 OK
x-amz-id-2: apCkPouaYzoy5gjemxU+BjDLbQxxE46EUhDXBHirq6PK0OZbubP2BVhWllxlSV99zg5UB3tGbd8=
x-amz-request-id: D928A1DF3B3EB0DE
Date: Sat, 27 Jan 2018 18:18:19 GMT
Last-Modified: Wed, 08 Nov 2017 09:10:40 GMT
ETag: "a339a5d4a0ad6bb215a1cef5221b0f6a"
Content-Type: text/html
Content-Length: 85
Server: AmazonS3