Monday, 18 February 2013

Issue Tracking with Google Docs

It's been a lot of time without a new entry. Sometimes we have the need of tracking issues between the members of a small development team. I know there are a lot of online tools designed to perform this task. Even if they are free or paid some license, we have to adapt to their rules so there is consistency in the displayed data. it may happen that the data to be tracked is so specific that it doesn't fit with the model proposed by the most of these online tools, and the agility of the information requires to see everyone in real time. This is not the mainstream case but it's a possibility and it should be taken into account for small tasks.

Another goal for this post is to bring to the light the new features that Google is offering with the online Docs, in this case the Spread Sheet, these are online collaborative work tools that allow several users to edit the same document at same time. what if we can extend this behavior by adding our own scripts and react to specific spread sheet events? as I am talking about issues tracking, the potential users of this are developers! and as a developer I became very happy when I discovered I could do it. It reminds me someway to VBA in Microsoft Office, but saving the distances, of course.

Yes we can add our scripts to Google Docs, for more information about this scripting language see this page https://developers.google.com/apps-script/ Back to our example with the simple issue tracker, scenario: we have a team of four developer that receives the bug list every day and must have up to date the status as closer as possible to real time. Colors for the rows is good for know at glance the status (i.e Red for some issues that are blocked for some reason) and we also want that those blocked or waiting for external information to be at top of this spreadsheet, as well as those already closed or assigned to others to be at bottom.

Spreadsheet with some data


As a plus, we want also to take advantage of the data validation for the columns such as the developer assigned to the task and the status of the issue, so for solving this we have second sheet (it might be in the same sheet but we don't want to see the list of status nor the developers) where we place those lists and refer to them in the data validation form.
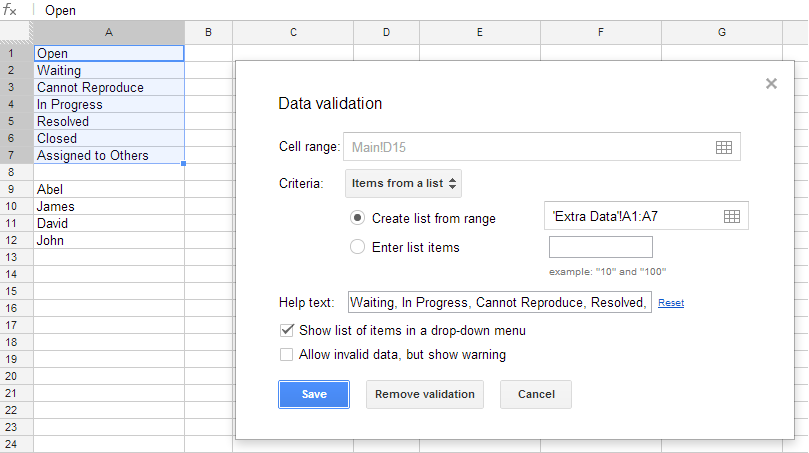

The same procedure for the list of developers. When go to the Tools menu option Script Editor... then get the following dialog


Then choose Spreadsheet and we are ready to start coding, even have some kind of intellisense when typing Ctrl+Space bar, the Help menu is also available and the pages have a lot of documentation with examples.
In this example it has been used the function onEdit which is executed by the spreadsheet after any cell is edited.

The code is quite simple, it determines the data range, loops through every row and set color according to status, cell to cell in the same row, then sorts this range using as criteria the column D values from Z to A so conveniently chosen the status names as we wanted they to be displayed. Here's the whole code

function onEdit(event)
{
 
  var sheet = SpreadsheetApp.getActiveSheet();
  // just do nothing if not in the right sheet
  if (sheet.getName() != "Main") return;  
  
  var range = sheet.getDataRange();
  var numRows = range.getNumRows();
  var numCols = range.getNumColumns();
  var values = range.getValues();
  
  // determine the actual amount of data rows
  var actualDataRows = numRows;
  for (var i = 1; i < numRows; i++) {
    if (values[i][0] == "") { // Column A
      actualDataRows = i-1;
      break;
    } 
  }

  // for each data row set background color according to status
  for (var i = 1; i < actualDataRows; i++) {
    var cell = values[i][3]; // Column D
    var color = "";
    switch (cell) {
      case "Waiting": 
        color = "#ea9999";
        break;
        
      case "Closed": 
        color = "#cccccc";
        break;
        
      case "In Progress": 
        color = "#6D9EEB";
        break;
        
      case "Resolved": 
        color = "#B6D7A8";
        break;
        
      case "Cannot Reproduce": 
        color = "#FFD966";
        break;
        
      case "Assigned to Others": 
        color = "#E69138";
        break;

      default:
        color = "#ffffff";
        break;
    }    
    
    if (color != "") {
      // getRange(row, column, optNumRows, optNumColumns)
      var row = sheet.getRange(i+1, 1, 1, numCols);
      row.setBackgroundColor(color);
    }
  }
  
  // sort after having changed something
  var tosort = sheet.getRange(2, 1, actualDataRows-1, numCols);
  tosort.sort({column: 4, ascending: false});
  tosort.setBorder(true, true, true, true, true, true);

}

The sample spreadsheet can be found at this link, it's public so anyone can play with it. I hope this text has been useful and encourage you to dig into these scripts capabilities.

Saturday, 25 August 2012

Upload very large files - Part 4

Earlier in this blog I talked about the general idea behind one solution for uploading very large files (I consider very large when they are above 2GB), how the file API is becoming more popular and the possible client side approaches. This time I’ll describe the Silverlight and JavaScript communication for the client implementation part of the solution. As a quick reminder, the client is responsible for:

  • Prompt the file dialog and store locally the metadata related to the file to be uploaded.
  • Send each packet accordingly with its id, the current packet number and the total packets.
  • Receive the ACK from each packet and send the last received + 1 unless this is the last one.

With the pure JavaScript experience in the client implementation, I proceeded to make a clone using Silverlight technology as a fallback if the browser doesn’t have all the requirements for running the HTML5 implementation. I considered Flash but as I mentioned in my earlier post in this blog, I hate Flash, in addition, Silverlight became more popular nowadays and the project where I was working included it. Anyway, if someone wants to make a flash version, it will be welcome!

The visual element are pretty simple (and rough) just a Textbox and a Button surrounded by a Grid layout, the goal is just to simulate the input file control, when the user clicks on the button, a file dialog is open in the same way the browser does it.

With this approach, all the code that manages the sending and receiving data from the server was translated from JavaScript to C#; in order to simplify the code, I’ve done a class named AsyncWebRequest. Some interesting points with Silverlight implementation is the communication with JavaScript, the usual way to do this is by annotating the public properties and methods with the attribute [ScriptableMember] and the class with [ScriptableType], so the client can interact through this interface.

From the client side, first, I wanted to avoid carrying with the file Silverlight.js, so I had to inspect very deep what exactly that file does, well, really not much: some helper functions that write the object tag with all the params and something interesting that of course I copy for me, the events setup. As far as I was made research, there’s a param named onLoad where we assign the name of the load function.

That works well if we have only one Silverlight in the page or if we have the complete control over what is rendered in the page. My idea was that you can have as many freshuploads as you want (you will know why). A little trick must be done, instead of expecting that a function exists, I added to window object (in order to be visible to the Silverlight object) but I added to the function name a random auto incremented number, so every newly freshupload created, will add a completely different name to the function load, and this function is implemented internally, and through this function as parameter we have the host object and with it, all the public methods and properties.

Once this key element is established, the code is barely a wrapper of the internal Silverlight implementation, and it looks as follows:

prototype: {
    init: function () {
        // ...
    },
    getDOMElement: function () {
        return this.input.next();
    },
    hasFile: function () {
        return this.uploader.HasFile();
    },
    getFileName: function () {
        return this.uploader.GetFileName();
    },
    getFileSize: function () {
        return this.uploader.GetFileSize();
    },
    cancelUpload: function () {
        this.uploader.CancelUpload();
    },
    startUpload: function () {
        this.uploader.StartUpload();
    }
}
	

In the next post I’ll describe how this can be used seamlessly, without worrying about what implementation to use, I mean, some kind of “Factory” that determines which variant to use. I’ll also show here in further posts some detailed examples on how to use it either with ASP.NET MVC or ASP.NET WebForms.

The whole source code can be found at https://bitbucket.org/abelperezok/freshupload.

Upload very large files - Part 3

Earlier in this blog I talked about the general idea behind one solution for uploading very large files (I consider very large when they are above 2GB), how the file API is becoming more popular and the possible client side approaches. This time I’ll describe the JavaScript client implementation part of the solution. As a quick reminder, the client is responsible for:

  • Prompt the file dialog and store locally the metadata related to the file to be uploaded.
  • Send each packet accordingly with its id, the current packet number and the total packets.
  • Receive the ACK from each packet and send the last received + 1 unless this is the last one.

The initial implementation, some kind of proof of concept, was made using HTML5 with the FileReader API, but as this cannot be the only implementation, it was necessary to let open an “interface” so any other technology for further implementations can be done without the risk of touching unnecessary code fragments.

The object was named $.uploaderHtml5 as a jquery extension and the interface was defined as follows:

{    
    // initialization code
    init: function () { },
    
    // return the visual element associated
    getDOMElement: function () { },
    
    // return true if there's a selected file
    hasFile: function () { },
    
    // return the file name from the input dialog
    getFileName: function () { },
    
    // return the file size from the input dialog        
    getFileSize: function () { },
    
    // stop the current upload 
    cancelUpload: function () { },
    
    // start the current upload
    startUpload: function () { }
}
 

In the HTML5 implementation there are of course more internal functions that deal with the proper send and receive packets actions, because it’s responsible for all the verifications such as parse the ACK from the server and take action accordingly, the POST to the server must be done with all the data required so the server can interpret it and ask for a new piece.

The particularly interesting point here is how the file API is used to deal with the partial and vendor-dependent implementation, the “standard” method slice has three known variants: mozSlice, webkitSlice and slice, so there’s no choice that ask for each of them.

if ('mozSlice' in this.ufile) {
    // mozilla
    packet = this.ufile.mozSlice(startByte, endByte);
} else if ('webkitSlice' in this.ufile) {
    // webkit
    packet = this.ufile.webkitSlice(startByte, endByte);
} else {
    // IE 10
    packet = this.ufile.slice(startByte, endByte);
} return packet;
 

Another HTML5 element used in this code is the FormData object which is really easy to use for send post data to the server; in addition, the XMLHttpRequest has the ability of uploading files which is very important in order to simplify the code, otherwise an iframe should have been set up with a form inside with an input type=file.

The whole source code can be found at https://bitbucket.org/abelperezok/freshupload.

Monday, 2 July 2012

Upload very large files - Part 2

Earlier in this blog I talked about the general idea behind one solution for uploading very large files (I consider very large when they are above 2GB), how the file API is becoming more popular and the possible client side approaches. This time I’ll describe the server side part of the solution. As a quick reminder, the server is responsible for:

  • To determine if the request is to be handled by the mechanism, if not, just let it go.
  • To determine if the request is an initial packet or a data packet.
  • To handle properly each type of packet giving the appropriate response so the client can continue.

This is part of a bit more complex solution, named FreshUplaod, which has the Server component and client components using either JavaScript or Silverlight. The core element is the UploadHelper class, as the name indicates is a helper, it encapsulates the dirty logic regarding the request data reading and processing all stuff.

The methods ProcessInitialPacket and ProcessDataPacket do the actual work, but it’s necessary to know if the request data corresponds to one or another, that’s the job for these other methods IsInitialPacket and IsDataPacket. The actual helper utility is another method, ProcessRequest that acts as a façade to the whole mechanism. An example on how to use it is as follows:

[HttpPost]
public ActionResult Upload(FormCollection collection)
{
    var packetSize = 4 * 1024 * 1024; // default to 4 MB
    var filePath = Server.MapPath("~/_temp_upload/");

    var result = UploadHelper.ProcessRequest(
        Request, filePath, packetSize);

    if (result != null)
        return Json(result);
    return Content("");
}
 

This is using a controller action on ASP.NET MVC 3, where the access to the request is quite easy and the conversion to Json is stress-free too. The key points here are the packet size and the folder where the file is to be stored, the packet size must be exactly the same configured on client side in order to expect a good behavior, I’ve used the 4 MB value because this is the default constraint imposed by ASP.NET and of course this can be tweaked as you want in web.config file.

Now let’s see how to use this element on ASP.NET WebForms, the idea I suggest here is to use a handler whether it was a Generic Handler or ASP.NET Handler, it can be also a WebForm but is not elegant enough solution because the WebForms are chained in a different pipeline and there can be a bit of noise, although it work as well. Here’s the code sample:

public void ProcessRequest(HttpContext context)
{
    var packetSize = 4 * 1024 * 1024; // default to 4 MB
    var filePath = context.Server.MapPath("~/_temp_upload/");

    var result = UploadHelper.ProcessRequest(
        context.Request.RequestContext.HttpContext.Request, 
        filePath, packetSize);

    if (result != null)
    {
        JsonResult(context.Response, result);
    }
    else
    {
        context.Response.Write("");
    }
}

private void JsonResult(HttpResponse response, object result)
{
    response.ContentType = "application/json";
    var serializer = new JavaScriptSerializer();
    var json = serializer.Serialize(result);
    response.Write(json);
}


Here we have a little more hand work but not so much, the json conversion and output is done completely manual (if some WebForms people knows how to achieve this with fewer code, please let me know cause I’m a little out of this part of ASP.NET, although I support Scott Hanselman with his slogan that “Only One ASP.NET”). The other key point is how to get the Request but with an instance of HttpRequestBase class, the default context.Response is an HttpRequest instance, so after some minutes of try-error-retry I found this way to get right value, again if some knows a better way to do it, you know.

In the next posts I’ll cover the other parts of this solution. The whole source code can be found at https://bitbucket.org/abelperezok/freshupload, I am still preparing the code samples so in a few weeks they will be ready.

Wednesday, 20 June 2012

Making easy asynchronous web requests

In web development it’s very frequent to communicate between applications via web requests, may be as client in Restful interfaces or APIs, or just simply send information to some server from any client technology. There are many ways to achieve this task in .NET Framework, the most popular probably is the HttpWebRequest class, which support either synchronous or asynchronous methods. The synchronous way is the simplest, but it has as consequence the thread-blocking problem and CPU time wastage and if we use it in some user interface it could get the so hated Not Responding state. If we don’t make a proper use of multi-threading aware, this is not a good approach.
The asynchronous tactic could be used instead, but it’s a little hard-to-try at glance, the same code I do in a few lines synchronous becomes at least three methods and a lot more lines of code. Just go to MSDN and search for HttpWebRequest.BeginGetRequestStream(...) and you’ll see the sample code like this.
var request = WebRequest.CreateHttp("http://www.example.com/data/to/request");
request.Method = "POST";
request.BeginGetRequestStream(AsyncCallbackRequest, request);
(...)

private void AsyncCallbackRequest(IAsyncResult ar) 
{
    HttpWebRequest request = (HttpWebRequest)ar.AsyncState;
    Stream stream = request.EndGetRequestStream(ar);
 (...) 
 // manipulate the stream: write data or wahtever
    request.BeginGetResponse(GetResponseCallback, request);
}

private void GetResponseCallback(IAsyncResult ar) 
{
    HttpWebRequest request = (HttpWebRequest)ar.AsyncState;
    HttpWebResponse response = (HttpWebResponse)request.EndGetResponse(ar);
    Stream streamResponse = response.GetResponseStream();
 (...) 
 // manipulate the response: read data and parse it 
}
In some scenarios for example in a Silverlight application, we have not available the whole .NET features and unless we use a third party library or another weird or abstract solution, this is the key for sending or receiving HTTP data across the network. If the application must do several types of request involving different formats or data types, then the amount of asynchronous-logic methods might be larger than the actual business-logic for our application and that’s not good for anyone, maintenance is compromised.
So I’ve done a small class that encapsulates all this garbage repetitive code, at the time I fire some custom events which will be listened outside of the class and the real logic to be performed in those event listeners, the code will be clear and focused on the real tasks to be done on it. I show the code here:
public class AsyncWebRequest
{
    private readonly string _uri;

    public AsyncWebRequest(string uri)
    {
        _uri = uri;
    }

    public void Start()
    {
        var request = WebRequest.CreateHttp(_uri);
        request.Method = "POST";

        var args = new PrepareDataEventArgs { Request = request };
        if (PrepareData != null)
        {
            PrepareData(this, args);
        }

        request.BeginGetRequestStream(AsyncCallbackRequest, request);
    }

    public event EventHandler<PrepareDataEventArgs> PrepareData;
    public event EventHandler<SendDataEventArgs> SendRequest;
    public event EventHandler<ReceiveDataEventArgs> ReceiveResponse; 

    private void AsyncCallbackRequest(IAsyncResult ar)
    {
        HttpWebRequest request = (HttpWebRequest)ar.AsyncState;

        var args = new SendDataEventArgs();

        // End the operation
        if (SendRequest != null)
        {
            SendRequest(this, args);
        }            

        // only if there's data or data is not empty, write the actual data
        if (args.Data != null && args.Data.Length > 0)
        {
            Stream stream = request.EndGetRequestStream(ar);

            // Write to the request stream.
            stream.Write(args.Data, 0, args.Length);

            // Close the stream
            stream.Close();
        }
        // Start the asynchronous operation to get the response
        request.BeginGetResponse(GetResponseCallback, request);
    }

    private void GetResponseCallback(IAsyncResult ar)
    {
        HttpWebRequest request = (HttpWebRequest)ar.AsyncState;

        // End the operation
        HttpWebResponse response = (HttpWebResponse)request.EndGetResponse(ar);

        Stream streamResponse = response.GetResponseStream();
        StreamReader streamRead = new StreamReader(streamResponse);
        string responseString = streamRead.ReadToEnd();

        if (ReceiveResponse != null)
        {
            ReceiveResponse(this, new ReceiveDataEventArgs{ Data = responseString });
        }

        // Close the stream object
        streamResponse.Close();
        streamRead.Close();

        // Release the HttpWebResponse
        response.Close();
        //Synchronization.Set();
    }
}
This class fires three events, first the PrepareData is fired before the request is modified for getting the stream, this is a constrain imposed by .NET because after this state the request cannot be modified, so this is the event used to set all the header information such as content/type, among others. After having got the request stream and before start getting the response the second event (SendRequest) is fired and here’s the place to set the actual data to send if any, the length must be set too because the buffer might be larger than the actual data to send. Finally, right after the data arrival, ReceiveResponse, the third event, allows us to set a listener in order to process the received data, for example to parse a JSON data. An example on how to use it is shown as follows:
var asweb = new AsyncWebRequest(_postDataurl);
asweb.PrepareData += (o, args) => 
{
    args.Request.ContentLength = bytes.Length;
    args.Request.ContentType = "application/x-www-form-urlencoded";
};

asweb.SendRequest += (o, args) =>
{
    args.Data = bytes;
    args.Length = bytes.Length;
};

asweb.ReceiveResponse += (o, args) =>
{
    var json = JsonValue.Parse(args.Data);
    (...)
};

asweb.Start();
I hope this tiny class will help you to deal with web request taking advantage of asynchrony.

Tuesday, 1 May 2012

Upload very large files - Part 1

In my last post I talked about settings we have to set server side on IIS in order to allow large uploads, and I also mentioned the security risks involved. The solution I’ll talk this time is becoming more common as HTML5 is being implemented more and more.

The main problem was related to the size of the post when uploading, but why not split file into several small pieces and upload piece by piece? Maybe some time ago was crazy to think about manipulating the file in client side from JavaScript, the only ways were using Flash or Silverlight, now the file API is more popular, almost all modern browsers implement it but IE which is always retarded implementing good stuff.

I’ve found some implementations such as plupload or http://hertzen.com/experiments/jsupload/ but I’m not 100 % satisfied with it, I took the ideas and hands on. In this first part I’ll explain how it works to achieve a bullet proof mechanism, for example: The connection might be interrupted or something can happen on the server and the worker thread was shot down. The mechanism must be protected against these events.

I talked to a friend of mine and after a session of brainstorming I decided to imitate some kind of TCP connection in regard to sending packet and receiving the ACK (Acknowledgement), this stuff. The idea is implemented as follows:

  • The browser opens the file dialog and a file is selected, the initial packet is prepared with file name, the type (MIME) and the size.
  • In the server a new GUID is generated for this file that will be the file id for the whole process.
  • A new file is created with this id that will be the metadata file, where the information from the client will be stored for further use.
  • A new blank file is created with this id and the extension of the original name that will be the data file.
  • The reply for this initial packet is a JSON with the GUID generated.

The following steps in client side are:

  • Read the file fragment according to the current packet number and send to the server the data packet with the id, the current packet number and the total packets.
  • Each data packet sent receives its ACK which indicates the number of the last packet received OK, after that the client will send the last received + 1 unless this is the last one.

The server process the data packet:

  • If the metadata file or actual file doesn’t exist, the result is an ACK with packet -1, which means the file must be uploaded from scratch.
  • If the file doesn’t have the required size: the packet number – 1 multiplied by packet size, then return the required value in order to the client knows which is the correct fragment to resend.
  • If everything goes well, a success ACK with the current packet number is sent encouraging to the client to send the next packet.

I’ve implemented this using HTML5 techniques but not all the browsers are capable for to do it, Modernizr could be a great helper on this, since there’s no HTML5 detection but feature detection on demand, for now it’s necessary the browser to be capable of use the file API and if you want to support retry after refresh the page, it should be capable of access to local Storage which allows to store data and retrieve it when necessary. The browser will able to use the XMLHttpRequest object for upload files.

I haven’t implemented yet any fallback mechanism, it will be nice to have a third party such as Silverlight which could substitute the missing browser HTML5 features, a good example of implementation using Silverlight can be found at HSS.Interlink. they cover all the aspects on read a fragment of file and send the request to the server.

My implementation I am planning to distribute it via nuget.org containing a js script and a dll with the classes to be called from any handler/controller without to have to deal with all the verifications mentioned above.

In next posts I’ll cover the implementation of this solution and I’ll provide a code sample for to understand it better.

Saturday, 14 April 2012

Magic settings for upload large files under IIS and .NET

I remember when I started this blog; I talked about upload large files using .NET and IIS. This time I’ll share with you some interesting points to be aware of when trying to upload large files. I consider large when the size is bigger than 2GB, because this is the actual limit is almost all web servers under Microsoft technology.
Based on my experience with this kind of situations, I can say that the web environment is not ready to transfer that much information. Remember the beginnings of WWW, when everything that roamed through the wires were just text and small graphics, I say more, remember what HTTP stands for (Hypertext Transfer Protocol) and what is HyperText?
However, the file transfer to and from the server is something very common nowadays, therefore, it’s necessary to know how to handle it. For those who doesn’t need to upload files greater than 500 MB, I recommend the solution I presented through the my firsts posts in this blog, even for upload a bit bigger files, but when the size start over the 1 GB it’s better to think about another solution.
The larger sizes you could upload the bigger security risk you have. I explain, solutions like NeatUpload and many others (open source or not) expect to make the upload in a big single request, although there are modules that make the copy block by block in order to be sure of not making big memory peaks, the web server must allow a very large request, exposing it to a DOS attack, just an example. Another possible problem may be if the client doesn’t have a fast connection (like me) there’s a (high) risk that a large file might be interrupted, and then? Start over again. On the server side the risk of execution timed out exists too (I’ve faced that), so the value of this setting must be increased.
If you wish to upload small/medium files there’s no problem using this kind of solution, but if you want go over the size, I suggest another kind of workaround.
Alongside my research for the best solution I’ve found the following links I hope to be useful to you, I let MSDN articles, Stack Overflow questions, among others very interesting sources written by the most involved people in this matter, where one can drink the honeys of knowledge.
As a quick conclusion, I can say the following in order to configure properly your application:
The default value for the request size in ASP.NET 2.0 and later is 4 MB. Under IIS6 the setting is configured by the httpRuntime node, example:
 <configuration> 
  <system.web>
   <httpRuntime maxRequestLength="102400" executionTimeout="3600" />
  </system.web>
 </configuration> 
Important to say here, the value of maxRequestLength is given in KB and the executionTimeout is given in seconds.
Under IIS7+ the setting is configured by the requestLimits node, example:
 <system.webServer>
  <security>
   <requestFiltering>
    <requestLimits maxAllowedContentLength="1024000000" />
   </requestFiltering>
  </security>
 </system.webServer>
In this case the value of maxAllowedContentLength is given in bytes. This must combined with the applicationHost.config file usually located at (C:\Windows\System32\inetsrv\Configs) whose section should look like:
 <section name="requestFiltering" overrideModeDefault="Allow" />

As I said before, I hope this compilation saves you time of google-research, in a further post I’ll talk about another solution that I consider that more fits better in web environment.