Sunday, 19 January 2014

Mocking a repository using Moq

Some time ago, I wrote about how to mock a repository in a generic way, so the it behaves accordingly using the supplied fake data which is no more than a list of objects of the same type of the repository we are mocking, of course. When I did that, I used RhinoMocks as mocking framework and I confess I'm a big fan of that as I consider it very versatile and powerful, but after having read this news about the current state of RhinoMocks, I decided to switch to another one.

I'm not trying to say that as soon as a good project is left behind from its creator, it means that the users should go away from it, as Ayende says as for this goal, it's done, in my opinion that latest release of RhinoMocks could be useful for the next 5 years. The new owner seems to have good ideas for the next versions of RhinoMocks. However, the community and life in general is moving at a different speed and sometimes we have to find a substitute even if we like the current one item.

According to the community, after some research on the internet and based on several well-documented stackoverflow answers, Moq is the best alternative, it's based on Linq and Expressions and it can be used in very simple ways which is good for the increasing amount of developers who are starting to use TDD or just trying to automate some tests.
Let's refresh the simple repository interfaces to be mocked:
public interface IIdentityKey<Tkey>
{
    TKey Id { get; set; }
}
public interface IRepository<Tkey,TEntity> where TEntity : IIdentityKey<Tkey>
{
    IQueryable<TEntity> All();
 
    TEntity FindBy(TKey id);
 
    TEntity Add(TEntity entity);
 
    void Update(TEntity entity);
 
    void Delete(TEntity entity);
}
In our controller we use this interface as it will be injected using any IoC such as Ninject, but important here is that the controller doesn't know or even cares the actual implementation of this repository, this is a fragment of our controller:
public class PersonController : ApiController
{
    private readonly IRepository<long, Person> _repository;  
 
    public PersonController(IRepository<long, Person> repository)
    {
        _repository = repository;
    }
 
    // GET api/person
    public IEnumerable<Person> Get()
    {
        return _repository.All().ToArray();
    }
 
    // the rest of the code removed for brevity ...
}
We need to create the 5 methods previously mentioned in the interface in a way that they make the operations on a list with initial data, such as this:
private List<Person> _fakedata = new List<Person> {
    new Person { Id = 1, Name = "Person1", Email = "person1@nomail.com" },
    new Person { Id = 2, Name = "Person2", Email = "person2@nomail.com" },
    //  ( ... )
    new Person { Id = 8, Name = "Person8", Email = "person8@nomail.com" }
};
Let's start with the actual mock creation and set up now using Moq
private IRepository<TK, TE> CreateRepository<TK, TE>(List<TE> data)
    where TE : class, IIdentityKey<TK>
{
    var mock = new Mock<IRepository<TK, TE>>();

    // all the mocking setup goes here ...

    return mock.Object;
}
The actual mock procedure is made through the combination of Setup(...).Returns(...) and Setup(...).Callback(...) for methods that return something and void respectively. The All() method is done this way.
// setup All method
mock.Setup(x => x.All()).Returns(data.AsQueryable());
The Returns() method accepts an object of the same type as the return type in Setup() argument or a Func with return type the same as declared in Setup, so it matches the signature at runtime. In that example it's just return the raw list previously declared.
// setup Add method
mock.Setup(x => x.Add(It.IsAny<TE>()))
    .Returns(new Func<TE, TE>(x => {
        dynamic lastId = data.Last().Id;
        dynamic nextId = lastId + 1;
        x.Id = nextId;
        data.Add(x);
        return data.Last();
    }));
The Add() method is implemented using a bit more complex behaviour in order to simulate the auto incremental in database helped by dynamics for not to force a concrete type as in C# there's no generic constraint for only numeric types.
// setup Update method
mock.Setup(x => x.Update(It.IsAny<TE>()))
    .Callback(new Action<TE>(x =>
    {
        var i = data.FindIndex(q => q.Id.Equals(x.Id));
        data[i] = x;
    }));

// setup FindBy (id)
mock.Setup(x => x.FindBy(It.IsAny<TK>()))
    .Returns(new Func<TK, TE>(
        x => data.Find(q => q.Id.Equals(x))
    ));

// setup Delete
mock.Setup(x => x.Delete(It.IsAny<TE>()))
    .Callback(new Action<TE>(x => {
        var i = data.FindIndex(q => q.Id.Equals(x.Id));
        data.RemoveAt(i);
        }
    ));

Following the same idea, we've got the remaining methods from the interface implementation. Earlier I mentioned a generic method which accepts two arguments: TK and TE related to type of key and of entity, now it will be called by another method for this specific controller.
        
private PersonController CreateController()
{
    IRepository<long, Person> repo = CreateRepository<long, Person>(_fakedata);
    PersonController target = new PersonController(repo);
    return target;
}
Finally, the test should look like this fragment:
  
[TestMethod]
public void Get()
{
    // Arrange
    PersonController controller = CreateController();

    // Act
    IEnumerable<Person> result = controller.Get();

    // Assert
    Assert.IsNotNull(result);
    Assert.AreEqual(8, result.Count());
    Assert.AreEqual("Person1", result.ElementAt(0).Name);
    Assert.AreEqual("Person8", result.ElementAt(7).Name);
}

[TestMethod]
public void GetById()
{
    // Arrange
    PersonController controller = CreateController();

    // Act
    Person result = controller.Get(5);

    // Assert
    Assert.AreEqual("Person5", result.Name);
}
We invoke the CreateController method on each test so the logic previously described is encapsulated and then a new instance of the controller with the mocked repository inside. The sample code can be downloaded here.

Saturday, 29 June 2013

ExcelHandler updated version

About a year ago, I published the first release of the ExcelHandler library with the corresponding first NuGet package, it was the first experience with these powerful way of sharing code with the community. Since then, the time has passed and several things have happened, I received a pull request from Paulo Rezende that came with a good addition regarding to be able to get the number of sheets for a workbook, he also has some good ideas that I want to discuss with him and some of those are already in an experimental branch.

When looking for some kind of automatization at the moment of generating and publishing the NuGet Package, found an interesting Visual Studio Extension named NuGet.PackageNPublish.Extension that adds a new project template with the skeleton of a nuget package, it uses the text templating for recreate the .nuspec file each time the project is rebuilt and extracts as much as it can form the metadata in AssemblyInfo.cs file which is a good idea because the version and file names are prone to be out of synchronization when done manually.

Some of the improvement added to this library include: updated dependencies to newer versions, the NPOI and EPPlus libraries also evolved through the months, so there were some breaking changes that were changed in internal implementations for each dependency. Finally I added an automated test project, so it's not more necessary to run the console application sample. New elements in interfaces are:
  • NumberOfSheets property in IExcelHandler interface, now it's possible to know the amount of sheets in a workbook.
  • CreateSheet(string) method in IExcelHandler interface, now it's possible to add new sheets to a workbook.
  • LoadExelFile(string) doesn't require the file exists in both implementations, so it can also be used to create new Excel files and not just for editing existing ones.
The current version of source code can be found at https://bitbucket.org/abelperezok/excelhandler/ and the NuGet Package at https://nuget.org/packages/ExcelHandler/. Hope this to be useful and any comment or issue will be welcome.

Tuesday, 30 April 2013

Using Web API filter for Polymorphic results

When starting a little deeper with Web API I found a block on the road: if I returned any object different of the return type declared in the action method signature, then the serialization mechanism throw an exception related to the type instantiated is not expected, the error message is like this: "Type 'Mvc4AppFilter.Models.Student' with data contract name 'Student:http://schemas.datacontract.org/2004/07/Mvc4AppFilter.Models' is not expected. Consider using a DataContractResolver or add any types not known statically to the list of known types - for example, by using the KnownTypeAttribute attribute or by adding them to the list of known types passed to DataContractSerializer." when trying to serialize as XML, JSON works like a charm, why is this happening?
If we find the source code for class System.Net.HttpHttpRequestMessageExtensions at method with this signature, because there are several overloads:
public static HttpResponseMessage CreateResponse<T>(this HttpRequestMessage request, HttpStatusCode statusCode, T value, HttpConfiguration configuration)
We found the things related to content negotiation and checking for proper values from configuration, but at the end there's something like this:
return new HttpResponseMessage
{
    Content = new ObjectContent<T>(value, result.Formatter, mediaType),
    StatusCode = statusCode,

    RequestMessage = request
};
and the key point is that if the typeof(T) is not equal to value.GetType() then the ObjectContent throws the exception because of the mismatching of types and that occurs when for example we declare the method with return type Person and for some reason we return either a Worker object or Student object (where both inherit from Person)

The first solution was to extract the important sentences from this source code and create my own extension for CreateResponse and using the ObjectContent non generic version, but later I decided to group this code in a Filter, in this case an Action filter, and it will be executed after each action is executed, the goal is to transform the any object return type action to a properly configured HttpResponseMessage. Here's the code.
public class HttpResponseFilter : ActionFilterAttribute
{
    public override void OnActionExecuted(HttpActionExecutedContext actionExecutedContext)
    {
        var request = actionExecutedContext.Request;
        var response = actionExecutedContext.Response;
        if (response.Content != null && !response.Content.IsHttpResponseMessageContent() && response.Content is ObjectContent) 
        {
            var objContent = response.Content as ObjectContent;
            var value = objContent.Value;
            var result = request.CreateResponse(System.Net.HttpStatusCode.OK);
            if (value != null)
            {
                var config = request.GetConfiguration();
                var negociator = config.Services.GetContentNegotiator();
                var nresult = negociator.Negotiate(value.GetType(), request, config.Formatters);
                result.Content = new ObjectContent(value.GetType(), value, nresult.Formatter);
            }
            actionExecutedContext.Response = result;
        }
    }
}

Finally, we need to register the filter in application startup, i.e. in the file out of the box WebApiConfig.cs by adding this line:
config.Filters.Add(new HttpResponseFilter());
Hope it helps you to improve your code, the source can be downloaded here.

Monday, 1 April 2013

Mocking a repository using RhinoMocks

Unit testing is often a tedious and repetitive task, even if we are testing controllers for Web API, the main goal for the code to be testable is the separation of concerns, so the parts can be tested separately and in an isolated way. To achieve this it's necessary to supply the dependencies to our target testing code. Here is where the mocks come to the scene.

One code that is usually mocked is the repositories, the mocked objects are in the form: when the method X is invoked with argument Y then return Z, or something around that. An actual repository can be mocked using an in memory list of the same entity.

We can do this by two ways: one is to implement the repository interface with an actual class that hides that in memory list, but as the application grows, the number of these fake classes will grow too, I discourage this practice as non-scalable. The other way is to use a mocking framework and there are a lot of them and can be found at nuget, I'll use RhinoMocks for this post.

The code for mocking can be quite cryptic using this kind of framework, but in the long term is better than writing actual fake code, the goal for faking repositories is to keep the data consistency so if we add a new item to the list, we can verify the count and see that there is one more or if we remove one item, and so on.

Let's start with the repository interface, this is very simple repository in order to have less things to do in the example and keep complexity off.
    
    public interface IIdentityKey<Tkey>
    {
        TKey Id { get; }
    }
    public interface IRepository<Tkey,TEntity> where TEntity : IIdentityKey<Tkey>
    {
        IQueryable<TEntity> All();

        TEntity FindBy(TKey id);

        TEntity Add(TEntity entity);

        void Update(TEntity entity);

        void Delete(TEntity entity);
    }

In our controller we use this interface as it will be injected using any IoC such as Ninject, but important here is that the controller doesn't know or even cares the actual implementation of this repository, this is a fragment of our controller:
    
    public class PersonController : ApiController
    {
        private readonly IRepository<long, Person> _repository;  

        public PersonController(IRepository<long, Person> repository)
        {
            _repository = repository;
        }

        // GET api/person
        public IEnumerable<Person> Get()
        {
            return _repository.All().ToArray();
        }

        // the rest of the code removed for brevity ...
    }

Now it's the time for constructing the mock object, but first a quick recipe on using RhinoMocks for creating mock objects:

    MockRepository mocks = new MockRepository();
    IRepository<long, Person> repo = mocks.Stub<IRepository<long, Person>>();
    using (mocks.Record())
    {
        // Method constructing here
    }

We need to create the 5 methods previously mentioned in the interface in a way that they make the operations on a list with initial data, such as this:

    private List<Person> _fakedata = new List<Person> {
        new Person { Id = 1, Name = "Person1", Email = "person1@nomail.com" },
        new Person { Id = 2, Name = "Person2", Email = "person2@nomail.com" },
        //  ( ... )
        new Person { Id = 8, Name = "Person8", Email = "person8@nomail.com" }
    };

Or if the objects are more complex with relationships, might be using for loop, nonetheless the data is created. Let's see the method stubs for the operations to be mocked, for that, we use the combination of the the Stub(...).Return(...) and Stub(...).Do(...) the easiest operation is the Get without parameters and looks like this:

// setup All method
repo.Stub(x => x.All()).Return(_fakedata.AsQueryable());

Here we are just saying, when you call the method All, then return the _fakedata object as queryable, this simple because the method have no parameters. Let's see now the Add method, which has a parameter and returns a value, it's intended to accept the object that is to be added and returns the object in a state after inserted.

    // setup Add method
    repo.Stub(x => x.Add(Arg<Person>.Is.Anything))
        .Do(new Func<Person, Person>(
            x =>
            {
                _fakedata.Add(x);
                return _fakedata.Last();
            }
        ));

In this operation we tell to the mock that when the Add method is invoked with an argument of type Person without any constraint, at this point it can be set any kind of constraint like if is null or not null or equals or greater than, etc. but as we are mocking the operation for customize the action, we use no constraint. The Do accepts a generic delegate, that's why it's necessary to specify the concrete delegate like Func<Person,Person> that matches the signature of the operation we want to mock and the parameter expressed as a lambda expression where x is the only parameter, the logic is simple but we can include more realistic work like set the Id by getting the maximum Id and adding one, the key point here is to add the item to our list.

Using a similar technique we can implement the Update, FindBy and Delete operations, as follows:

    // setup Update method
    repo.Stub(x => x.Update(Arg<Person>.Is.Anything))
        .Do(new Action<Person>(x =>
        {
            var i = _fakedata.FindIndex(q => q.Id == x.Id);
            _fakedata[i] = x;
        }));

    // setup FindBy
    repo.Stub(x => x.FindBy(Arg<long>.Is.Anything))
        .Do(new Func<long, Person>(
            x => _fakedata.Find(q => q.Id == x)
        ));

    // setup Delete
    repo.Stub(x => x.Delete(Arg<Person>.Is.Anything))
        .Do(new Action<Person>(
            x => _fakedata.Remove(x)
        ));

Now, the test should look like this fragment:

    [TestMethod]
    public void Get()
    {
        // Arrange
        PersonController controller = CreateController();

        // Act
        IEnumerable<Person> result = controller.Get();

        // Assert
        Assert.IsNotNull(result);
        Assert.AreEqual(8, result.Count());
        Assert.AreEqual("Person1", result.ElementAt(0).Name);
        Assert.AreEqual("Person8", result.ElementAt(7).Name);
    }

    [TestMethod]
    public void GetById()
    {
        // Arrange
        PersonController controller = CreateController();

        // Act
        Person result = controller.Get(5);

        // Assert
        Assert.AreEqual("Person5", result.Name);
    }

Where the CreateController method contains all the logic previously described and returns a new instance of the controller with the mocked object passed as parameter in the constructor, The sample code can be downloaded here.
Monday, 18 February 2013

Issue Tracking with Google Docs

It's been a lot of time without a new entry. Sometimes we have the need of tracking issues between the members of a small development team. I know there are a lot of online tools designed to perform this task. Even if they are free or paid some license, we have to adapt to their rules so there is consistency in the displayed data. it may happen that the data to be tracked is so specific that it doesn't fit with the model proposed by the most of these online tools, and the agility of the information requires to see everyone in real time. This is not the mainstream case but it's a possibility and it should be taken into account for small tasks.

Another goal for this post is to bring to the light the new features that Google is offering with the online Docs, in this case the Spread Sheet, these are online collaborative work tools that allow several users to edit the same document at same time. what if we can extend this behavior by adding our own scripts and react to specific spread sheet events? as I am talking about issues tracking, the potential users of this are developers! and as a developer I became very happy when I discovered I could do it. It reminds me someway to VBA in Microsoft Office, but saving the distances, of course.

Yes we can add our scripts to Google Docs, for more information about this scripting language see this page https://developers.google.com/apps-script/ Back to our example with the simple issue tracker, scenario: we have a team of four developer that receives the bug list every day and must have up to date the status as closer as possible to real time. Colors for the rows is good for know at glance the status (i.e Red for some issues that are blocked for some reason) and we also want that those blocked or waiting for external information to be at top of this spreadsheet, as well as those already closed or assigned to others to be at bottom.

Spreadsheet with some data


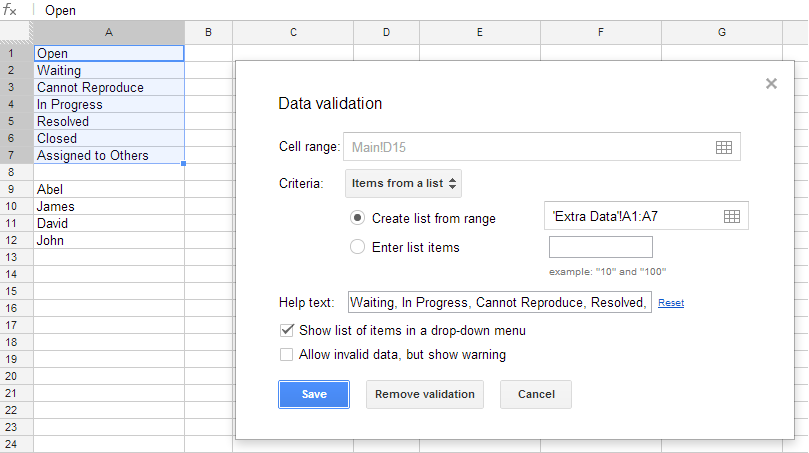
As a plus, we want also to take advantage of the data validation for the columns such as the developer assigned to the task and the status of the issue, so for solving this we have second sheet (it might be in the same sheet but we don't want to see the list of status nor the developers) where we place those lists and refer to them in the data validation form.


The same procedure for the list of developers. When go to the Tools menu option Script Editor... then get the following dialog


Then choose Spreadsheet and we are ready to start coding, even have some kind of intellisense when typing Ctrl+Space bar, the Help menu is also available and the pages have a lot of documentation with examples.
In this example it has been used the function onEdit which is executed by the spreadsheet after any cell is edited.

The code is quite simple, it determines the data range, loops through every row and set color according to status, cell to cell in the same row, then sorts this range using as criteria the column D values from Z to A so conveniently chosen the status names as we wanted they to be displayed. Here's the whole code

function onEdit(event)
{
 
  var sheet = SpreadsheetApp.getActiveSheet();
  // just do nothing if not in the right sheet
  if (sheet.getName() != "Main") return;  
  
  var range = sheet.getDataRange();
  var numRows = range.getNumRows();
  var numCols = range.getNumColumns();
  var values = range.getValues();
  
  // determine the actual amount of data rows
  var actualDataRows = numRows;
  for (var i = 1; i < numRows; i++) {
    if (values[i][0] == "") { // Column A
      actualDataRows = i-1;
      break;
    } 
  }

  // for each data row set background color according to status
  for (var i = 1; i < actualDataRows; i++) {
    var cell = values[i][3]; // Column D
    var color = "";
    switch (cell) {
      case "Waiting": 
        color = "#ea9999";
        break;
        
      case "Closed": 
        color = "#cccccc";
        break;
        
      case "In Progress": 
        color = "#6D9EEB";
        break;
        
      case "Resolved": 
        color = "#B6D7A8";
        break;
        
      case "Cannot Reproduce": 
        color = "#FFD966";
        break;
        
      case "Assigned to Others": 
        color = "#E69138";
        break;

      default:
        color = "#ffffff";
        break;
    }    
    
    if (color != "") {
      // getRange(row, column, optNumRows, optNumColumns)
      var row = sheet.getRange(i+1, 1, 1, numCols);
      row.setBackgroundColor(color);
    }
  }
  
  // sort after having changed something
  var tosort = sheet.getRange(2, 1, actualDataRows-1, numCols);
  tosort.sort({column: 4, ascending: false});
  tosort.setBorder(true, true, true, true, true, true);

}

The sample spreadsheet can be found at this link, it's public so anyone can play with it. I hope this text has been useful and encourage you to dig into these scripts capabilities.

Saturday, 25 August 2012

Upload very large files - Part 4

Earlier in this blog I talked about the general idea behind one solution for uploading very large files (I consider very large when they are above 2GB), how the file API is becoming more popular and the possible client side approaches. This time I’ll describe the Silverlight and JavaScript communication for the client implementation part of the solution. As a quick reminder, the client is responsible for:

  • Prompt the file dialog and store locally the metadata related to the file to be uploaded.
  • Send each packet accordingly with its id, the current packet number and the total packets.
  • Receive the ACK from each packet and send the last received + 1 unless this is the last one.

With the pure JavaScript experience in the client implementation, I proceeded to make a clone using Silverlight technology as a fallback if the browser doesn’t have all the requirements for running the HTML5 implementation. I considered Flash but as I mentioned in my earlier post in this blog, I hate Flash, in addition, Silverlight became more popular nowadays and the project where I was working included it. Anyway, if someone wants to make a flash version, it will be welcome!

The visual element are pretty simple (and rough) just a Textbox and a Button surrounded by a Grid layout, the goal is just to simulate the input file control, when the user clicks on the button, a file dialog is open in the same way the browser does it.

With this approach, all the code that manages the sending and receiving data from the server was translated from JavaScript to C#; in order to simplify the code, I’ve done a class named AsyncWebRequest. Some interesting points with Silverlight implementation is the communication with JavaScript, the usual way to do this is by annotating the public properties and methods with the attribute [ScriptableMember] and the class with [ScriptableType], so the client can interact through this interface.

From the client side, first, I wanted to avoid carrying with the file Silverlight.js, so I had to inspect very deep what exactly that file does, well, really not much: some helper functions that write the object tag with all the params and something interesting that of course I copy for me, the events setup. As far as I was made research, there’s a param named onLoad where we assign the name of the load function.

That works well if we have only one Silverlight in the page or if we have the complete control over what is rendered in the page. My idea was that you can have as many freshuploads as you want (you will know why). A little trick must be done, instead of expecting that a function exists, I added to window object (in order to be visible to the Silverlight object) but I added to the function name a random auto incremented number, so every newly freshupload created, will add a completely different name to the function load, and this function is implemented internally, and through this function as parameter we have the host object and with it, all the public methods and properties.

Once this key element is established, the code is barely a wrapper of the internal Silverlight implementation, and it looks as follows:

prototype: {
    init: function () {
        // ...
    },
    getDOMElement: function () {
        return this.input.next();
    },
    hasFile: function () {
        return this.uploader.HasFile();
    },
    getFileName: function () {
        return this.uploader.GetFileName();
    },
    getFileSize: function () {
        return this.uploader.GetFileSize();
    },
    cancelUpload: function () {
        this.uploader.CancelUpload();
    },
    startUpload: function () {
        this.uploader.StartUpload();
    }
}
	

In the next post I’ll describe how this can be used seamlessly, without worrying about what implementation to use, I mean, some kind of “Factory” that determines which variant to use. I’ll also show here in further posts some detailed examples on how to use it either with ASP.NET MVC or ASP.NET WebForms.

The whole source code can be found at https://bitbucket.org/abelperezok/freshupload.

Upload very large files - Part 3

Earlier in this blog I talked about the general idea behind one solution for uploading very large files (I consider very large when they are above 2GB), how the file API is becoming more popular and the possible client side approaches. This time I’ll describe the JavaScript client implementation part of the solution. As a quick reminder, the client is responsible for:

  • Prompt the file dialog and store locally the metadata related to the file to be uploaded.
  • Send each packet accordingly with its id, the current packet number and the total packets.
  • Receive the ACK from each packet and send the last received + 1 unless this is the last one.

The initial implementation, some kind of proof of concept, was made using HTML5 with the FileReader API, but as this cannot be the only implementation, it was necessary to let open an “interface” so any other technology for further implementations can be done without the risk of touching unnecessary code fragments.

The object was named $.uploaderHtml5 as a jquery extension and the interface was defined as follows:

{    
    // initialization code
    init: function () { },
    
    // return the visual element associated
    getDOMElement: function () { },
    
    // return true if there's a selected file
    hasFile: function () { },
    
    // return the file name from the input dialog
    getFileName: function () { },
    
    // return the file size from the input dialog        
    getFileSize: function () { },
    
    // stop the current upload 
    cancelUpload: function () { },
    
    // start the current upload
    startUpload: function () { }
}
 

In the HTML5 implementation there are of course more internal functions that deal with the proper send and receive packets actions, because it’s responsible for all the verifications such as parse the ACK from the server and take action accordingly, the POST to the server must be done with all the data required so the server can interpret it and ask for a new piece.

The particularly interesting point here is how the file API is used to deal with the partial and vendor-dependent implementation, the “standard” method slice has three known variants: mozSlice, webkitSlice and slice, so there’s no choice that ask for each of them.

if ('mozSlice' in this.ufile) {
    // mozilla
    packet = this.ufile.mozSlice(startByte, endByte);
} else if ('webkitSlice' in this.ufile) {
    // webkit
    packet = this.ufile.webkitSlice(startByte, endByte);
} else {
    // IE 10
    packet = this.ufile.slice(startByte, endByte);
} return packet;
 

Another HTML5 element used in this code is the FormData object which is really easy to use for send post data to the server; in addition, the XMLHttpRequest has the ability of uploading files which is very important in order to simplify the code, otherwise an iframe should have been set up with a form inside with an input type=file.

The whole source code can be found at https://bitbucket.org/abelperezok/freshupload.