Tuesday, 20 February 2018

Serverless static website - part 7

Now that we have our source code versioned and safely stored, we need a way to make it go to our S3 bucket, otherwise it won't be visible to the public. There are, as usual, many ways to address this scenario, but as a developer, I can't live without CI/CD integration for all my processes. In this case, we have a very simple process, and we can combine the building and deploying steps in one go. To do that, once again, AWS offers some useful services, I'll be using CodeBuild for this task.

Creating the access policy

Just like anything in AWS, a CodeBuild project needs access to other AWS services and resources. The way this is done is by applying service roles with policies. As per AWS docs, a CodeBuild project needs the following permissions:

  • logs:CreateLogGroup
  • logs:CreateLogStream
  • logs:PutLogEvents
  • codecommit:GitPull
  • s3:GetObject
  • s3:GetObjectVersion
  • s3:PutObject

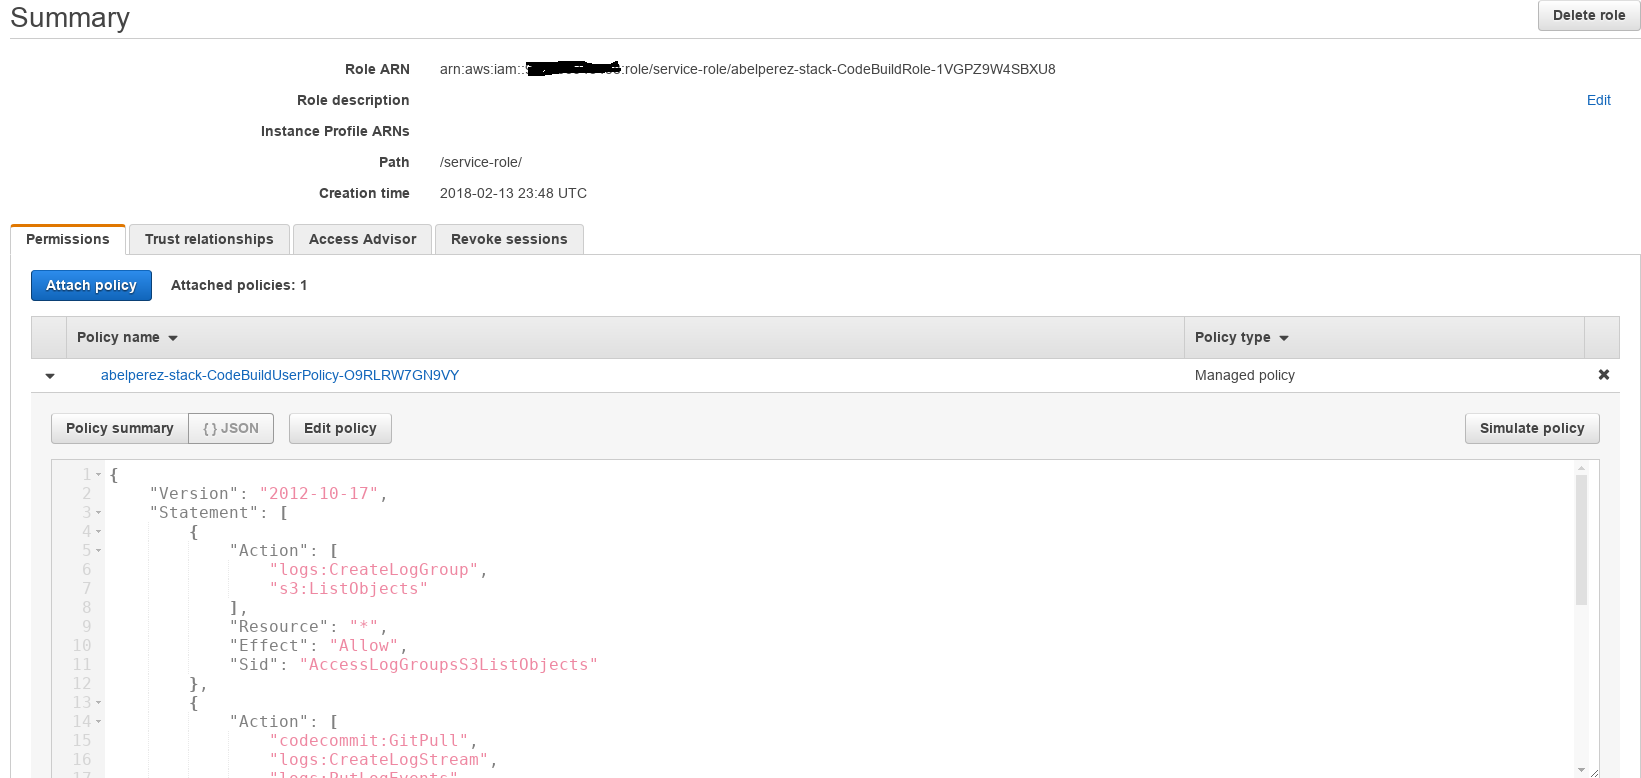
The difference is that the proposed policy in the docs does not restrict access to any resource, it suggests to change the * to something more specific. The following is the resulting policy restricting access to logs in the log group created by the CodeBuild project. Also I've added full access to the bucket, since we'll be copying files to that bucket. In summary, the policy below grants the following permissions (account id is masked with 111111111111):

  • Access to create new log groups in CloudWatch
  • Access to create new log streams within the log group created by the build project
  • Access to create new log events within the log stream created by the build project
  • Access to pull data through Git to CodeCommit repository
  • Full Access to our S3 bucket where the files will go
{
    "Version": "2012-10-17",
    "Statement": [
        {
            "Action": [
                "logs:CreateLogGroup",
                "s3:ListObjects"
            ],
            "Resource": "*",
            "Effect": "Allow",
            "Sid": "AccessLogGroupsS3ListObjects"
        },
        {
            "Action": [
                "codecommit:GitPull",
                "logs:CreateLogStream",
                "logs:PutLogEvents"
            ],
            "Resource": [
                "arn:aws:logs:eu-west-1:111111111111:log-group:/aws/codebuild/
                 abelperez-stack-builder",
                "arn:aws:logs:eu-west-1:111111111111:log-group:/aws/codebuild/
                 abelperez-stack-builder:*",
                "arn:aws:codecommit:eu-west-1:111111111111:abelperez.info-web"
            ],
            "Effect": "Allow",
            "Sid": "AccessGitLogs"
        },
        {
            "Action": "s3:*",
            "Resource": [
                "arn:aws:s3:::www.abelperez.info",
                "arn:aws:s3:::www.abelperez.info/*"
            ],
            "Effect": "Allow",
            "Sid": "AccessS3staticBucket"
        }
    ]
}

Creating the service role

Go to IAM console, select Roles from the left hand side menu, click on Create Role. On the Select type of trusted entity screen, select AWS service EC2, Lambda and others and from the options, CodeBuild
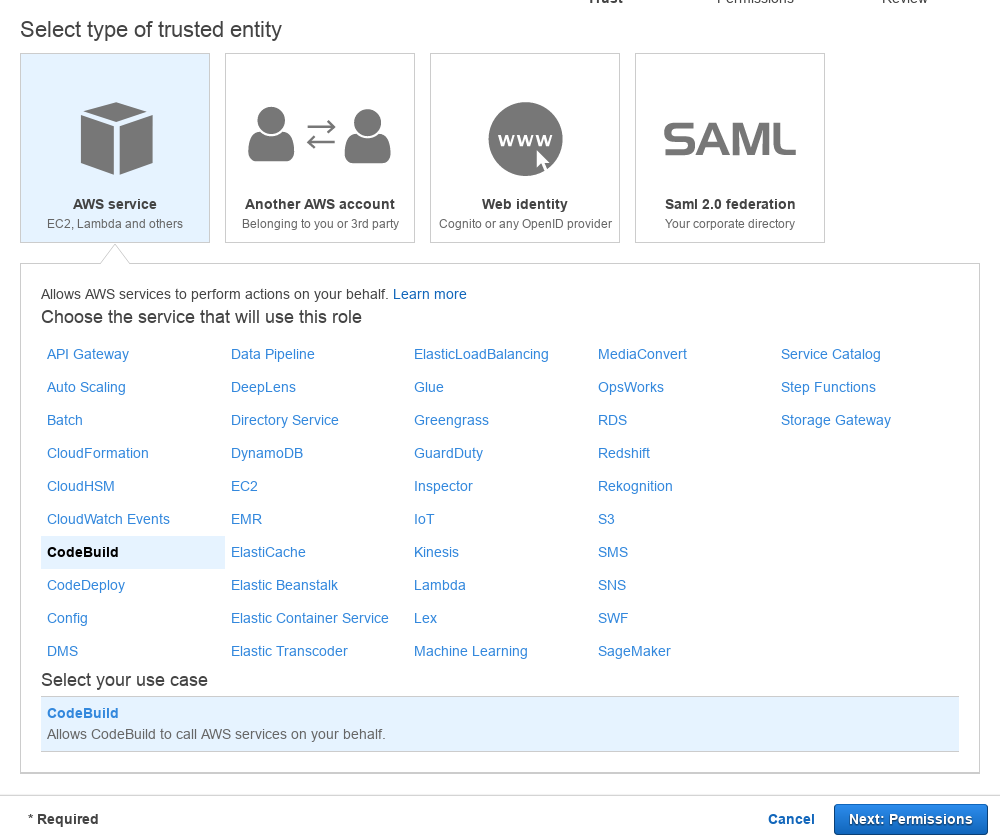
Click Next: Permissions, at this point, we can create a policy with the JSON above or continue to Review and then add the policy later. To create the policy, click Create Policy button, select JSON tab, paste the JSON above, Review and Create Policy, then back to role permission screen, refresh and select the policy. Give it a name, something like CodeBuildRole or anything meaningful and click on Create Role to finish the process.
Creating the CodeBuild project

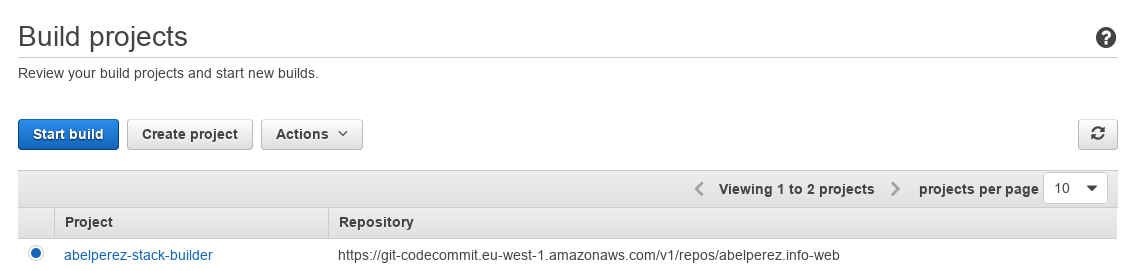
With all permissions set, let's start with the actual CodeBuild project, where we'll specify the source code origin, build environment, artifacts and role. On CodeBuild console, if it's the first project, click Get Started, otherwise select Build projects from the left hand side menu, and click on Create Project

Enter the following values:

  • Project name* a meaningful name i.e "abelperez-stack-builder"
  • Source provider* select "AWS CodeCommit"
  • Repository* select the repository previously created
  • Environment image* select "Use an image managed by AWS CodeBuild"
  • Operating system* select "Ubuntu"
  • Runtime* select "Node.js"
  • Runtime version* select "aws/codebuild/nodejs:6.3.1"
  • Buildspec name leave default "buildspec.yml"
  • Artifacts: Type* select "No artifacts"
  • Role name* select the previously created role

After finishing all the input, review and save the project.
Creating the build spec file

When creating the CodeBuild project, one of the input parameters is the Buildspec file name, which refers to the description of our build process. In this case, it's very simple process:

  • BUILD: Create a directory dist to copy all output files
  • BUILD: Copy all .html file to dist
  • POST_BUILD: Synchronise all content of dist folder with www.abelperez.info S3 bucket

The complete buildspec.yml containing the above steps:

version: 0.2

phases:
  build:
    commands:
      - mkdir dist
      - cp *.html dist/

  post_build:
    commands:
      - aws s3 sync ./dist s3://www.abelperez.info/ --delete --acl=public-read

The last step is executed on post build phase, which is at the end of the all build steps when everything is ready to package / deploy or in this case ship to our S3 bucket. This is done by using the sync subcommand of s3 service from AWS Command line interface. It basically takes an origin and a destination and make them to be in sync.

--delete instructs to remove files in the destination that are not in the source, because by default they are not deleted.

--acl=public-read instructs to edit bucket objects' ACL, in this case read access to everyone.

At this point, we can remove the bucket policy previously created if we wish so, since every single file will be publicly accessible, that would allow to have other folders in the same bucket and not being accessible. It will depend on the use case for the website.

Let's test it

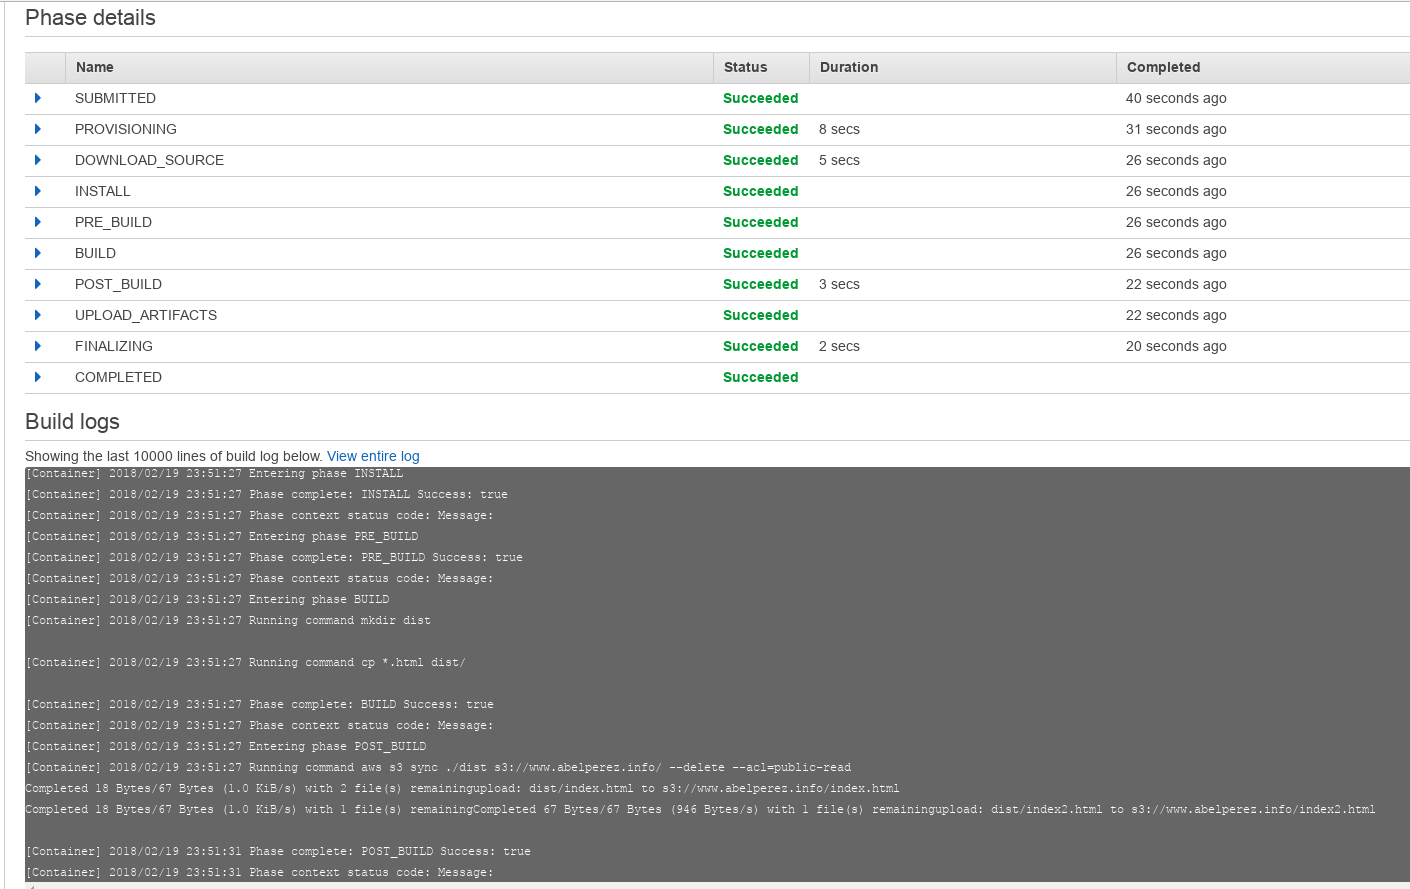
It's time to verify if everything is in the right place. We have the build project with some basic commands to run and assuming the above code is saved in a file named buildspec.yml at root level of the code repository, the next step is to commit and push that file to CodeCommit.

Let's go back to CodeBuild console, select the build project we've just created and click Start build, then choose the right branch (master in my case) and once again Start build.
Tuesday, 6 February 2018

Serverless static website - part 6

Up to this point we've created a simple HTML page and set up all the plumbing to make it visible to the world in a distributed and secure way. Now, if we want to update the content, we can either go to S3 console and upload manually the files or from the AWS CLI synchronise a local folder with a bucket. None of those ways seem to scale in the long run. As a developer I like to keep things under control, even more, under source control.

It can be done by using any popular cloud hosted version control systems, such as github, but in this example I'll use the one provided by AWS, it's called CodeCommit and it's a Git repository compatible with all current git tools.

Creating the repository

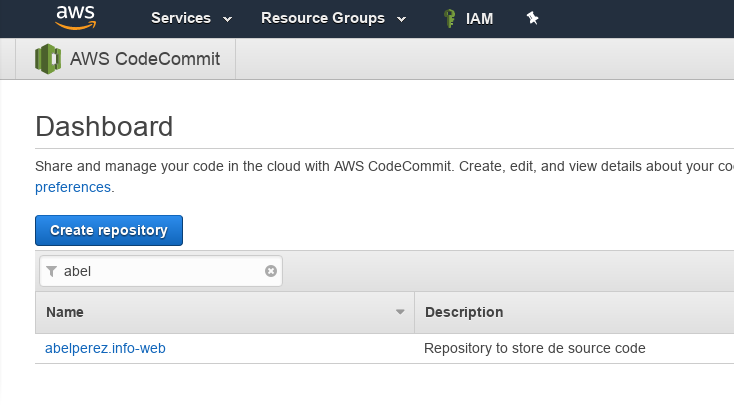
In CodeCommit console, which can be accessed by selecting Services, then under Developer Tools, select CodeCommit. Once there, click on Create repository button, or Get started if you haven't created any repository before.

Next, give it a name and a description and you'll see something like this:

Creating the user

Now, we need a user for ourselves or if someone else is going to contribute to that repository. There are many ways to address this part, I'll go for creating a user with a specific policy to grant access to that particular CodeCommit repository

In IAM (Identity and Access Management) console, select Users from left hand side menu, then click Add user. Next, give it a name and Programmatic access, this user won't access the console so it doesn't need login and password, not even access keys.

Click Next, Skip permissions for now, we'll deal with that in the next section. Review and create the user.

Creating the policy

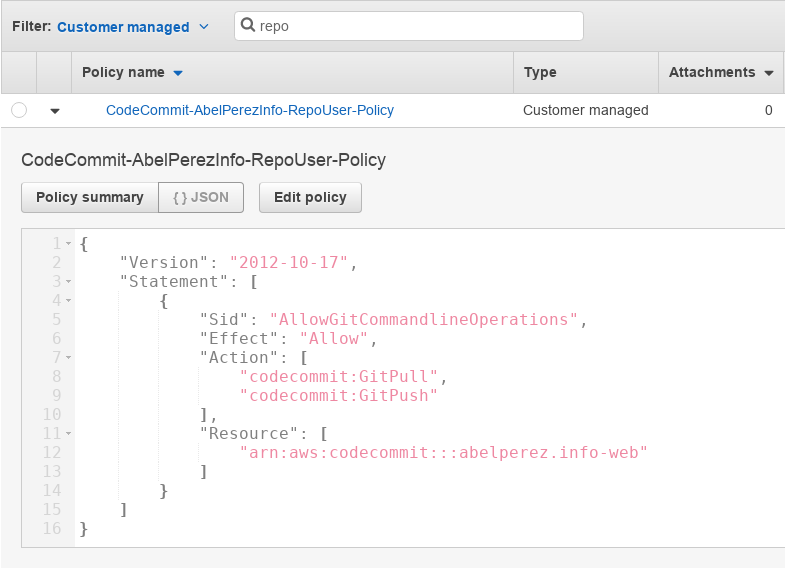
Back to IAM console dashboard, select Policies from the left menu, then click on Create policy, select JSON tab and copy the following:

{
    "Version": "2012-10-17",
    "Statement": [
        {
            "Sid": "AllowGitCommandlineOperations",
            "Effect": "Allow",
            "Action": [
                "codecommit:GitPull",
                "codecommit:GitPush"
            ],
            "Resource": [
                "arn:aws:codecommit:::abelperez.info-web"
            ]
        }
    ]
}

Details about creating policies is beyond the scope of this post, but essentially this policy grants pull and push operations on abelperez.info-web repository. Click Review Policy and give it a meaningful name such as CodeCommit-MyRepoUser-Policy or something that states what permissions are granted, just to keep everything organised. Create the policy and you'll be able to to see it if filtering by the name.

Assigning the policy to the user

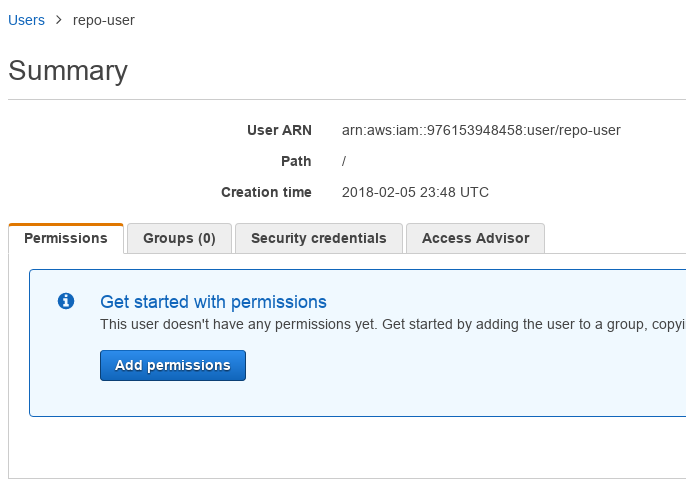
Back to IAM console dashboard, select Users, select the user we've created before, on tab Permissions, click Add Permissions

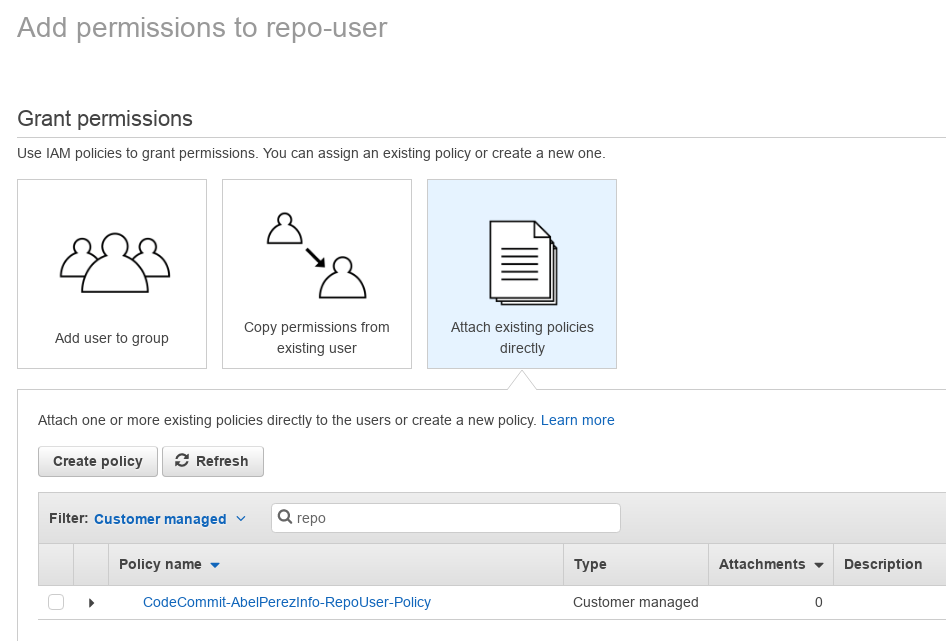
Once there, select Attach existing policies directly from the top three buttons. Then, filter by Customer managed policies to make it easier to find our policy (the one created before). Select the policy, Review and Add Permissions.

When it's done, we can see the permission added to the user, like below.

Granting access via SSH key

Once we've assigned the policy, the user should have permission to use git pull / push operations, now we need to link that IAM user with a git user (so to speak). To do that, CodeCommit provides two options: via HTTPS and SSH. The simpler way is using SSH, it only requires to upload the SSH public key to IAM user settings, then add some host/key/id information to SSH configuration file and that's it.

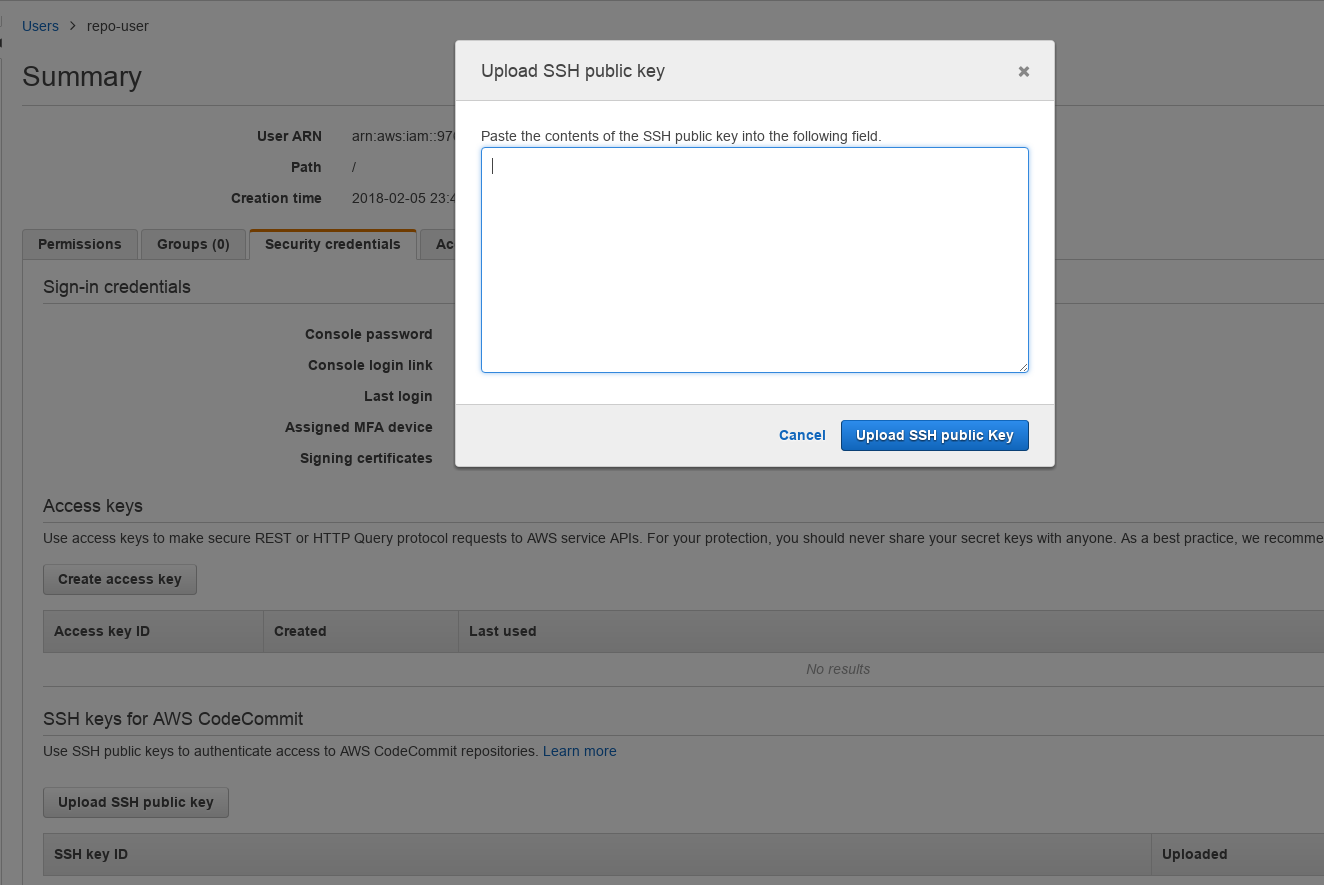
In IAM console, select the previously created user, then on Security Credentials tab, scroll down all the way to SSH keys for AWS CodeCommit, then click on Upload SSH public key button, paste your SSH public key. If you don't have one created yet, have a look at here and for more info, here. Click Upload SSH public key button and we are good to go.

If you are interested in accessing via HTTPS, then have a look at this documentation page on AWS website.

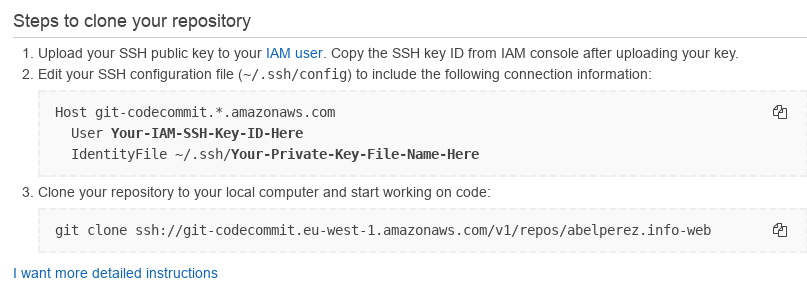
Back to CodeCommit console, select the repository previously created, then on the right hand side, click Connect button. AWS will show a panel with instructions, depending on your operating system, but it's essentially like this:

The placeholder Your-IAM-SSH-Key-ID-Here refers to the ID auto generated by IAM when you upload your SSH key and it has the format like APKAIWBASSHIDEXAMPLE

Let's test it

The following command sequence has been executed after setting up all the previous steps on AWS console. Started by cloning an empty repo, then created a new file. Added and committed that file to the repository and finally pushed that commit to the remote repository

abel@ABEL-DESKTOP:~/Downloads$ git clone ssh://git-codecommit.eu-west-1
.amazonaws.com/v1/repos/abelperez.info-web
Cloning into 'abelperez.info-web'...
warning: You appear to have cloned an empty repository.
abel@ABEL-DESKTOP:~/Downloads$ cd abelperez.info-web/
abel@ABEL-DESKTOP:~/Downloads/abelperez.info-web$ ls
abel@ABEL-DESKTOP:~/Downloads/abelperez.info-web$ echo "<h1>New file</h1>" > index.html
abel@ABEL-DESKTOP:~/Downloads/abelperez.info-web$ cat index.html 
<h1>New file</h1>
abel@ABEL-DESKTOP:~/Downloads/abelperez.info-web$ git add index.html 
abel@ABEL-DESKTOP:~/Downloads/abelperez.info-web$ git commit -m "first file"
[master (root-commit) c81ad93] first file
 Committer: Abel Perez Martinez <abel@ABEL-DESKTOP>
Your name and email address were configured automatically based
on your username and hostname. Please check that they are accurate.
You can suppress this message by setting them explicitly. Run the
following command and follow the instructions in your editor to edit
your configuration file:

    git config --global --edit

After doing this, you may fix the identity used for this commit with:

    git commit --amend --reset-author

 1 file changed, 1 insertion(+)
 create mode 100644 index.html
abel@ABEL-DESKTOP:~/Downloads/abelperez.info-web$ git status
On branch master
Your branch is based on 'origin/master', but the upstream is gone.
  (use "git branch --unset-upstream" to fixup)
nothing to commit, working tree clean
abel@ABEL-DESKTOP:~/Downloads/abelperez.info-web$ git push
Counting objects: 3, done.
Writing objects: 100% (3/3), 239 bytes | 0 bytes/s, done.
Total 3 (delta 0), reused 0 (delta 0)
To ssh://git-codecommit.eu-west-1.amazonaws.com/v1/repos/abelperez.info-web
 * [new branch]      master -> master

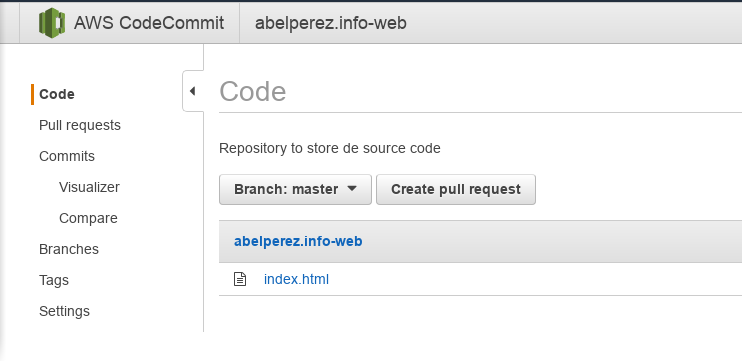
After this, as expected, the new file is now visible from CodeCommit console.

Friday, 2 February 2018

Serverless static website - part 5

Once we have created the certificate, we need a bridge between a secure endpoint and the current buckets. One of the most common ways to address this is by using CloudFront content distribution service. By using this, we'll make our website to be distributed to some (depending on the pricing) of the Amazon AWS edge locations, which means that if we have some international audience for our website, it will be served to the client by the closest edge location.

Creating WWW Distribution

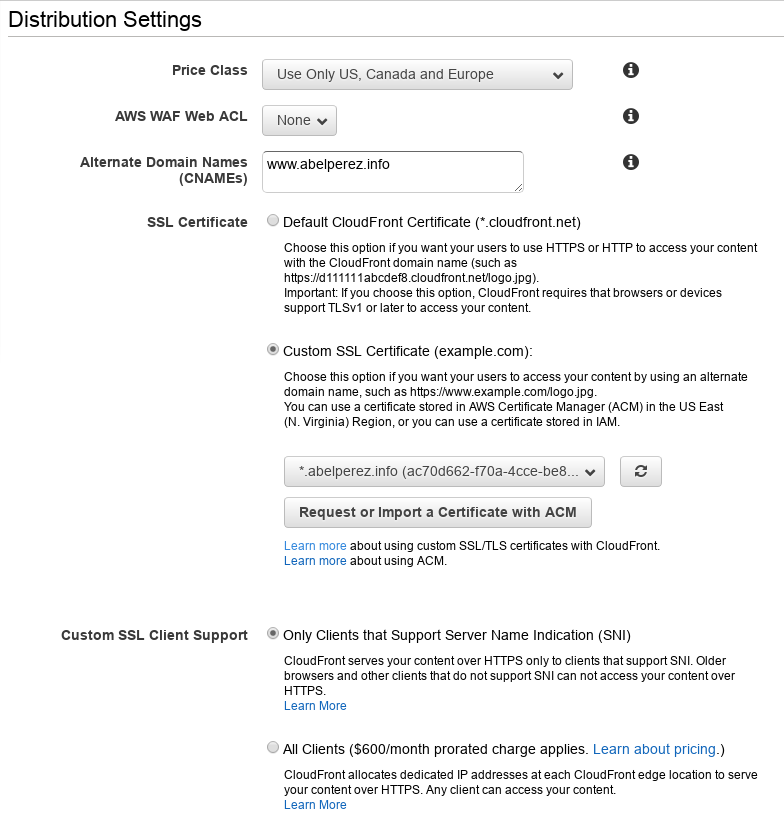
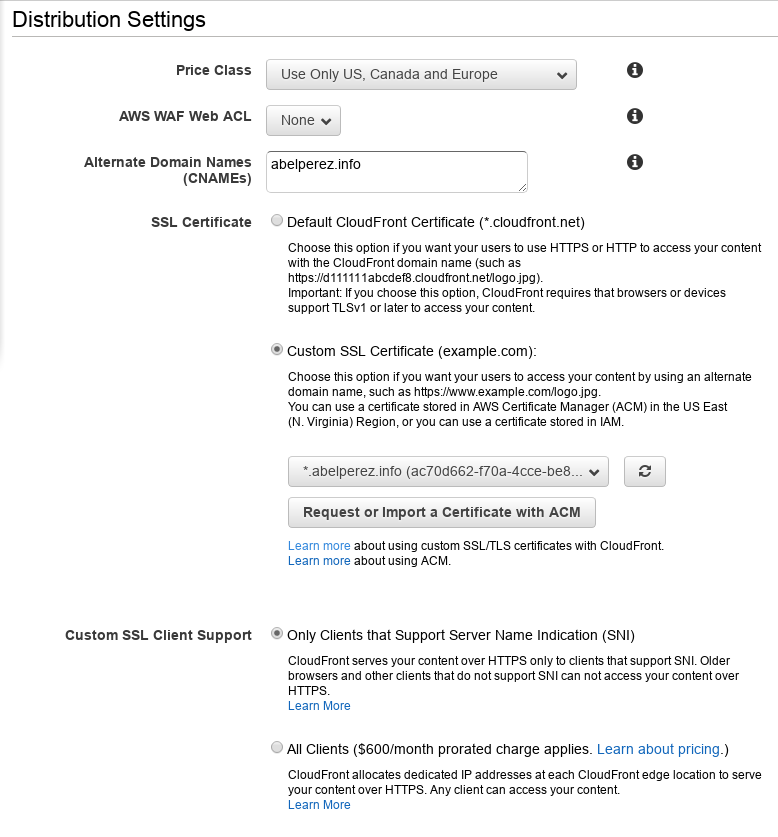
First, on AWS Console select CloudFront from the services list, under Networking & Content Delivery category. Once there, click on Create Distribution button, in this case, we are interested in a Web Distribution, so under Web, select Get Started. In the create distribution form, there are some key values that are required to enter in order to make this configuration to work. The rest can stay with default value

  • Origin Domain Name: www.abelperez.info.s3-website-eu-west-1.amazonaws.com (which is the endpoint for the bucket)
  • Viewer Protocol Policy: HTTP and HTTPS (this way if anyone tries to visit through HTTP, it will be redirected to HTTPS endpoint)
  • Price Class: Depending on your needs, in my case, US, Canada en Europe is enough
  • Alternate Domain Names(CNAMEs): www.abelperez.info
  • SSL Certificate: Custom SSL Certificate (example.com): and select your certificate from the dropdown menu
  • Default Root Object: index.html

Note: If you can't see your certificate in the dropdown, make sure you've created / imported in the region N. Virginia.

Once entered all this information, click Create Distribution

Creating non-WWW Distribution

Let's repeat the process to create another distribution, this time some values will be different, as we'll point to the non-www bucket and domain name.

  • Origin Domain Name: abelperez.info.s3-website-eu-west-1.amazonaws.com (which is the endpoint for the bucket)
  • Viewer Protocol Policy: HTTP and HTTPS (this way if anyone tries to visit through HTTP, it will be redirected to HTTPS endpoint)
  • Price Class: Depending on your needs, in my case, US, Canada en Europe is enough
  • Alternate Domain Names(CNAMEs): abelperez.info
  • SSL Certificate: Custom SSL Certificate (example.com): and select your certificate from the dropdown menu (the same as above)
  • Default Root Object: leave empty, since this distribution won't serve any file.

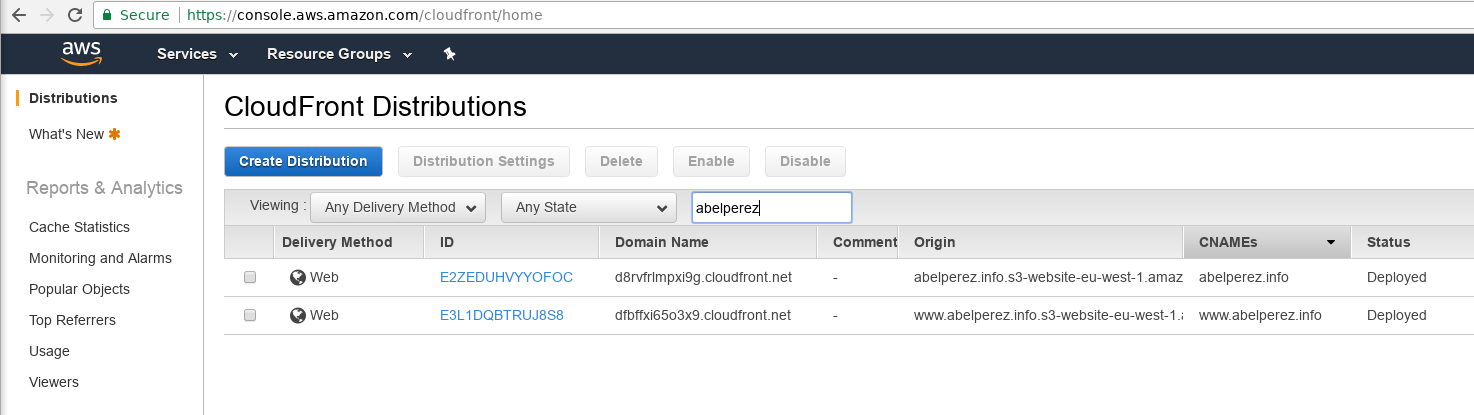
Once entered all this information, click Create Distribution, the creation process will take about 30 minutes, so be patient. When they're done, the status changes to Deployed and they can start receiving traffic. You'll see something like this:

Updating DNS records

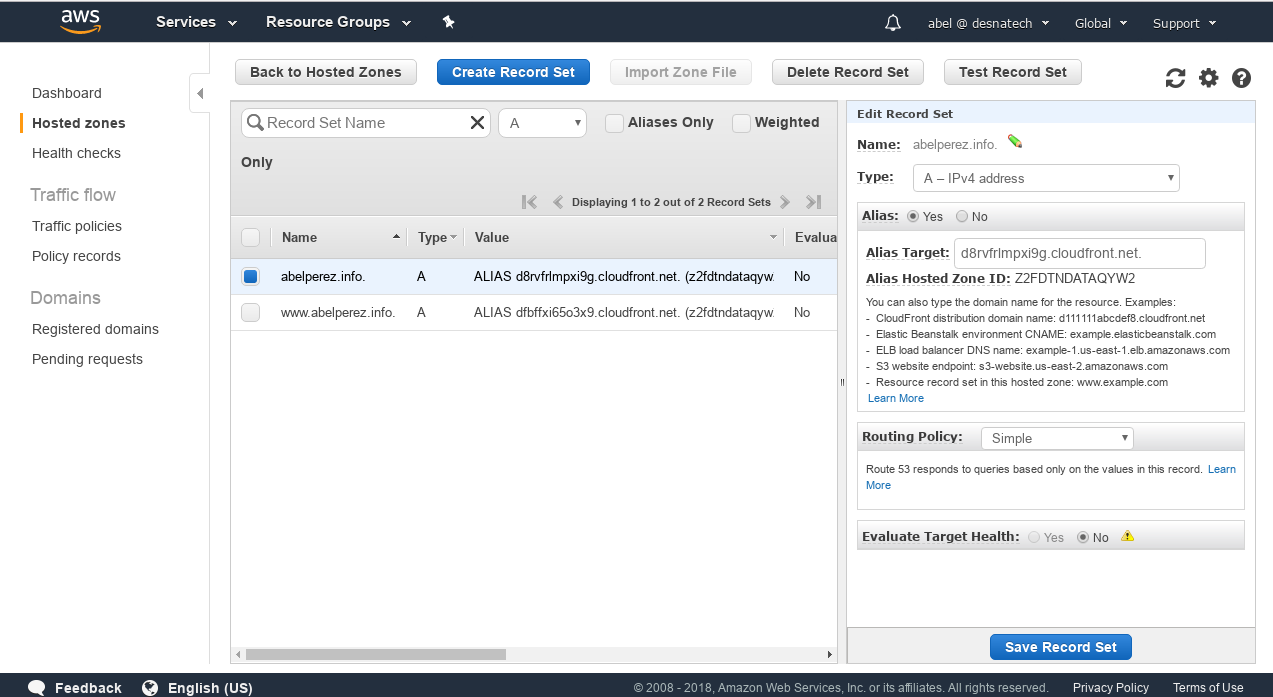
Now that we have created the distributions, it's time to update how Route 53 is going to resolve DNS requests to CloudFront distributions instead of the S3 bucket previously configured. To do that, on Route 53 console, select the Hosted Zone, then select one record set, and updated the Alias Target to the corresponding CloudFront distribution Domain Name. Then repeat the process for the other record set.

The following diagram illustrates the interaction between the AWS services we've used up this point. The browser first queries DNS for the given domain name, Route 53, will resolve to the appropriate CloudFront distribution, which can serve the content if it has already cached, otherwise it will request from the bucket and then serve the content. If the request is over HTTP to CloudFront, it will issue a HTTP 301 redirection to the HTTPS endpoint. If the request is over HTTPS to CloudFront, it will use the assigned certificate, which in this case is the same for both www and non-www endpoints.


     < HTTP 301 - Redirecto to HTTPS
 +----------------------------+
 |                            |                                         
 |       GET HTTP >     +-----+------+             +----------------+
 |     abelperez.info   | CloudFront |  GET HTTPS  |   S3 Bucket    |
 |           +--------> | (non-www)  |-----------> | abelperez.info +--+
 |           |          |            |             |                |  |
 |           |          +------+-----+             +----------------+  |
 |     +-----+-----+            \                                      |
 |     |           |             V                                     |
 | +-> | Route 53  |       (SSL certficate)                            |
 | |   |           |             A                                     |
 | |   +-----+-----+            /                                      |
 | |         |          +------+-----+          +--------------------+ |
 | |         |          | CloudFront |GET HTTPS |     S3 Bucket      | |
 | |         +--------> |   (www)    |--------> | www.abelperez.info | |
 | |   GET HTTP >       |            |          |                    | |
 | | www.abelperez.info +-----+------+          +----------+---------+ |
 | |                          |                            |           |
 V |                          |                            |           |
+--+--------+ <---------------+                            |           |
|           |      < HTTP 301 - Redirecto to HTTPS         |           |
|           | <--------------------------------------------+           |
|  Browser  |      < HTTP 200 - OK                                     |
|           | <--------------------------------------------------------+
+-----------+      < HTTP 301 - Redirect to www

One more step

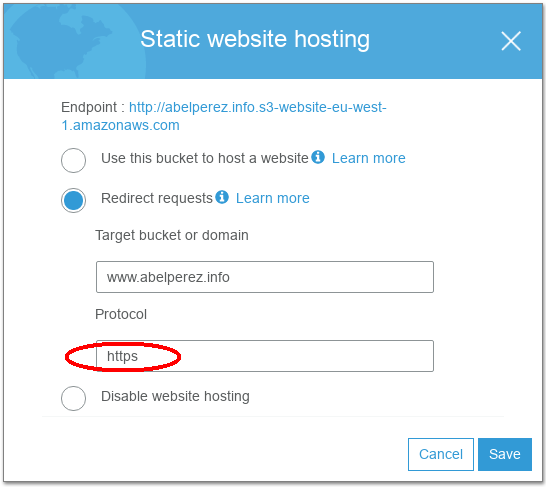
There is a bucket that its sole purpose is to redirect requests from non-www to www domain name, this bucket was set to use HTTP protocol, in this case, we are going to update it to HTTPS, so we can save one redirection step in the process.

Let's test it

Once again, we'll use curl to test all the scenarios, in this case we have four scenarios to test (HTTP/HTTPS and www/non-www)

(1) HTTPS on www.abelperez.info - Expected 200

abel@ABEL-DESKTOP:~$ curl -L -I https://www.abelperez.info
HTTP/2 200 
content-type: text/html
content-length: 79
date: Fri, 02 Feb 2018 00:57:25 GMT
last-modified: Mon, 22 Jan 2018 18:58:47 GMT
etag: "87fa2caa5dc0f75975554d6291b2da71"
server: AmazonS3
x-cache: Miss from cloudfront
via: 1.1 19d823478cf075f6fae7a5cb1336751a.cloudfront.net (CloudFront)
x-amz-cf-id: 7np_vqutTogm9pKceNZ82Zim61Eb0E0D9fJBkFaqNHUz3LF63fEh2w==

(2) HTTPS on abelperez.info - Expected 301 to https://www.abelperez.info

abel@ABEL-DESKTOP:~$ curl -L -I https://abelperez.info
HTTP/2 301 
content-length: 0
location: https://www.abelperez.info/
date: Fri, 02 Feb 2018 01:00:11 GMT
server: AmazonS3
x-cache: Miss from cloudfront
via: 1.1 75235d68607fb64805e0649c6268c52b.cloudfront.net (CloudFront)
x-amz-cf-id: 6WSECgHhkvCqZLW7kInopHnovCPcKU56oNQCZiCv7gaQLv2wSu-Vcw==

HTTP/2 200 
content-type: text/html
content-length: 79
date: Fri, 02 Feb 2018 00:57:25 GMT
last-modified: Mon, 22 Jan 2018 18:58:47 GMT
etag: "87fa2caa5dc0f75975554d6291b2da71"
server: AmazonS3
x-cache: RefreshHit from cloudfront
via: 1.1 7158f458652a2c59cfcb688d5dc80347.cloudfront.net (CloudFront)
x-amz-cf-id: _U7qobfP61P2aYyOakzzfwWjkKYrBeKObtWziPv7NVb5M3yPMlsbrQ==

(3) HTTP on www.abelperez.info - Expected 301 to https://www.abelperez.info

abel@ABEL-DESKTOP:~$ curl -L -I http://www.abelperez.info
HTTP/1.1 301 Moved Permanently
Server: CloudFront
Date: Fri, 02 Feb 2018 01:00:32 GMT
Content-Type: text/html
Content-Length: 183
Connection: keep-alive
Location: https://www.abelperez.info/
X-Cache: Redirect from cloudfront
Via: 1.1 2c7c2f0c6eb6b2586e9f36a7740aa616.cloudfront.net (CloudFront)
X-Amz-Cf-Id: qVYxI7z1DSVpzGrIfGWtHI8dZ1Ywx6dPUf4qGmtXbxl71IvC5R6P6Q==

HTTP/2 200 
content-type: text/html
content-length: 79
date: Fri, 02 Feb 2018 00:57:25 GMT
last-modified: Mon, 22 Jan 2018 18:58:47 GMT
etag: "87fa2caa5dc0f75975554d6291b2da71"
server: AmazonS3
x-cache: RefreshHit from cloudfront
via: 1.1 6b11bd43fbd97ec7bb8917017ae0f954.cloudfront.net (CloudFront)
x-amz-cf-id: w1YRlI4QR5W_bxXVXftmGioMCWoeCpwcCqlj0ucPlizOZVev22RU6g==

(4) HTTP on abelperez.info - Expected 301 to https://abelperez.info which in turn will be another 301 to https://www.abelperez.info

abel@ABEL-DESKTOP:~$ curl -L -I http://abelperez.info
HTTP/1.1 301 Moved Permanently
Server: CloudFront
Date: Fri, 02 Feb 2018 01:01:00 GMT
Content-Type: text/html
Content-Length: 183
Connection: keep-alive
Location: https://abelperez.info/
X-Cache: Redirect from cloudfront
Via: 1.1 60d859e64626d7b8d0cc73d27d6f8134.cloudfront.net (CloudFront)
X-Amz-Cf-Id: eiJCl56CO6aUNA3xRnbf8J_liGfY3oI5jdLdhRRW4LoNFbCMunYyPg==

HTTP/2 301 
content-length: 0
location: https://www.abelperez.info/
date: Fri, 02 Feb 2018 01:01:01 GMT
server: AmazonS3
x-cache: Miss from cloudfront
via: 1.1 f030bd6bd539e06a932b0638e025c51d.cloudfront.net (CloudFront)
x-amz-cf-id: 7KfYWyxPhIXXJjybnISt25apbbHUKx74r9TUI9Kguhn2iQATZELfHg==

HTTP/2 200 
content-type: text/html
content-length: 79
date: Fri, 02 Feb 2018 00:57:25 GMT
last-modified: Mon, 22 Jan 2018 18:58:47 GMT
etag: "87fa2caa5dc0f75975554d6291b2da71"
server: AmazonS3
x-cache: RefreshHit from cloudfront
via: 1.1 3eebab739de5f3b3016088352ebea37f.cloudfront.net (CloudFront)
x-amz-cf-id: R8kB6ndn1K8YOiF6J2deG0QkHh-3QD65q0hfV5vdXm5-_1sNNlc3Ng==

Saturday, 27 January 2018

Serverless static website - part 4

Security is an aspect that should never be left behind, even if we are only displaying content to general public. As per Google's strategy to favour secure traffic, they've started to penalise websites that are only on HTTP, we are going to follow this idea and add HTTPS and SSL certificate to this website.

Requesting a certificate

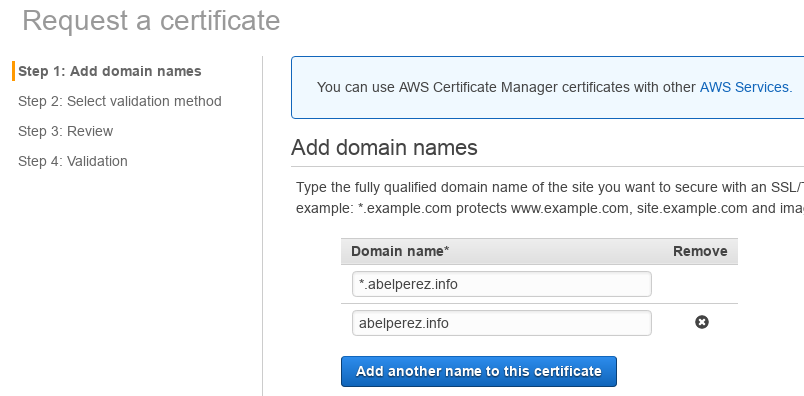
On AWS console, we have a Certificate Manager under Security, Identity & Compliance category. Once there, we have two choices: Import a certificate or Request a certificate. We'll use the request option. It's important for this to work with further steps to make sure we are in N. Virginia region before requesting a certificate. Click on Request a certificate button

In this example, I'm interested in creating a certificate that will validate the main domain abelperez.info, the subdomain www.abelperez.info and any subdomain I create in the future, that is done by using the wildcard *.abelperez.info.

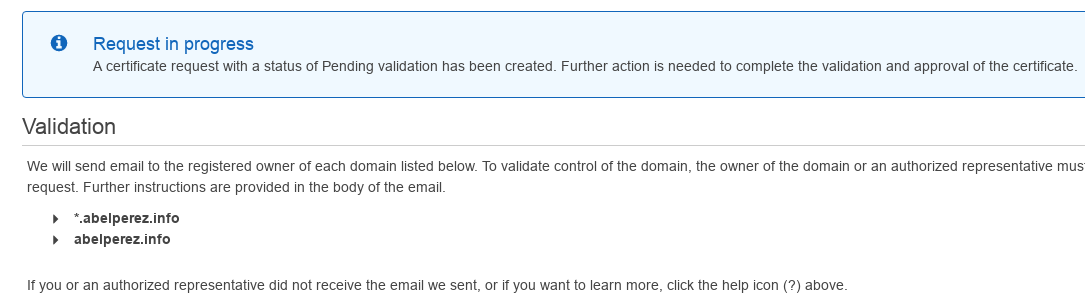
Next step is validate the identity, basically we need to prove that we in fact own the domain we are creating the certificate for. In this case I chose Email validation. The request in progress should look like this.

Verifying domain ownership

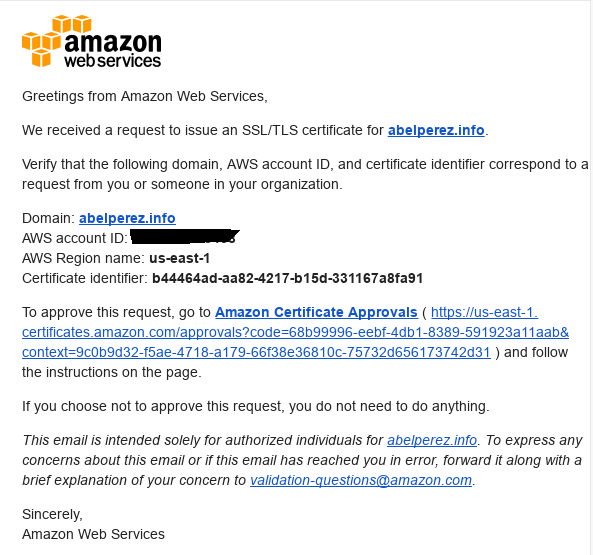
At this point, we should receive an email (or a few of them) asking to validate our email address by following a link.

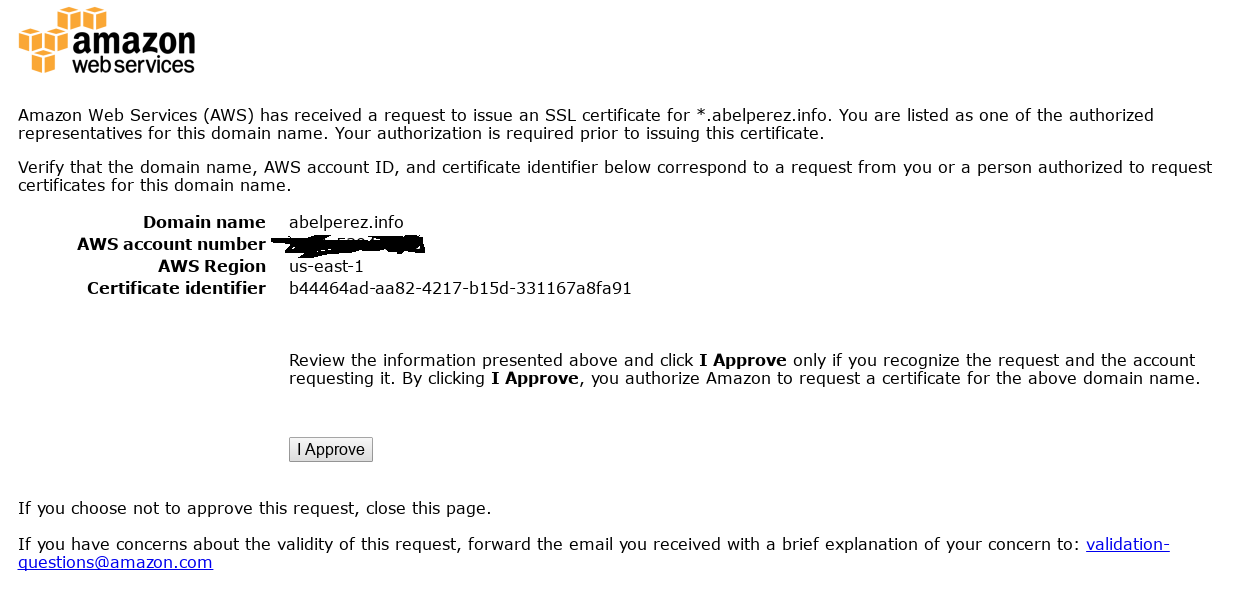
The verification page looks like this one, just click I approve.

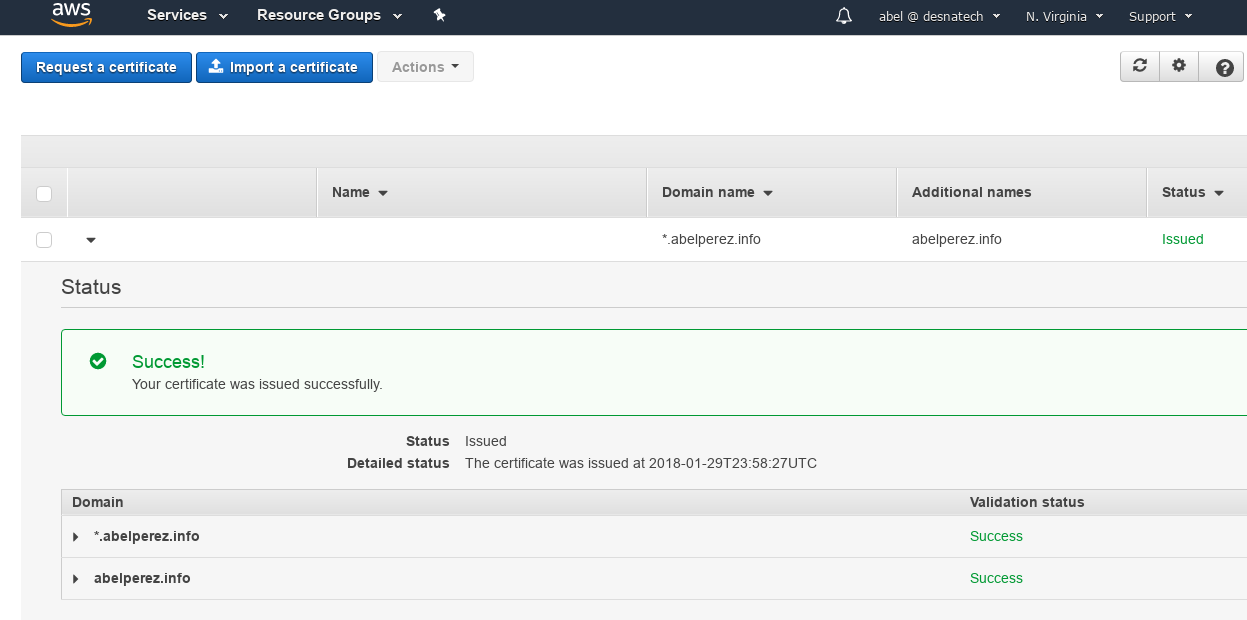
It's important to note that in this case, because I'm requesting a certificate for *.abelperez.info and abelperez.info, I'll receive two requests and I have to verify both of them, if that's your case, make sure you've verified all the requests, otherwise the operation will be incomplete, and the certificate won't be issued until all validation are completed. Once it's verified, the certificate should look like this.

Now that we have valid certificate for our domain, it can be attached to other entities like CloundFront CDN distribution, Elastic Load balancer, etc.

Serverless static website - part 3

To www or not to www ? well, that's not the real question. Apparently, nowadays this topic has changed a little bit from the early times of the World Wide Web. In this article, there are some interesting pieces of information for those interested in that topic.

The bottom line is whatever your choice is, there has to be consistency, in this example, the canonical name will be www.abelperez.info, but I also want that if anyone browses just abelperez.info, they have to be redirected to the www version. How do we do that on AWS ?

Creating the redirect bucket

As discussed earlier, an S3 bucket can be configured as a website, but it will only listen on a single hostname (www.abelperez.info), therefore if we want to listen on another hostname (abelperez.info), we need another S3 bucket, again matching the bucket name with the hostname.

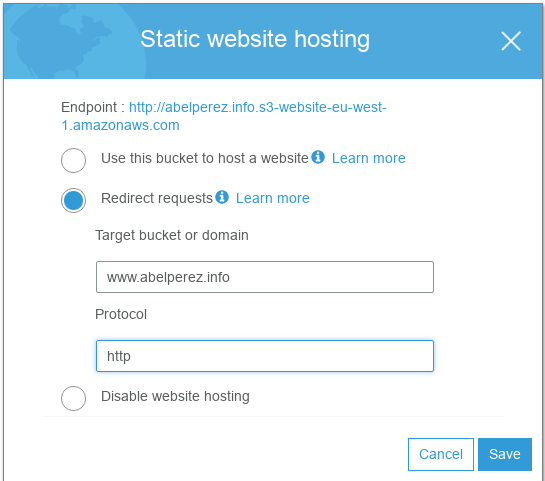
On AWS S3 console, create a new bucket named (your domain name without www). This time, instead of selecting Use this bucket to host a website, let's select Redirect requests where:

  • Target bucket or domain: is the www hosthame
  • Protocol: will be http for now

The configuration should look like this

Creating the Record set

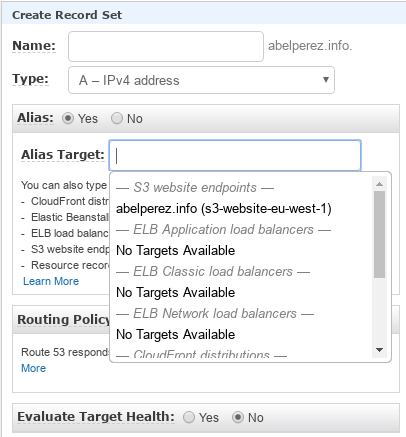
Now, we need to route DNS requests to the new website previously created. To do that, let's go to Route 53 console, select your hosted zone, then click on Create Record Set button. Specify the following values:

  • Name: leave in blank - it will be non www DNS entry
  • Type: A
  • Alias: Yes
  • Alias Target: You should see the bucket name in the list

What have we done so far ?

We have created two DNS entries pointing to two different S3 buckets (effectively two web servers). One web server (www) will serve the content as explained earlier. The other web server (non www) will issue 301 redirect code to the www version. This way, the browser will request again, but now with the www version which will get served by the www web server, delivering the content as expected.

The following diagram illustrates the workflow

                                                 +----------------+
                GET abelperez.info               |   S3 Bucket    |
                +------------------------------> | abelperez.info +----+
                |                                |                |    |
          +-----+-----+                          +----------------+    |
          |           |                                                |
      +-> | Route 53  |                                                |
      |   |           |                                                |
      |   +-----+-----+                      +--------------------+    |
      |         |                            |     S3 Bucket      |    |
      |         +--------------------------> | www.abelperez.info |    |
      |         GET www.abelperez.info       |                    |    |
      |                                      +----------+---------+    |
+-----+-----+                                           |              |
|           | <-----------------------------------------+              |
|  Browser  |        HTTP 200 - OK                                     |
|           | <--------------------------------------------------------+
+-----------+        HTTP 301 - Permanent Redirect to www

Let's test it

To test this behaviour, one easy way is using the universal tool CURL, we'll use two switches:

  • -L Follows the redirects
  • -I Fetches headers only

For more information about CURL, see the manpage.

There are two scenarios to test: first, when we try to hit non www host. We can see the first request gets HTTP 301 code and the second gets HTTP 200.

abel@ABEL-DESKTOP:~$ curl -L -I http://abelperez.info
HTTP/1.1 301 Moved Permanently
x-amz-id-2: pLVO9p67k51FJpZCSbF2LxJyrB8w9WyEkgNXHF0Zq8twe3Dw1ud3OiIHRzN0y5B4wDvwngLGEBg=
x-amz-request-id: AD13DD8436422AAC
Date: Sat, 27 Jan 2018 17:50:19 GMT
Location: http://www.abelperez.info/
Content-Length: 0
Server: AmazonS3

HTTP/1.1 200 OK
x-amz-id-2: s/6E2lV7nYtfBq96Qftwip7lzMvIkOMuIq0jbwCisYU0V7ujMRisPuqPsNt2vMuBWFIYuwkqLFs=
x-amz-request-id: 1C258F07FD183836
Date: Sat, 27 Jan 2018 17:50:19 GMT
Last-Modified: Wed, 08 Nov 2017 09:10:40 GMT
ETag: "a339a5d4a0ad6bb215a1cef5221b0f6a"
Content-Type: text/html
Content-Length: 85
Server: AmazonS3

The second scenario is trying to go directly to www host, and the request gets HTTP 200 straight away.

abel@ABEL-DESKTOP:~$ curl -L -I http://www.abelperez.info
HTTP/1.1 200 OK
x-amz-id-2: apCkPouaYzoy5gjemxU+BjDLbQxxE46EUhDXBHirq6PK0OZbubP2BVhWllxlSV99zg5UB3tGbd8=
x-amz-request-id: D928A1DF3B3EB0DE
Date: Sat, 27 Jan 2018 18:18:19 GMT
Last-Modified: Wed, 08 Nov 2017 09:10:40 GMT
ETag: "a339a5d4a0ad6bb215a1cef5221b0f6a"
Content-Type: text/html
Content-Length: 85
Server: AmazonS3

Wednesday, 24 January 2018

Serverless static website - part 2

In the previous part I explained how to create a s3 bucket and make it behave like a web server, then we put some files on it and were able to publicly browse using the HTTP endpoint provided by s3. However, this is not the most appealing url to associate with our website, we most likely want to own a domain name.

Buying a domain name

If we want a domain, there are a lot of places where you can buy one, they are usually cheap, unless we go crazy with the name. Here is the list of ICANN-Accredited Registrars where you can choose your favourite. There is one particular domain registrar that might be convenient, if you search amazon in that list, it will come up, yes, Amazon also sell domain names. In this example I purchased mine through them, just to keep everything in the same place, you are free to choose your domain registrar, it doesn't make a big difference when setting everything up.

Route 53 is the service that manages DNS on AWS. To register a domain, once in Route 53 console, go to Domains / Registered domains. Then Choose a domain name with your favourite TLD and follow the process, it's that simple.

When you register a new domain, it can take some times a couple of days to complete the process, this is indicated in the console by listing the new domain under Pending requests, once the process is complete it will appear under Registered domain. Your console should look like this by then. More information about registering a domain with Route 53, see here.

Creating a Public Hosted Zone

Once you have domain name of yours, whether registered with Route 53 or with another registrar, it's the time to create a public hosted zone, which is basically a container for all DNS records associated with your domain and subdomains. To do that, go to Route 53 console, choose Hosted Zones, hit the Create Hosted Zone button, then provide the domain name, and optionally a comment, also make sure Public Hosted Zone is selected. When it's done, it should look like this.

If you chose to buy your domain with a different registrar, then you'll have to update your name servers with the new ones created by the Hosted Zone. See AWS docs on how to do that, here.

Creating a Record Set

In AWS world, a Record Set is similar to standard DNS record, but with some extensions. In this particular case, we'll use Alias. To create a record, select the Hosted Zone and click Create Record Set button. Specify the following values:

  • Name: www
  • Type: A
  • Alias: Yes
  • Alias Target: You should see the bucket name in the list

It's important to note that the name of the bucket where we are hosting our files must match the record name. So in this case, my record is www.abelperez.info, that's exactly the name of the bucket, otherwise Route 53 won't be able to make the association between those two.

Click on Create button, and that's it. We've just linked the domain name to a serverless web server for static files.

Let's test it

To test all this, it's very simple, let's browse to http://www.abelperez.info (your domain of course) and see what happens

Your browser content should display this

For more information about Route 53 Alias records values, see here.

Serverless static website - part 1

Cloud computing has become nowadays one of the most popular practices, but it doesn't have to be limited only to a reduced group of specialists. In fact, I'll show you how to take advantage of this new thing called "serverless" on AWS to host a static website

The idea behind this is not to worry about the underlying infrastructure, AWS will handle that. In this case, we'll start by using one of the oldest services they provide, Amazon S3.

Accessing Amazon AWS

If you are new to Amazon AWS, you should start by creating a new account and use the free 1 year trial, which allows a lot of room for playing with it.

In this example I show a real domain I already own and a simple HTML file (very simple)

Creating the S3 bucket

Once you've logged in AWS console, choose Services from the top left menu, then S3 in Storage category or just browse to https://s3.console.aws.amazon.com/s3/

Click on Create Bucket and follow the wizard. It's important to note that if you're trying to use your own domain name within AWS (using Route 53) the name of your bucket has to match the domain name. In this case I'm using www.abelperez.info, therefore, that's my bucket name. Also, if you plan to use a CDN (using CloundFront distribution), this is not relevant, however I encourage this practice as it will organise better the buckets for their purpose. For more information about how to create a bucket, see here

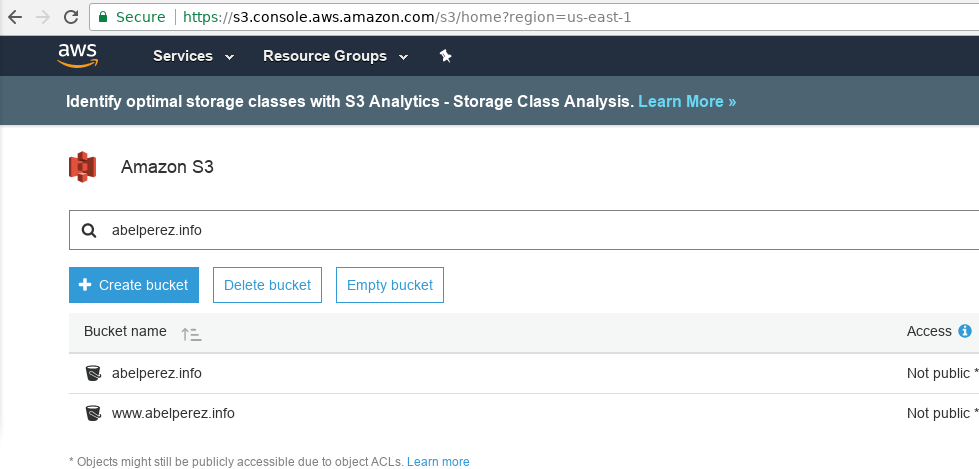
Your S3 console should look similar to this

Converting the S3 bucket in a website

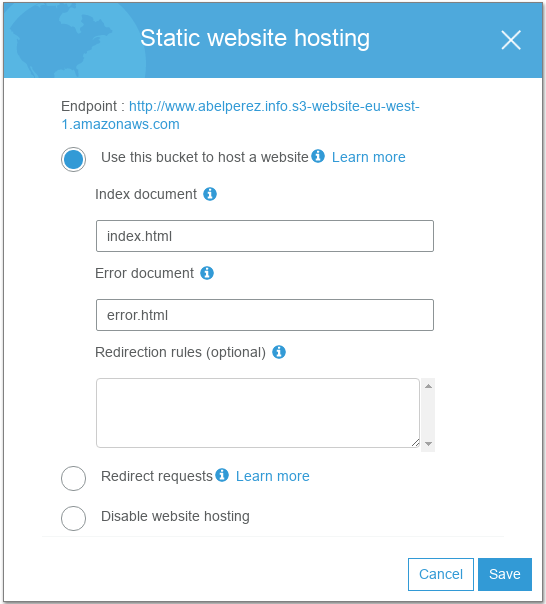
Next step, on the same console page, select the bucket and click on Properties, then find Static website hosting. In the expanded form, choose the option Use this bucket to host a website and specify index and error documents accordingly, typically the same as proposed by the watermark. Save and take not that the format of your HTTP endpoint (public url) is like http://www.abelperez.info.s3-website-eu-west-1.amazonaws.com

It follows the convention of http://<your-bucket-name>.s3-website-<region-where-it-was-created>.amazonaws.com

It should look like this

Granting public read access to all files

Granting public read to all objects is usually deemed as a bad practice, but in this particular case (and for now), we need a way to make public all files we upload to the bucket. S3 Buckets allow a very granular permission system on all objects inside a bucket, that means every time we upload a file, we are responsible for choosing the right permissions. However, this process can be tedious and prone to error (it's easy to forget)

Let's add a Bucket Policy that will entitle all clients request to read the objects inside our bucket. To do that, select the bucket in the console and click on Permissions tab, then click on Bucket Policy and add the following text, just replacing www.abelperez.info with your bucket name

{
    "Version": "2012-10-17",
    "Id": "PublicReadAccess",
    "Statement": [
        {
            "Sid": "GrantPublcReadAccess",
            "Effect": "Allow",
            "Principal": "*",
            "Action": "s3:GetObject",
            "Resource": "arn:aws:s3:::www.abelperez.info/*"
        }
    ]
}

Creating AWS policies is out of the scope of this post, but basically it allows the GetObject action to all objects inside the bucket named www.abelperez.info

Finally, upload some files

Just for demonstration purposes, I've uploaded a single HTML file, at the moment of this writing is located at https://www.abelperez.info/index.html. You can use any HTML, CSS, Javascript, images files you like.

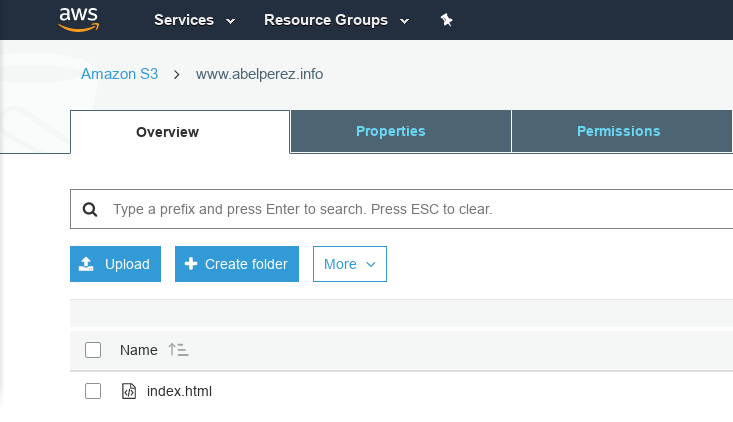
On way of uploading files to a S3 bucket is by using the console, like we've done all the other operations, select the bucket, and using Upload and Create folder buttons you can recreate your website directory tree. There are better ways to upload files, for example, using the command line or the Rest API.

Your bucket content should look like this

Let's test it

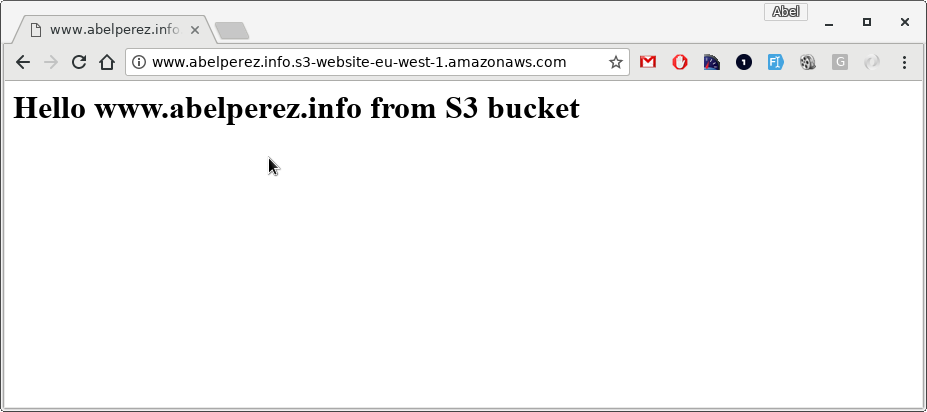
To test all this, it's actually very simple, let's take the HTTP endpoint from earlier and paste in the browser http://www.abelperez.info.s3-website-eu-west-1.amazonaws.com

Your browser content should display this

For full AWS documentation about this topic, see here